Panasonic KX-TA82492 Installation Manual - Page 75
Starting KX-TA Maintenance Console for the first time
 |
UPC - 037988851416
View all Panasonic KX-TA82492 manuals
Add to My Manuals
Save this manual to your list of manuals |
Page 75 highlights
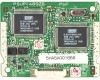
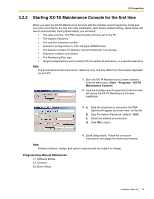
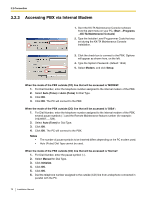
3.2 Connection 3.2.2 Starting KX-TA Maintenance Console for the first time When you start the KX-TA Maintenance Console with the Installer Level Programmer Code and connect to the PBX for the first time after initialization (with factory default setting), Quick Setup will launch automatically. During Quick Setup, you will setup: • The date and time. The PBX uses the date and time set to the PC. • The System Password. • The operator extension number. • Automatic Configuration for CO Line Type (DTMF/Pulse). • The feature numbers for Operator Call and Automatic Line Access. • Extension numbers and names. • The Numbering Plan type. • Ringing assignment for each outside (CO) line (either all extensions, or a specific extension). Note The screenshots shown here are for reference only, and may differ from the screens displayed on your PC. 1. Start the KX-TA Maintenance Console software from the start menu. (Start →Programs →KX-TA Maintenance Console) 2. Type the Installer Level Programmer Code that was set during the KX-TA Maintenance Console installation. 3. a. b. c. d. Click the check box to connect to the PBX. Options will appear as shown here, on the left. Type the System Password. (default: 1234) Select the method of connection. Click OK to log in. 4. Quick Setup starts. Follow the on-screen instructions and assign the items as prompted. Note Software features, design, and system requirements are subject to change. Programming Manual References 4.1 Software Modes 6.1 Connect 8.2 Quick Setup Installation Manual 75
-
 1
1 -
2
-
3
-
4
-
5
-
6
-
7
-
8
-
9
-
10
-
11
-
12
-
13
-
14
-
15
-
16
-
17
-
18
-
19
-
20
-
21
-
22
-
23
-
24
-
25
-
26
-
27
-
28
-
29
-
30
-
31
-
32
-
33
-
34
-
35
-
36
-
37
-
38
-
39
-
40
-
41
-
42
-
43
-
44
-
45
-
46
-
47
-
48
-
49
-
50
-
51
-
52
-
53
-
54
-
55
-
56
-
57
-
58
-
59
-
60
-
61
-
62
-
63
-
64
-
65
-
66
-
67
-
68
-
69
-
 70
70 -
 71
71 -
 72
72 -
 73
73 -
 74
74 -
 75
75 -
 76
76 -
 77
77 -
 78
78 -
 79
79 -
 80
80 -
81
-
82
-
83
-
84
-
85
-
86
-
87
-
88
 |
 |