Panasonic KX-TA82492 Installation Manual - Page 62
Panasonic KX-TA82492 - Voice Message Expansion Card Manual
 |
UPC - 037988851416
View all Panasonic KX-TA82492 manuals
Add to My Manuals
Save this manual to your list of manuals |
Page 62 highlights
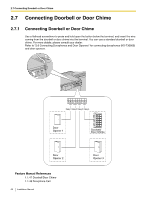
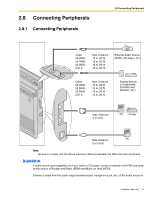
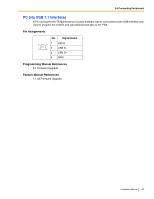
2.8 Connecting Peripherals the MOH Jack of the PBX. Use an EIAJ RC-6701 A plug (2-conductor, 3.5 mm [1/8 in] in diameter). • Input impedance: 8 Ω CAUTION • Do not force audio cables into the jacks. Doing so may damage the connections and cause the audio to cut in and out. • The MOH port is an SELV port and should only be connected to an approved SELV device. Notes • • • • Use the supplied audio source connector in the event that the user-supplied audio cable connector is too long and does not fit when the top front cover of the PBX is closed. Remove the connector from the user-supplied audio cable, expose the bare cable, and attach the supplied audio source connector. When the PBX and external audio source are not connected to the same ground, a humming noise may be heard in the BGM and MOH. The audio source used for BGM and MOH is determined by system programming. To adjust the sound level of the MOH, use the volume control on the external audio source. Feature Manual References 1.1.7 Background Music (BGM) 1.1.85 Music on Hold Pager Only 1 paging device (user-supplied) can be connected to the PBX. Use an EIAJ RC-6701 A plug (2-conductor, 3.5 mm [1/8 in] in diameter). • Output impedance: 600 Ω CAUTION The External Paging Jack is an SELV port and should only be connected to an approved SELV device. Notes • • Use the supplied pager connector in the event that the user-supplied pager cable connector is too long and does not fit when the top front cover of the PBX is closed. Remove the connector from the user-supplied pager cable, expose the bare cable, and attach the supplied pager connector. To adjust the sound level of the pager, use the volume control on the loudspeaker or amplifier. Feature Manual References 1.1.92 Paging-SUMMARY 62 Installation Manual
-
 1
1 -
2
-
3
-
4
-
5
-
6
-
7
-
8
-
9
-
10
-
11
-
12
-
13
-
14
-
15
-
16
-
17
-
18
-
19
-
20
-
21
-
22
-
23
-
24
-
25
-
26
-
27
-
28
-
29
-
30
-
31
-
32
-
33
-
34
-
35
-
36
-
37
-
38
-
39
-
40
-
41
-
42
-
43
-
44
-
45
-
46
-
47
-
48
-
49
-
50
-
51
-
52
-
53
-
54
-
55
-
56
-
 57
57 -
 58
58 -
 59
59 -
 60
60 -
 61
61 -
 62
62 -
 63
63 -
 64
64 -
 65
65 -
 66
66 -
 67
67 -
68
-
69
-
70
-
71
-
72
-
73
-
74
-
75
-
76
-
77
-
78
-
79
-
80
-
81
-
82
-
83
-
84
-
85
-
86
-
87
-
88
 |
 |