Panasonic KXFLM551 Operating Instructions - Page 54
Advanced features
 |
View all Panasonic KXFLM551 manuals
Add to My Manuals
Save this manual to your list of manuals |
Page 54 highlights
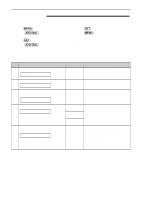
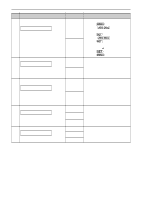
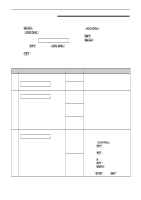
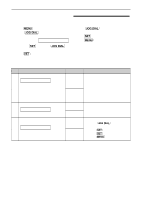
Features Summary Advanced features! How to set menu options 1. Press p. 2. Rotate n until the following is displayed: ADVANCED MODE then press w and rotate n until the desired feature is displayed. 3. Press w. 4. Rotate n until the desired setting is displayed. 5. Press w. 6. Press p. Note: q Step 4 may be slightly different depending on the feature. q See page 51 for more details. Programming table Code Feature & Display Settings Setting the journal report to print automatically ON #22 AUTO JOURNAL OFF Sending document overseas OVERSEAS MODE NEXT FAX If you have difficulty sending an overseas fax, activate this feature #23 before starting transmission. This feature makes sending documents ERROR easier as the transmission speed is slowed down. OFF Sending a fax at a specific time DELAYED SEND This feature allows you to take advantage of low-cost calling hours offered by your telephone #25 company. q The setting can be reserved to take place up to 24 hours in advance. ON / fax no. / hh:mm OFF How the unit operates "ON": The unit will print the journal report automatically after every 30 new fax communications (p. 29). "NEXT FAX": This setting is effective only for the next attempted fax transmission. After transmission, the unit will return to the previous setting. "ERROR": When the previous fax transmission fails and you redial the same number. q This feature is not available for broadcast transmission. q The calling charge may be higher. To send a document: 1. Insert the document. 2. Follow steps 1-3 above. 3. Rotate n to select "ON". 4. Press w. 5. Enter the fax number. 6. Press w. 7. Enter the transmission start time. Press * to select "AM" or "PM". 8. Press w. 9. Press p. q To cancel after programming, press { then w. (The default setting is in bold type.) 54
-
 1
1 -
2
-
3
-
4
-
5
-
6
-
7
-
8
-
9
-
10
-
11
-
12
-
13
-
14
-
15
-
16
-
17
-
18
-
19
-
20
-
21
-
22
-
23
-
24
-
25
-
26
-
27
-
28
-
29
-
30
-
31
-
32
-
33
-
34
-
35
-
36
-
37
-
38
-
39
-
40
-
41
-
42
-
43
-
44
-
45
-
46
-
47
-
48
-
 49
49 -
 50
50 -
 51
51 -
 52
52 -
 53
53 -
 54
54 -
 55
55 -
 56
56 -
 57
57 -
 58
58 -
 59
59 -
60
-
61
-
62
-
63
-
64
-
65
-
66
-
67
-
68
-
69
-
70
-
71
-
72
-
73
-
74
-
75
-
76
-
77
-
78
-
79
-
80
 |
 |
