Panasonic PTDZ8700U PTDS8500U User Guide - Page 58
Position Menu, Shift, Aspect
 |
UPC - 885170010963
View all Panasonic PTDZ8700U manuals
Add to My Manuals
Save this manual to your list of manuals |
Page 58 highlights
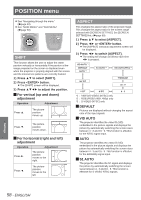
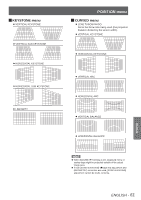
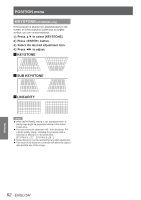
POSITION menu zzSee "Navigating through the menu" (Æpage 49). zzSee "MAIN MENU" and "SUB MENU" (Æpage 50). SHIFT This function allows the user to adjust the raster position vertically or horizontally if the position of the image projected on the screen is displaced even when the projector is properly aligned with the screen, and the internal test patterns are correctly framed. 1111 Press ▲▼ to select [SHIFT]. 2222 Press button. zzThe [SHIFT] screen will be displayed. 3333 Press to adjust the position. JJFor vertical (up and down) adjustment Operation Adjustment Press ▲. The picture position moves up. Press ▼. The picture position moves down. JJFor horizontal (right and left) adjustment Operation Adjustment Press ►. The picture position moves to the right. Press ◄. The picture position moves to the left. ASPECT This changes the aspect ratio of the projected image. This changes the aspect ratio for the screen range selected with [SCREEN SETTING]. Set [SCREEN SETTING] first. (Æpage 69) 1111 Press ▲▼ to select [ASPECT]. 2222 Press ◄► or button. zzThe [ASPECT] individual adjustment screen will be displayed. 3333 Press ◄► to switch [ASPECT]. zzThe setting will change as follows each time ◄► is pressed. VID AUTO *1 DEFAULT AUTO *2 S1 AUTO *3 VID AUTO (PRI.) *3 HV FIT THROUGH 16 : 9 V FIT H FIT 4 : 3 ***** VIDEO/S-VIDEO (NTSC) only ***** RGB1/RGB2 (480i, 480p) only ***** S-VIDEO (NTSC) only JJDEFAULT Pictures are displayed without changing the aspect ratio of the input signals. JJVID AUTO The projector identifies the video ID (VID) embedded in the picture signals and displays the picture by automatically switching the screen sizes between 4 : 3 and 16 : 9. This function is effective for the NTSC signal input. JJAUTO The projector identifies the video ID (VID) embedded in the picture signals and displays the picture by automatically switching the screen sizes between 4 : 3 and 16 : 9. This function is effective for the 480i/480p signal input. JJS1 AUTO The projector identifies the S1 signal and displays the picture by automatically switching the screen sizes between 4 : 3 and 16 : 9. This function is effective for S-VIDEO NTSC signals. Settings 58 - ENGLISH
-
 1
1 -
2
-
3
-
4
-
5
-
6
-
7
-
8
-
9
-
10
-
11
-
12
-
13
-
14
-
15
-
16
-
17
-
18
-
19
-
20
-
21
-
22
-
23
-
24
-
25
-
26
-
27
-
28
-
29
-
30
-
31
-
32
-
33
-
34
-
35
-
36
-
37
-
38
-
39
-
40
-
41
-
42
-
43
-
44
-
45
-
46
-
47
-
48
-
49
-
50
-
51
-
52
-
 53
53 -
 54
54 -
 55
55 -
 56
56 -
 57
57 -
 58
58 -
 59
59 -
 60
60 -
 61
61 -
 62
62 -
 63
63 -
64
-
65
-
66
-
67
-
68
-
69
-
70
-
71
-
72
-
73
-
74
-
75
-
76
-
77
-
78
-
79
-
80
-
81
-
82
-
83
-
84
-
85
-
86
-
87
-
88
-
89
-
90
-
91
-
92
-
93
-
94
-
95
-
96
-
97
-
98
-
99
-
100
-
101
-
102
-
103
-
104
-
105
-
106
-
107
-
108
-
109
-
110
-
111
-
112
-
113
-
114
-
115
-
116
-
117
-
118
-
119
-
120
-
121
-
122
-
123
-
124
-
125
-
126
-
127
-
128
-
129
 |
 |
