Panasonic PTDZ8700U PTDS8500U User Guide - Page 71
AUTO SIGNAL, AUTO SETUP, Press ▲▼ to select [AUTO SETUP].
 |
UPC - 885170010963
View all Panasonic PTDZ8700U manuals
Add to My Manuals
Save this manual to your list of manuals |
Page 71 highlights
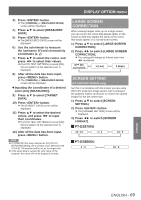
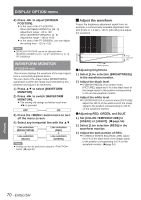
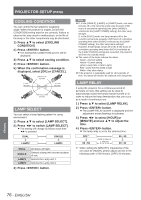
DISPLAY OPTION menu 4444 Adjust the light portion of RED. zzIn [RED] of [WHITE BALANCE HIGH], adjust the 100 % of the white level of the image signal to the position corresponding to 100 % on the waveform monitor. (Æpage 54) 5555 Adjust [GREEN] and [BLUE] in a similar manner. Note zzWhen the DVI-D signal, HDMI signal, or SDI signal is inputted, check that the [DVI SIGNAL LEVEL], [HDMI SIGNAL LEVEL], and [SDI SIGNAL LEVEL] are correctly set before adjusting the black level. zzThe keystone cannot be applied to the waveform monitor display. zzThe waveform monitor cannot be displayed in the [P IN P] mode. zzIf the [P IN P] mode is set while the waveform is being monitored, the waveform monitor will turn off. zzThe waveform monitor is not displayed while the onscreen display is off. AUTO SIGNAL You can turn ON/OFF automatically detecting system of the AUTO SETUP feature. 1111 Press ▲▼ to select [AUTO SIGNAL]. 2222 Press ◄► to switch [AUTO SIGNAL]. zzThe setting will change as follows each time ◄► is pressed. OFF ON OFF ON Only when button is pressed, the projected image position will be adjusted. If unregistered signals are input when [ON] is selected, auto setup will be initiated automatically. AUTO SETUP Use this setting when adjusting a specific or oblong (16:9, etc.) signal. 1111 Press ▲▼ to select [AUTO SETUP]. 2222 Press button. zzThe [AUTO SETUP] screen will be displayed. 3333 Press ▲▼ to select [MODE]. 4444 Press ◄► to switch [MODE]. zzThe setting will change as follows each time ◄► is pressed. DEFAULT WIDE USER DEFAULT WIDE USER To receive signals of which image aspect is 4:3 or 5:4 (applicable resolution : 640 × 400, 640 × 480, 800 × 600, 832 × 624, 960 × 720, 1 024 × 768, 1 152 × 864, 1 152 × 870, 1 280 × 960, 1 280 × 1 024, 1 600 × 1 200, 1 400 × 1 050) To receive signals of which the image aspect is wide (applicable resolution: 720 × 400, 848 × 480, 1 280 × 720, 1 024 × 600, 1 120 × 750, 1 440 × 900, 1 680 × 1 050) To receive signals of specific horizontal resolution (number of horizontally displayed dots) 5555 If [USER] is selected, press ◄► to enter the horizontal resolution of signal source into [DISPLAY DOTS]. 6666 Press button. zzExecute automatic adjustment. A message "PROGRESS..." appears during automatic adjustment. When the adjustment is complete, the system returns to the input screen. Settings ENGLISH - 71
-
 1
1 -
2
-
3
-
4
-
5
-
6
-
7
-
8
-
9
-
10
-
11
-
12
-
13
-
14
-
15
-
16
-
17
-
18
-
19
-
20
-
21
-
22
-
23
-
24
-
25
-
26
-
27
-
28
-
29
-
30
-
31
-
32
-
33
-
34
-
35
-
36
-
37
-
38
-
39
-
40
-
41
-
42
-
43
-
44
-
45
-
46
-
47
-
48
-
49
-
50
-
51
-
52
-
53
-
54
-
55
-
56
-
57
-
58
-
59
-
60
-
61
-
62
-
63
-
64
-
65
-
 66
66 -
 67
67 -
 68
68 -
 69
69 -
 70
70 -
 71
71 -
 72
72 -
 73
73 -
 74
74 -
 75
75 -
 76
76 -
77
-
78
-
79
-
80
-
81
-
82
-
83
-
84
-
85
-
86
-
87
-
88
-
89
-
90
-
91
-
92
-
93
-
94
-
95
-
96
-
97
-
98
-
99
-
100
-
101
-
102
-
103
-
104
-
105
-
106
-
107
-
108
-
109
-
110
-
111
-
112
-
113
-
114
-
115
-
116
-
117
-
118
-
119
-
120
-
121
-
122
-
123
-
124
-
125
-
126
-
127
-
128
-
129
 |
 |
