Panasonic WVNP1004 WVNP1004 User Guide - Page 27
Con the camera settings such as image quality and brightness, etc., Camera]
 |
View all Panasonic WVNP1004 manuals
Add to My Manuals
Save this manual to your list of manuals |
Page 27 highlights
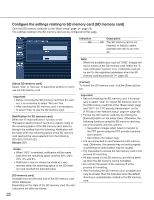
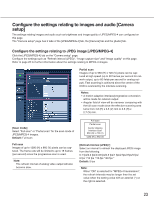
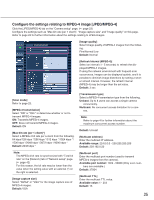
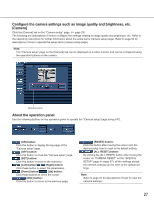
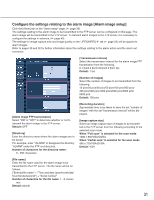
Configure the camera settings such as image quality and brightness, etc. [Camera] Click the [Camera] tab on the "Camera setup" page. (☞ page 23) The following are descriptions of how to configure the settings relating to image quality and brightness, etc. Refer to the operating instructions for further information about the setup items (camera setup page). Refer to page 52 for descriptions of how to operate the setup items (camera setup page). Note: The "Camera setup" page on the [Camera] tab can be displayed on a video monitor and can be configured using the operation buttons on the camera. Operation panel About the operation panel Use the following buttons on the operation panel to operate the "Camera setup" page using a PC. [ON] button: Click this button to display the top page of the "Camera setup" page. [OFF] button: Click this button to close the "Camera setup" page. [SET] button: Click this button to move to the submenu. [Left] button/ [Right] button: Click these button to select the parameters. [Down] button/ [Up] button: Click these buttons to move the cursor. [ESC] button: Click this button to return to the previous page. [RESET] button: Click this button after moving the cursor onto the desired setup item to reset to the default setting. [ALL RESET] button: By clicking the [ALL RESET] button after moving the cursor on "CAMERA RESET" on the "SPECIAL SETUP" page (☞ page 57), all the settings except the network settings can be reset to the default settings. Note: Refer to page 51 for descriptions of how to reset the network settings. 27
-
 1
1 -
2
-
3
-
4
-
5
-
6
-
7
-
8
-
9
-
10
-
11
-
12
-
13
-
14
-
15
-
16
-
17
-
18
-
19
-
20
-
21
-
 22
22 -
 23
23 -
 24
24 -
 25
25 -
 26
26 -
 27
27 -
 28
28 -
 29
29 -
 30
30 -
 31
31 -
 32
32 -
33
-
34
-
35
-
36
-
37
-
38
-
39
-
40
-
41
-
42
-
43
-
44
-
45
-
46
-
47
-
48
-
49
-
50
-
51
-
52
-
53
-
54
-
55
-
56
-
57
-
58
-
59
-
60
-
61
-
62
-
63
-
64
-
65
-
66
-
67
-
68
-
69
-
70
-
71
-
72
-
73
 |
 |
