Panasonic WVNP1004 WVNP1004 User Guide - Page 31
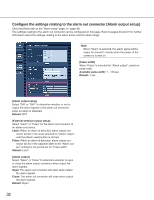
Con the settings relating to the alarm image [Alarm image setup], Recording duration]
 |
View all Panasonic WVNP1004 manuals
Add to My Manuals
Save this manual to your list of manuals |
Page 31 highlights
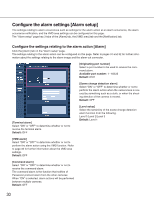
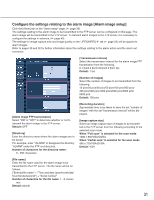
Configure the settings relating to the alarm image [Alarm image setup] Click the [Alarm] tab on the "Alarm setup" page. (☞ page 30) The settings relating to the alarm image to be transmitted to the FTP server can be configured on this page. The alarm image will be transmitted to the FTP server. To transmit alarm images to the FTP server, it is necessary to configure the settings in advance. (☞ page 40) The settings for image capture size and image quality on the "JPEG/MPEG-4" tab (☞ page 23) will be applied to alarm images. Refer to pages 30 and 32 for further information about the settings relating to the alarm action and the alarm out connector. [Transmission interval] Select the transmission interval for the alarm image FTP transmission from the following. 0.1 fps/0.2 fps/0.33 fps/0.5 fps/1 fps Default: 1 fps [Number of images] Select the number of images to be transmitted from the following. 10 pics/20 pics/30 pics/50 pics/100 pics/200 pics/ 300 pics/500 pics/1000 pics/2000 pics/3000 pics/ 5000 pics Default: 100 pics [Alarm image FTP transmission] Select "ON" or "OFF" to determine whether or not to transmit the alarm image to the FTP server. Default: OFF [Directory] Enter the directory name where the alarm images are to be saved. For example, enter "/ALARM" to designate the directory "ALARM" under the FTP root directory. Number of characters for the directory name: 0 - 256 characters [Recording duration] Approximate time to be taken to save the set "number of images" with the set "transmission interval" will be displayed. [Image capture size] Select an image capture size of images to be transmitted to the FTP server from the following according to the selected scan mode. When "Full scan" is selected for the scan mode 1280 x 960/VGA/QVGA When "Partial scan" is selected for the scan mode 960 x 720/VGA/QVGA Default: VGA [File name] Enter the file name used for the alarm image to be transmitted to the FTP server. The file name will be as follows. ["Entered file name" + "Time and date (year/month/day/ hour/minute/second)"] + "Serial number" Number of characters for the file name: 1 - 8 charac- ters Default: (blank) 31
-
 1
1 -
2
-
3
-
4
-
5
-
6
-
7
-
8
-
9
-
10
-
11
-
12
-
13
-
14
-
15
-
16
-
17
-
18
-
19
-
20
-
21
-
22
-
23
-
24
-
25
-
 26
26 -
 27
27 -
 28
28 -
 29
29 -
 30
30 -
 31
31 -
 32
32 -
 33
33 -
 34
34 -
 35
35 -
 36
36 -
37
-
38
-
39
-
40
-
41
-
42
-
43
-
44
-
45
-
46
-
47
-
48
-
49
-
50
-
51
-
52
-
53
-
54
-
55
-
56
-
57
-
58
-
59
-
60
-
61
-
62
-
63
-
64
-
65
-
66
-
67
-
68
-
69
-
70
-
71
-
72
-
73
 |
 |
