Pfaff creative 1.5 Manual - Page 25
Attach Presser Foot, USB Port, USB Embroidery Stick, Connect to and Remove From USB Port
 |
View all Pfaff creative 1.5 manuals
Add to My Manuals
Save this manual to your list of manuals |
Page 25 highlights
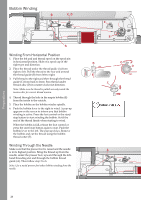
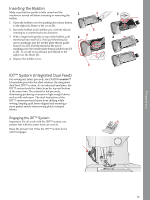
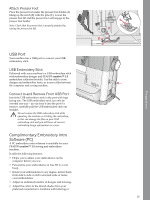
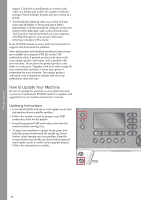
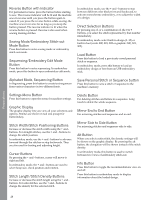
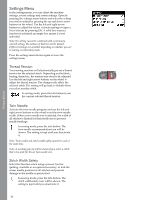
Preparations Attach Presser Foot Place the presser foot under the presser foot holder (A) lining up the notch (B) with the pins (C). Lower the presser foot lift and the presser foot will engage in the presser foot holder. Note: Check that the presser foot is properly attached by raising the presser foot lift. USB Port Your machine has a USB port to connect your USB embroidery stick. USB Embroidery Stick Delivered with your machine is a USB embroidery stick with embroidery designs and PFAFF® creative™ 1.5 embroidery collection booklet. Use the stick to store designs and embroidery fonts, or to move files between the computer and sewing machine. Connect to and Remove From USB Port Insert the USB embroidery stick in the port with logo facing you. The USB embroidery stick can only be inserted one way - do not force it into the port! To remove, carefully pull the USB embroidery stick out straight. Do not remove the USB embroidery stick while operating the machine or stitching the embroidery, as this can damage the files on your USB embroidery stick and you will loose all current embroidery design information on screen. Complimentary Embroidery Intro Software (PC) A PC embroidery intro software is available for your PFAFF® creative™ 1.5 sewing and embroidery machine. It adds the following features: • Helps you to adjust your embroideries on the computer before you sew. • Personalize your embroideries in true 3D in a real hoop. • Rotate your embroideries to any degree, mirror them from side to side or end to end and scale or resize your embroideries. • Adjust an unlimited number of designs and lettering. • Adjust the colors to the thread shades from your preferred manufacturer. Combine with lettering or 25
-
 1
1 -
2
-
3
-
4
-
5
-
6
-
7
-
8
-
9
-
10
-
11
-
12
-
13
-
14
-
15
-
16
-
17
-
18
-
19
-
 20
20 -
 21
21 -
 22
22 -
 23
23 -
 24
24 -
 25
25 -
 26
26 -
 27
27 -
 28
28 -
 29
29 -
 30
30 -
31
-
32
-
33
-
34
-
35
-
36
-
37
-
38
-
39
-
40
-
41
-
42
-
43
-
44
-
45
-
46
-
47
-
48
-
49
-
50
-
51
-
52
-
53
-
54
-
55
-
56
-
57
-
58
-
59
-
60
-
61
-
62
-
63
-
64
-
65
-
66
-
67
-
68
 |
 |
