Pfaff creative 1.5 Manual - Page 34
Stitch Adjustments, Stitch Width/Stitch Positioning, Stitch Length/Stitch Density, Elongation
 |
View all Pfaff creative 1.5 manuals
Add to My Manuals
Save this manual to your list of manuals |
Page 34 highlights
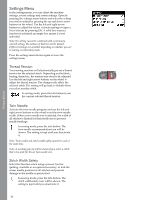
Stitch Adjustments Your machine will automatically select optimal settings for each stitch. You can make adjustments to every stitch as desired. Adjusted settings only affect the selected stitch and will be reset to default when another stitch is selected. Adjusted settings are not automatically saved when the machine is turned off. The values for stitch length and stitch width are shown to the right of the display. Use the next to the buttons numbers to make adjustments. When a setting is changed the numbers will be highlighted. When trying to exceed minimum or maximum settings for width and length, a warning sound will be heard. Stitch Width/Stitch Positioning Increase or decrease the stitch width using + and buttons. For straight stitches, use + and - to move the stitch position left or right. When a straight stitch is selected, the icon changes to show that stitch positioning is active instead of stitch width. 1. Stitch width/ stitch positioning Stitch Length/Stitch Density Increase or decrease the stitch length using + and buttons. For satin stitches, use the + and - buttons to increase or decrease the stitch density. This is often necessary when specialty threads are used or when a less dense satin stitch is desired. The stitch density does not affect the actual length of the entire stitch. When a satin stitch is selected, the icon changes to show that stitch density is active instead of stitch length. Elongation Elongation is used to lengthen satin stitches. The entire stitch will be longer but the density will remain the same. Press the alt button to show the elongation setting instead of density for satin stitches. The icon (3) changes to show an elongation symbol. Increase or decrease the elongation of the satin stitch using the + and - buttons. If elongation is not available for the selected stitch, a warning sound will be heard when pressing the alt button and the icon will not change. 2. Stitch length/ stitch density/elongation 3. Thread tension Sewing Mode 34
-
 1
1 -
2
-
3
-
4
-
5
-
6
-
7
-
8
-
9
-
10
-
11
-
12
-
13
-
14
-
15
-
16
-
17
-
18
-
19
-
20
-
21
-
22
-
23
-
24
-
25
-
26
-
27
-
28
-
 29
29 -
 30
30 -
 31
31 -
 32
32 -
 33
33 -
 34
34 -
 35
35 -
 36
36 -
 37
37 -
 38
38 -
 39
39 -
40
-
41
-
42
-
43
-
44
-
45
-
46
-
47
-
48
-
49
-
50
-
51
-
52
-
53
-
54
-
55
-
56
-
57
-
58
-
59
-
60
-
61
-
62
-
63
-
64
-
65
-
66
-
67
-
68
 |
 |
