Pfaff creative 1.5 Manual - Page 52
Hoop Positions, Stitches Left in Color Block, Current Color, Current Position, Park Position
 |
View all Pfaff creative 1.5 manuals
Add to My Manuals
Save this manual to your list of manuals |
Page 52 highlights
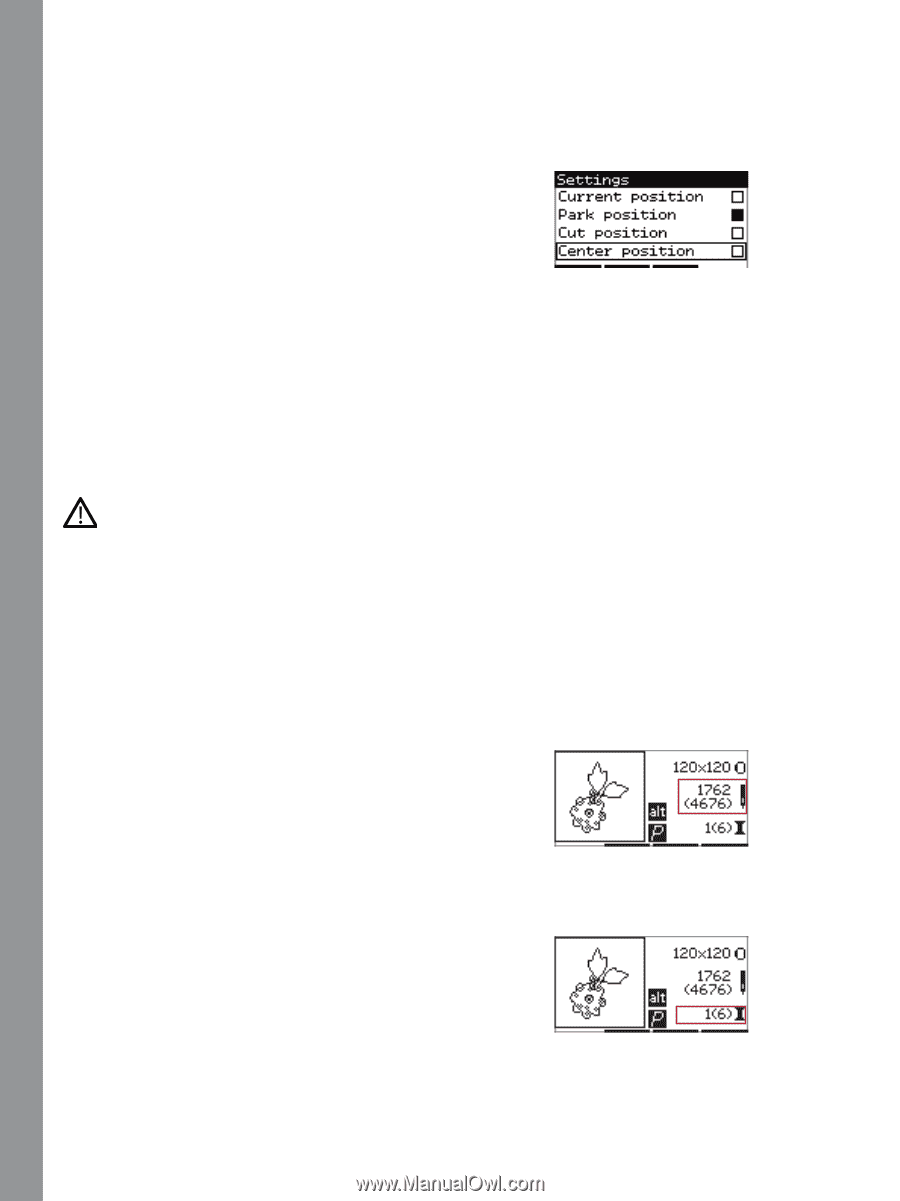
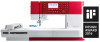
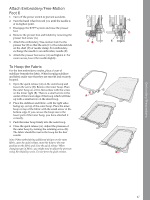
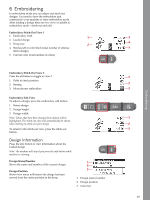
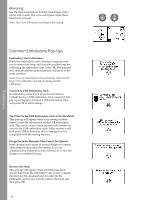
Embroidering Note: If you try to start embroidering and the hoop you have selected is not the same as the hoop attached to the embroidery unit, a pop-up will appear to inform you of this. Attach the correct hoop or select another hoop in the list. Hoop Positions Open the settings menu to choose between different hoop positions. Current Position When you want to return to the current stitch and start embroidering again where the embroidery was interrupted, select the current position option. You can also press the start/stop button once to return to the current stitch and start to embroider. Park Position When you have finished your embroidery, remove the hoop and select the park position option. It is very important that the hoop is removed, otherwise it may be damaged. Cut Position Cut position will move the hoop towards you, making it easier to trim fabric when embroidering an appliqué. Center Position Use the center position if you want to move the needle to the center position of the hoop. Stitches Left in Color Block The two values shown in the center position on the right side of the display indicate the number of stitches left in the current color block and the number of stitches left in the design (shown in brackets). Press the + or - buttons to step forward or backward stitch by stitch through the design. Step backwards a few stitches if the needle thread breaks or runs out. Current Color The values displayed in the lower right corner denote the current color block and the total number of color blocks in the design (shown in brackets). Use the + and buttons to move forward or backward through the color blocks. 52 Stitch-out view 1 Stitch-out view 1
-
 1
1 -
2
-
3
-
4
-
5
-
6
-
7
-
8
-
9
-
10
-
11
-
12
-
13
-
14
-
15
-
16
-
17
-
18
-
19
-
20
-
21
-
22
-
23
-
24
-
25
-
26
-
27
-
28
-
29
-
30
-
31
-
32
-
33
-
34
-
35
-
36
-
37
-
38
-
39
-
40
-
41
-
42
-
43
-
44
-
45
-
46
-
 47
47 -
 48
48 -
 49
49 -
 50
50 -
 51
51 -
 52
52 -
 53
53 -
 54
54 -
 55
55 -
 56
56 -
 57
57 -
58
-
59
-
60
-
61
-
62
-
63
-
64
-
65
-
66
-
67
-
68
 |
 |