Pfaff creative 1.5 Manual - Page 55
Embroidery Edit, Rotate, Design Height, Design Width, Move
 |
View all Pfaff creative 1.5 manuals
Add to My Manuals
Save this manual to your list of manuals |
Page 55 highlights
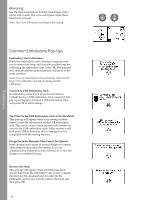
Embroidering Embroidery Edit To adjust your design, press the embroidery edit button. When you press the stitch-out button, the machine will switch to embroidery stitch-out. Note: When you press the start/stop button or foot control, machine will automatically change to embroidery stitch out view and start stitching. 1. Rotate 2. Design height 3. Design width Rotate You can rotate the design around its center point. Use the - and + buttons just to the right of the rotate icon to rotate. Each time you press the + button, the design will rotate 90 degrees clockwise. Press the - button to rotate the design counterclockwise. To the left of the rotate icon on the screen you can see how many degrees the design has rotated from its original position. Note: Some designs are too large to rotate in 90 degree increments. Each press of the button will then rotate 180 degrees. The P icon will rotate according to this setting, indicating the current orientation of the design in the embroidery area. Design Height You can increase or decrease the design height up to 20%. Use the + and - buttons just to the right of the design height icon. The design height is scaled 5% for each press. Design Width You can increase or decrease the design width up to 20%. Use the + and - buttons. The design width is scaled 5% each time you press a button. Move Use the wheel to move the design anywhere in the embroidery field. In the design information view you can see how far the design has been moved from its original position. Press the OK button to center the design in the hoop. 55
-
 1
1 -
2
-
3
-
4
-
5
-
6
-
7
-
8
-
9
-
10
-
11
-
12
-
13
-
14
-
15
-
16
-
17
-
18
-
19
-
20
-
21
-
22
-
23
-
24
-
25
-
26
-
27
-
28
-
29
-
30
-
31
-
32
-
33
-
34
-
35
-
36
-
37
-
38
-
39
-
40
-
41
-
42
-
43
-
44
-
45
-
46
-
47
-
48
-
49
-
 50
50 -
 51
51 -
 52
52 -
 53
53 -
 54
54 -
 55
55 -
 56
56 -
 57
57 -
 58
58 -
 59
59 -
 60
60 -
61
-
62
-
63
-
64
-
65
-
66
-
67
-
68
 |
 |
