Philips DVDR520H User manual - Page 13
System Menu - reset
 |
View all Philips DVDR520H manuals
Add to My Manuals
Save this manual to your list of manuals |
Page 13 highlights
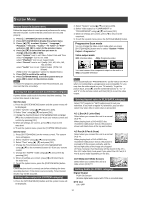
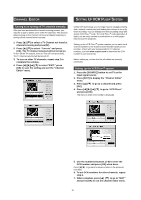
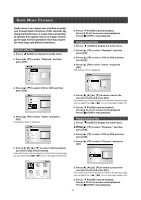
SYSTEM MENU Remote Control & System menu Follow the steps below to reset personal preferences for using the DVD recorder. Confirm that all connections are secured properly. 1. Press [ STANDBY] to turn on the unit. 2. Press [SYSTEM MENU] to display the system menu. 3. Press [p] [q] to select "System," "Language," "Playback," "Record," "Audio," "TV Tuner" or "EXIT" and press [t] [u] to return to the previous menu. 4. Press [p] [q] to select the item you want to change and press [u] or [OK]. select "System" icon to set: Video Output, Date and Time select "Language" icon to set: OSD select "Playback" icon to set: Aspect Ratio select "Record" icon to set: Quality ( M1, M2, M2x, M3, M4 and M6) select "Audio" icon to set: Digital Output (PCM / Bit Stream) (Refer to the "GUI operation" section for detailed menu) 5. Press [OK] to confirm the setting. 6. Press [SYSTEM MENU] to exit the system menu or press [t] to return to the previous menu.ot Notes: To record TV programs using the Timer Record feature, you must set the time accurately. Setting the date and time (in SYSTEM category) A power failure could result in incorrect date/time settings. The correct time needs to be reset. Set the date 1. Press the [SYSTEM MENU] button and the system menu will be displayed. 2. Select "System" using [p] [q] and press [OK]. 3. Select "Date" using [p] [q] and press [OK]. 4. Change the day/month/year in the highlighted field using [p] [q] or the numbered buttons (0~9) on your remote control and confirm by pressing [OK]. 5. When all settings are correct, press [t] to return to the main level. 6. To exit the system menu, press the [SYSTEM MENU] button. Set the time 1. Press [SYSTEM MENU] on the remote control. The system menu will appear. 2. Select "System" using [p] [q] and press [OK]. 3. Select "Time" using [p] [q] and press [OK]. 4. Change the "hour/minute/second"in the highlighted field using [p] [q] or the numbered buttons (0~9) on your remote control. 5. Change the "AM/PM" mode using [p] [q] and confirm by pressing [OK]. 6. When all settings are correct, press [t] until returning to the main level. 7. To exit the system menu, press the [SYSTEM MENU] button. Notes: Check that the clock is correctly set before initiating the timer recording function. If the clock is set incorrectly, Timer Record results may not be accurate. Setting video output (in SYSTEM category) 1. Press the [SYSTEM MENU] button and the system menu will be displayed. 2. Select "System" using [p] [q] and press [OK]. 3. Select "video output"as "COMPONENT"or "PROGRESSIVE" using [p] [q] and press [OK]. 4. When all settings are correct, press [t] to return to the main level. 5. To exit the system menu, press the [SYSTEM MENU] button. Progressive Scan mode You can change the video output mode when you press [SYSTEM MENU] button and to select "System-->Video Output-->Progressive." Video output mode: 480i: Interlace video 480p: Progressive video You must connect the component output on the unit to a 480p compatible television. Notes: If you accidentally set "PROGRESSIVE"as the VIDEO OUTPUT when not connecting to a progressive scan-compatible TV, you may lose the video signal on your TV instantly. To get the picture back, press [u] and the numbered buttons "5," "0," "2" and "0" on the remote control and then [OK] to re-set the video output. Setting Aspect ratio (in PLAYBACK category) Select "4:3"(regular) or "16:9"(widescreen) to suit your television. If you have a regular 4:3 television, you can also select how video title on some discs is presented. 4:3 L.Box (4:3 Letter Box) Select when you connect the unit to a normal (4:3) TV. When playing back a DVD-VIDEO disc recorded in wide picture format, the picture is shown with black bars at the top and bottom. 4:3 Pan (4:3 Pan & Scan) Select when you connect the unit to a normal (4:3) TV. When playing back a DVD-VIDEO disc recorded in wide picture format, the picture is zoomed to fill the screen vertically, and the left and right sides of the image are chopped off. Note, however, that the picture will be shown in the 4:3 L. Box (4:3 Letter Box) mode even if you select the 4:3 Pan (4:3 Pan & Scan) mode depending on the disc. 16:9 Wide (16:9 Wide Screen) Select when you connect the unit to a wide-screen (16:9) TV. Setting Audio (in AUDIO category) Digital Output PCM / Bit Stream (Enable digital audio output with PCM or encoded data) DTS Out ON / OFF 12
-
 1
1 -
2
-
3
-
4
-
5
-
6
-
7
-
 8
8 -
 9
9 -
 10
10 -
 11
11 -
 12
12 -
 13
13 -
 14
14 -
 15
15 -
 16
16 -
 17
17 -
 18
18 -
19
-
20
-
21
-
22
-
23
-
24
-
25
-
26
-
27
-
28
-
29
-
30
-
31
-
32
-
33
-
34
-
35
-
36
-
37
-
38
-
39
-
40
-
41
-
42
-
43
-
44
-
45
-
46
-
47
 |
 |
