Philips DVDR520H User manual - Page 20
Ecord
 |
View all Philips DVDR520H manuals
Add to My Manuals
Save this manual to your list of manuals |
Page 20 highlights
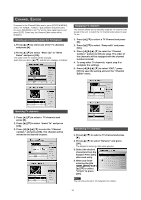
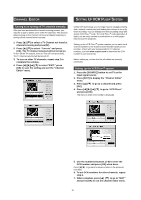
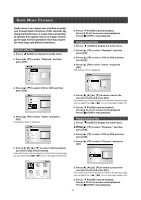
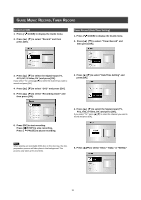
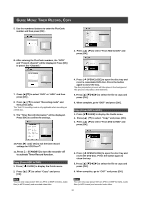
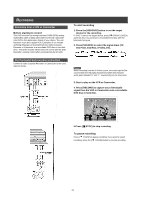
GUIDE MENU: TIMER RECORD 7. Press [p][q] [t] [u] or the numbered buttons (0~9) to set the date and press [OK] when done. 8. Press [p][q] [t] [u] or the numbered buttons (0~9) to set the time and press [OK] when done. 12. The "Timer Record information" will appear and press [OK] to confirm the settings. 9. Press [p][q] to set "Length" and then press [OK] . 10.Press [p][q] to select "HDD/DVD" and then press [OK] . 11. Press [p] [q] to select "Recording mode" and press [OK]. 13. Press [u] and [OK] to exit the timer record settings. 14. Press [ STANDBY] to turn the recorder off to activate Timer Record function. Timer Record (VCR Plus+ Setting) 1. Press [ GUIDE] to display the Guide menu. 2. Press [p] [q] to select "Timer Record" and then press [OK]. 3. Press [p] [q] to select "VCR Plus+ Setting" and press [OK]. Note: For Timer Record, there are seven recording modes for recording on DVD disc: M1, M2, M2x, M3, M4, M6 and Just Fit. The "Just Fit" recording mode is only applicable when recording onto DVD disc. When the recording mode is set to be "Just Fit," the recording mode will be automatically adjusted depending on how much recording space is available on the disc. 4. Press [p] [q] to select once, daily or weekly and press [OK]. 19
-
 1
1 -
2
-
3
-
4
-
5
-
6
-
7
-
8
-
9
-
10
-
11
-
12
-
13
-
14
-
 15
15 -
 16
16 -
 17
17 -
 18
18 -
 19
19 -
 20
20 -
 21
21 -
 22
22 -
 23
23 -
 24
24 -
 25
25 -
26
-
27
-
28
-
29
-
30
-
31
-
32
-
33
-
34
-
35
-
36
-
37
-
38
-
39
-
40
-
41
-
42
-
43
-
44
-
45
-
46
-
47
 |
 |
