Philips LC1241 User Guide
Philips LC1241 - ProScreen PXG20 XGA LCD Projector Manual
 |
View all Philips LC1241 manuals
Add to My Manuals
Save this manual to your list of manuals |
Philips LC1241 manual content summary:
- Philips LC1241 | User Guide - Page 1
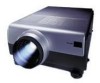
User guide ProScreen PXG20 Multimedia projector Philips Creative Display Solutions ) MMeennuu Auto sync Input D-Zoom OK Lens A/V Mute - Philips LC1241 | User Guide - Page 2
responsible party of this multi media projector is the following: Philips Consumer Electronics Company One Philips Drive Knoxville, TN 37914 Telephone (1888 NOT REMOVE COVER. NO USER-SERVICEABLE PARTS EXCEPT LAMP UNIT. REFER SERVICING TO QUALIFIED SERVICE PERSONNEL. This "bolt of lightning problems. - Philips LC1241 | User Guide - Page 3
projector, observe the following basic rules for its installation, use and servicing. 1. Unplug the projector from the wall outlet before cleaning or lamp by PHILIPS, as they may cause hazards. 4. Do not use the projector near projector and should follow the manufacturer's instructions. 7. Projector - Philips LC1241 | User Guide - Page 4
the keylock level 26 Checking the lamp usage time 26 Checking the input signal instructions before operating the LCD-projector. PACKAGING CONTENTS Please confirm that the following items are packed in the projector box. They are provided to help you use or set up your projector. • ProScreen - Philips LC1241 | User Guide - Page 5
frequency energy and, if not installed and used in accordance with the user's guide, may cause harmful interference to radio communications. Operation of this equipment in a residential SAVE ENERGY! To save energy, please put the projector in the STANDBY position if you are not going to use the - Philips LC1241 | User Guide - Page 6
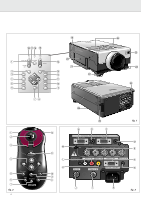
1 2 3 4 5 6 *&^ % Power ON Standby / OFF Lens Data 1 Data 2 Video Auto sync Lamp Temp. A / V Mute Volume Menu V-Format V-Effect D-Freeze D- Zoom OK ( ) $ ¡ # @ ! 0 9 ™ 78 § ≤ £ ) ™ £ 1 2 3 MMeennuu 4 5 6 7 fig. 2 4 Auto sync D-Zoom OK Input Lens A/V Mute @ ! 0 9 8 M ∞ A B C - Philips LC1241 | User Guide - Page 7
image adjustments. (Page 16) 10. USER-FRIENDLY DESIGN The two-colour design along with an intuitive Graphical User Interface (GUI) makes this projector very easy to set up and adjust. 11. AUTO SYNC TECHNOLOGY FOR AUTOMATIC IMAGE PERFECTION Automatically makes any necessary adjustments for perfectly - Philips LC1241 | User Guide - Page 8
life of the unit. Internal cleaning should only be performed by a Philips Authorised LCD Projector Dealer or Service Centre. NOTES ON OPERATION •The exhaust vent, the lamp cage cover and adjacent areas may be extremely hot during projector operation. To prevent injury, do not touch these areas until - Philips LC1241 | User Guide - Page 9
. % Temperature warning indicator (Temp.) Flashes when the temperature of the projector is too high ^ Lamp replacement indicator (Lamp) Lights to indicate the status of the lamp; Green: lamp is ready Flashing green: warming up Red: change the lamp & Audio / Video - Mute For muting the sound of the - Philips LC1241 | User Guide - Page 10
VD) Input sockets for connecting Data 1 BNC connection. F Data out (15 pin) Output socket for connecting to the Data in terminal of another data projector or data monitor. 4 Cursor Control To operate and navigate through the activated menu via up/down and the left/right cursor buttons G Audio out - Philips LC1241 | User Guide - Page 11
311 413 614 Distance lens center to bottom of image cm inch -5,00 -1,97 -7,50 -2,95 -9,00 -3,54 -10,50 -4,13 -11,50 -4,53 -12,50 -4,92 Lamp indicator shows that the lamp is warming up. Wait until the indicator stops flashing before operating the projector. The image shown is the Philips - Philips LC1241 | User Guide - Page 12
all other cables. 3. Put the lens cap back in place to prevent dust, dirt or other contamination from harming or damaging the front of the projector lens when moving the projector. 4. When transporting the projector, carry it by the carrying handle on the side. CAUTION! Do not lift or carry the - Philips LC1241 | User Guide - Page 13
in the left-hand column correspond with the numbers in the connection diagrams on the following pages. No. CABLE/ADAPTER 1 Computer VGA Cable Projector side Mini D-Sub 15P (male) CONNECTIONS Computer/AV products side Mini D-Sub 15P (male) 2 RCA Audio Video Cable RCA pin (male) x 3 RCA pin - Philips LC1241 | User Guide - Page 14
on the computer. Notes: - A Macintosh adapter may be required for use with some Macintosh computers. Contact your nearest Philips Authorised LCD Projector Dealer or Service Centre. - Audio Input 1 accepts Data 1 port input, Audio Input 2 accepts Data 2 port input. - A 3.5 mm minijack to RCA audio - Philips LC1241 | User Guide - Page 15
. 2. To use the built-in audio system, connect the red and white RCA connectors to the corresponding red and white Audio Input terminals on the projector (L) and the Audio output terminals on the video source. In case your VCR, Laser Disc player, video camera or TV is equipped with a Scart connector - Philips LC1241 | User Guide - Page 16
Optional Computer L Audio R in • Connect the Audio in L/R sockets of an amplifier or stereo system to the Audio out socket (G) of the projector. For this, use an audio connection cable (optional). Data out Mouse Audio out USB (8) • Connect the supplied USB mouse receiver to the corresponding - Philips LC1241 | User Guide - Page 17
and the flashing green Lamp indicator shows that the lamp is warming up. Wait until the indicator stops flashing before operating the projector. If the power serial port is not correctly set up. Refer to the computer's operation manual for details of setting up/installing the mouse driver. - For one - Philips LC1241 | User Guide - Page 18
has two sets of menu screens (Data/Video) that allow you to adjust the image and various projector settings. These menu screens can be operated from the projector or the remote control with the following buttons. Note: The On Screen Displays will automatically disappear when no changes have - Philips LC1241 | User Guide - Page 19
your own preferences by using the Data or Video ADJUST feature. - The projector will store the last used settings for every source. So when you the settings of the source switched to will be recalled. - When the projector is switched off and on again the settings for the selected source will be - Philips LC1241 | User Guide - Page 20
2. Press Menu. Menu bar and 'Picture' menu screen appear. GUI operation guide is also displayed. 3. Press 1 / 2 to select 'Fine Sync'. be made manually by pressing Auto sync (either on local keyboard and remote control), or automatically by setting 'Auto Sync' to 'ON' in the projector's GUI menu - Philips LC1241 | User Guide - Page 21
color temperature to suit the type of image input to the projector (Video, computer image, TV broadcast, etc.) Decrease the color mode. 1. Press Menu. - Menu bar and 'Picture' menu screen appear. GUI operation guide is also displayed. 2. Press 3 / 4 to select a specific adjustment item. 3. Press - Philips LC1241 | User Guide - Page 22
3 / 4 to select 'Signal Type', and then press 2. AUDIO CONTROL This projector's audio is factory preset to standard settings. However, you can adjust it to . 1. Press Menu. Menu bar and 'Picture' menu screen appear. GUI operation guide is also displayed. 4. Press 3 / 4 to select 'Computer/RGB' or - Philips LC1241 | User Guide - Page 23
use with various computers. Once these settings are stored, they can be easily selected each time you connect the computer to the projector. Saving/changing the adjustment setting 1. Press Menu. 2. Press 1 / 2 to select 'Fine Sync'. Selecting a saved setting 1. Press Menu. 2. Press 1 / 2 to select - Philips LC1241 | User Guide - Page 24
optional ceiling-mount bracket for this installation. - Before mounting the projector, contact your nearest Authorised LCD Projector Dealer or Service Centre to obtain the recommended ceiling-mount bracket (sold separately). -. When the projector is in the inverted position, use the upper edge of - Philips LC1241 | User Guide - Page 25
magnification toggles as shown below. x1 x2 x3 x4 x6 x8 AV MUTE FUNCTION This function can be used for muting the sound of the projector (or an external connected sound amplifier) and for muting the picture. Press A/V Mute. - 'AV Mute' is displayed on the screen. - If the input signal is - Philips LC1241 | User Guide - Page 26
9. OTHER SETTINGS Picture display mode (V-Format) (on projector keyboard only) DATA MODE 4:3 aspect ratio Other aspect ratios SVGA (800 x 600) XGA (1024 x 768) UXGA (1600 x 1200) SXGA (1280 x 1024) NORMAL 1024 x 768 1024 x - Philips LC1241 | User Guide - Page 27
' is set to ' ' in the GUI menu, the on-screen messages will not appear when Data 1, Data 2 or Video are pressed on the projector or Input on the remote control. 1. Press Menu. 2. Press 1 / 2 to select 'Options'. 3. Press 3 / 4 to select 'OSD Display'. AUTOMATIC POWER SHUTOFF FUNCTION When no - Philips LC1241 | User Guide - Page 28
recommended that the lamp be replaced after approximately 900 hours of usage. See page 29-30 for details. Note: After 1000 hrs of usage, the projector will not be the projector. Description of Background Images Selected item Background image Philips Blue None PHILIPS default image Blue screen - Philips LC1241 | User Guide - Page 29
IMAGE - This function allows you to specify the image to be displayed upon the projector's startup. Description of Startup Images Selected item Background image Philips None PHILIPS default image Black screen 1. Press Menu. 2. Press 1 / 2 to select 'Options'. 3. Press 3 / 4 to select 'Startup - Philips LC1241 | User Guide - Page 30
Audio Volume Balance Treble Bass Reset -30 +30 -30 +30 -30 +30 Options Lamp Timer AV mute Disp OSD Display Video System Background Startup Image MNTR Out/RS232C Auto Power ON/OFF] Auto PAL(50Hz/60HZ) SECAM NTSC4.43 NTSC3.58 Philips Blue None Philips None [ON/OFF] [ON/OFF] Normal Level A Level B - Philips LC1241 | User Guide - Page 31
up. Please refer to the operation manual of the computer for details on setting up/installing the correct mouse driver. - A Macintosh adapter may be required for use with some Macintosh computers. Contact your nearest Philips Authorised LCD Projector Dealer or Service Centre. - For more details on - Philips LC1241 | User Guide - Page 32
from your nearest Philips Authorized LCD Products Dealer or Service Center. Then carefully change the lamp by following the instructions below. If you wish, you may have the lamp replaced at your nearest Philips Authorized LCD Projector Dealer or Service Center. Replacing the lamp 1. Turn off the - Philips LC1241 | User Guide - Page 33
to touch the glass surface of the lamp cage or the inside of the projector. KENSINGTON LOCK This projector has a Kensington Security Standard slot for use with a Kensington Micro Saver Security System. Refer to the information that came with the system for instructions on how to use it to secure - Philips LC1241 | User Guide - Page 34
12. TROUBLESHOOTING If a fault occurs, first check the points listed below before taking the projector for repair. If you are unable to remedy a problem by following these hints, consult your dealer or service organisation. WARNING Under no circumstances should you try to repair the projector
-
 1
1 -
 2
2 -
 3
3 -
 4
4 -
 5
5 -
 6
6 -
 7
7 -
8
-
9
-
10
-
11
-
12
-
13
-
14
-
15
-
16
-
17
-
18
-
19
-
20
-
21
-
22
-
23
-
24
-
25
-
26
-
27
-
28
-
29
-
30
-
31
-
32
-
33
-
34
 |
 |

Philips
Creative Display
Solutions
User guide
ProScreen PXG20
Multimedia projector
)
A/V Mute
A/V Mute
Auto sync
Auto sync
Input
Input
OK
OK
Lens
Lens
D-Zoom
D-Zoom
Menu
Menu