Philips LC1241 User Guide - Page 18
Graphical User Interface
 |
View all Philips LC1241 manuals
Add to My Manuals
Save this manual to your list of manuals |
Page 18 highlights
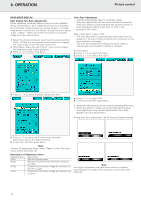
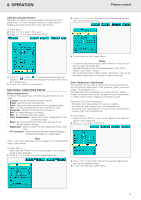
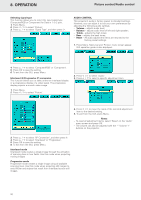
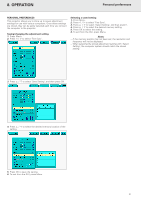
8. OPERATION Graphical User Interface GRAPHICAL USER INTERFACE Using the GUI (Graphical User Interface) Menu Screens This projector has two sets of menu screens (Data/Video) that allow you to adjust the image and various projector settings. These menu screens can be operated from the projector or the remote control with the following buttons. Note: The On Screen Displays will automatically disappear when no changes have been made within 30 seconds. DATA MODE MENU CONTROL 1. Press Menu to display the Data mode menu bar. VIDEO MODE MENU CONTROL 1. Press Menu to display the Video mode menu bar. 2. Press 1 / 2 to select an adjustment menu on the menu bar. 3. Press 3 / 4 to select a specific adjustment item. 4. To display a single adjustment item, press OK after selecting the item. - Only the menu bar and the selected adjustment item will appear. 2. Press 1 / 2 to select an adjustment menu on the menu bar. 3. Press 3 / 4 to select a specific adjustment item. 4. To display a single adjustment item, press OK after selecting the item. - Only the menu bar and the selected adjustment item will appear. 5. Press 1 / 2 to adjust the item. 6. Press Menu to exit from the GUI. 5. Press 1 / 2 to adjust the item. 6. Press Menu to exit from the GUI. LANGUAGE SELECTION English is the default setting language for the On-Screen Display. It can be changed to English, German, Spanish, Dutch, French, Italian, Swedish or Portuguese. 1. Press Menu. - The menu bar appears on the screen. 2. Press 1 / 2 to select 'Language'. 3. Press 3 / 4 to select the desired language. 4. Press OK to save the setting. The On-Screen Display is now programmed to display in the language selected. 5. To exit from the GUI, press Menu. 16
-
 1
1 -
2
-
3
-
4
-
5
-
6
-
7
-
8
-
9
-
10
-
11
-
12
-
 13
13 -
 14
14 -
 15
15 -
 16
16 -
 17
17 -
 18
18 -
 19
19 -
 20
20 -
 21
21 -
 22
22 -
 23
23 -
24
-
25
-
26
-
27
-
28
-
29
-
30
-
31
-
32
-
33
-
34
 |
 |
