Philips LC1241 User Guide - Page 12
Notes, CAUTION
 |
View all Philips LC1241 manuals
Add to My Manuals
Save this manual to your list of manuals |
Page 12 highlights
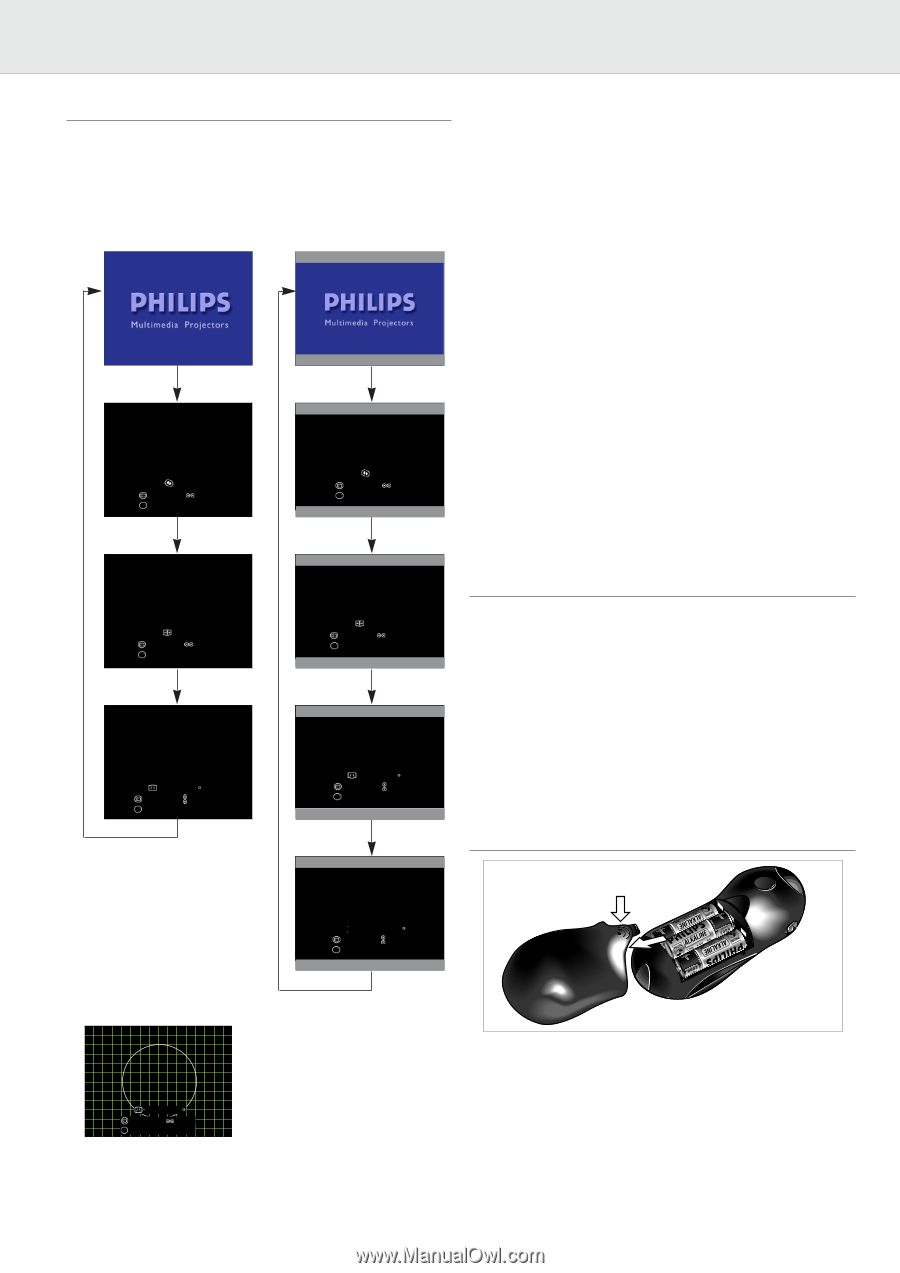
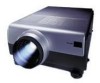
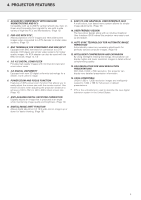
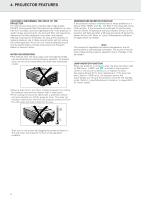
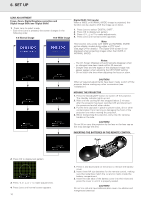
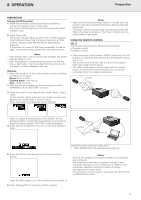
6. SET UP LENS ADJUSTMENT Focus, Zoom, Digital Keystone correction and Digital Image Shift (see 'Digital Shift') 1. Press Lens to select mode. - Each time Lens is pressed, the screen changes in the following order. 4:3 Normal image 16:9 Wide image Digital Shift (16:9 mode) When a WIDE or NORMAL (WIDE) image is projected, this function can be used to shift the image up or down. 1. Press Lens to select 'DIGITAL SHIFT'. 2. Press OK to display test pattern. 3. Press 1, 2, 3 or 4 to make adjustments. 4. Press Lens until normal screen apprears. Note: This function only works with WIDE and NORMAL (WIDE) picture display modes during video or DTV input. (See page 24 for details.) The Digital Shift screen is not displayed when projecting images other than WIDE or NORMAL (WIDE). FOCUS NEXT (Lens) ADJUST OK ZOOM NEXT (Lens) ADJUST OK KEYSTONE END (Lens) ADJUST OK TEST PTRN FOCUS NEXT (Lens) ADJUST OK ZOOM NEXT (Lens) ADJUST OK KEYSTONE END (Lens) ADJUST OK TEST PTRN Notes: - The On Screen Displays will automatically disappear when no changes have been made within 30 seconds. - Straight lines and the edges of the displayed image may appear jagged, when adjusting the KEYSTONE setting. - Do not touch the lens when adjusting the focus or zoom. CAUTION! When all required adjustments have been made, switch off the projector before making any other connections (see 'Installation'). MOVING THE PROJECTOR 1. Press the Standby/OFF button to switch off the projector. The standby indicator lights up red. 2. Wait until the cooling fan has stopped (about 2 minutes after the projector has been switched off) and disconnect the powercord and all other cables. 3. Put the lens cap back in place to prevent dust, dirt or other contamination from harming or damaging the front of the projector lens when moving the projector. 4. When transporting the projector, carry it by the carrying handle on the side. CAUTION! Do not lift or carry the projector by the lens or the lens cap as this may damage the lens. INSERTING THE BATTERIES IN THE REMOTE CONTROL Push I DIGITAL SHIFT END (Lens) ADJUST OK TEST PTRN 2. Press OK to display test pattern. KEYSTONE END ADJUST OK EXIT TEST PTRN 3. Press 1, 2, 3 or 4 to make adjustments. 4. Press Lens until normal screen appears. 10 1. Press in and downward on the arrow to remove the battery cover. 2. Insert three AA size batteries for the remote control, making sure their polarities match the (+) and (-) marks inside the battery compartment. 3. Insert the side tabs of the battery cover into their slots and press the cover in until it is properly seated. CAUTION! Do not mix old and new batteries (also never mix alkaline and manganese batteries).
-
 1
1 -
2
-
3
-
4
-
5
-
6
-
 7
7 -
 8
8 -
 9
9 -
 10
10 -
 11
11 -
 12
12 -
 13
13 -
 14
14 -
 15
15 -
 16
16 -
 17
17 -
18
-
19
-
20
-
21
-
22
-
23
-
24
-
25
-
26
-
27
-
28
-
29
-
30
-
31
-
32
-
33
-
34
 |
 |