Pioneer KRP-600M Owner's Manual - Page 22
Connect the Power Cord to the Panel, Route then Bundle the Power Cord and Cables - 60
 |
UPC - 012562899503
View all Pioneer KRP-600M manuals
Add to My Manuals
Save this manual to your list of manuals |
Page 22 highlights
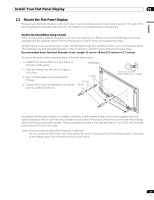
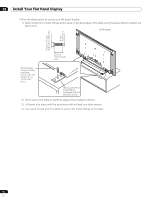
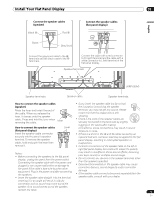
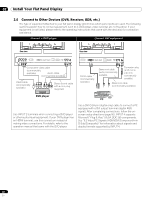
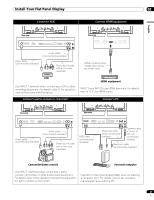
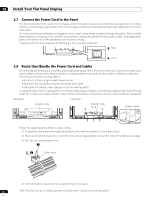
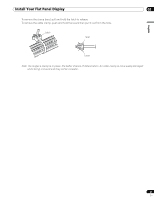
02 Install Your Flat Panel Display 2.7 Connect the Power Cord to the Panel The final connection is the power cord. Always connect the panel's power cord to a three-pronged outlet, verifying that the cord is properly grounded. The cord includes a noise filter that reduces electrical interference from the wall outlet. As long as the flat panel display is plugged in to an outlet, some power is drawn through the panel. When the flat panel display is not going to be used for a long period, unplug the panel from the power outlet. Unplugging the panel extends the life of the plasma as well as saves energy. Plug the cord in to the panel but do NOT plug it in to a power outlet yet. Rear Front 2.8 Route then Bundle the Power Cord and Cables Once the flat panel display is mounted, place additional equipment in the final position(s). Lay out the power cord, panel cables, and any other device cables in a logical pattern that works for the location. Please consider the following points when routing cables: • Access to a 3-prong (grounded) power outlet • Space for the noise filter between the panel and outlet • Placement of cables under carpets or across walking paths A reusable cable clamp is designed to lock the bundled cables in place. Your flat panel display has a total of three holes (60 inches: two holes) to attach cable clamps to the back of the panel. Use the cable clamps as necessary. KRP-600M Speaker cable KRP-500M Speaker cable Speaker cable Follow the steps below to attach a cable clamp. 1 ) Thread the clamp band through the holder and bundle the cable(s) in the cable clamp. 2 ) Push and hold the levers then insert the hook into an appropriate hole on the rear of the flat panel display. 3 ) Pull up the clamp band to lock. 1 2 Cable clamp 4 ) Confirm that the cable clamp is seated firmly in the panel. Note: Avoid pinching or creating pressure points when routing or bundling cables. 22 En
-
 1
1 -
2
-
3
-
4
-
5
-
6
-
7
-
8
-
9
-
10
-
11
-
12
-
13
-
14
-
15
-
16
-
 17
17 -
 18
18 -
 19
19 -
 20
20 -
 21
21 -
 22
22 -
 23
23 -
 24
24 -
 25
25 -
 26
26 -
 27
27 -
28
-
29
-
30
-
31
-
32
-
33
-
34
-
35
-
36
-
37
-
38
-
39
-
40
-
41
-
42
-
43
-
44
-
45
-
46
-
47
-
48
-
49
-
50
-
51
-
52
-
53
-
54
-
55
-
56
-
57
-
58
-
59
-
60
-
61
-
62
-
63
-
64
-
65
-
66
-
67
-
68
-
69
-
70
-
71
-
72
-
73
-
74
-
75
-
76
-
77
-
78
-
79
-
80
-
81
-
82
-
83
-
84
-
85
-
86
-
87
-
88
-
89
-
90
-
91
-
92
-
93
-
94
-
95
-
96
-
97
-
98
-
99
-
100
-
101
-
102
-
103
-
104
-
105
-
106
-
107
-
108
-
109
-
110
-
111
-
112
-
113
-
114
-
115
-
116
-
117
-
118
-
119
-
120
-
121
-
122
-
123
-
124
-
125
-
126
-
127
-
128
-
129
-
130
-
131
-
132
-
133
-
134
-
135
-
136
-
137
-
138
-
139
-
140
-
141
-
142
-
143
-
144
-
145
-
146
-
147
-
148
-
149
-
150
-
151
-
152
-
153
-
154
-
155
-
156
-
157
-
158
-
159
-
160
-
161
-
162
-
163
-
164
-
165
-
166
-
167
-
168
-
169
-
170
-
171
-
172
-
173
-
174
-
175
-
176
-
177
-
178
-
179
-
180
-
181
-
182
-
183
-
184
-
185
-
186
-
187
-
188
-
189
-
190
-
191
-
192
-
193
-
194
-
195
-
196
-
197
-
198
-
199
-
200
-
201
-
202
-
203
-
204
-
205
-
206
-
207
-
208
-
209
-
210
-
211
-
212
-
213
-
214
-
215
-
216
-
217
-
218
-
219
-
220
-
221
-
222
-
223
-
224
-
225
-
226
-
227
-
228
-
229
-
230
-
231
-
232
-
233
-
234
-
235
-
236
-
237
-
238
-
239
-
240
-
241
-
242
-
243
-
244
-
245
-
246
-
247
-
248
-
249
-
250
-
251
-
252
-
253
-
254
-
255
-
256
-
257
-
258
-
259
-
260
-
261
-
262
-
263
-
264
-
265
-
266
-
267
-
268
-
269
-
270
-
271
-
272
-
273
-
274
-
275
-
276
-
277
-
278
-
279
-
280
-
281
-
282
-
283
-
284
-
285
-
286
-
287
-
288
-
289
-
290
-
291
-
292
-
293
-
294
-
295
-
296
-
297
-
298
-
299
-
300
-
301
-
302
-
303
-
304
-
305
-
306
-
307
-
308
-
309
-
310
-
311
-
312
-
313
-
314
-
315
-
316
-
317
-
318
-
319
-
320
-
321
-
322
-
323
-
324
-
325
-
326
 |
 |
