Pioneer KRP-600M Owner's Manual - Page 60
Control Equipment with the Panel's Remote Through HDMI
 |
UPC - 012562899503
View all Pioneer KRP-600M manuals
Add to My Manuals
Save this manual to your list of manuals |
Page 60 highlights
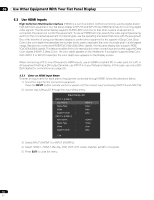
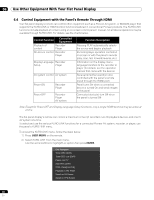
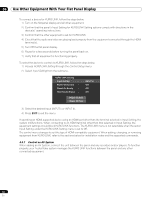
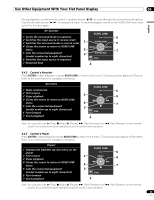
06 Use Other Equipment With Your Flat Panel Display 6.4 Control Equipment with the Panel's Remote Through HDMI Your flat panel display's remote can control other equipment such as a Pioneer AV system, or BD/DVD player that supports the KURO LINK or HDMI Control functions featured in conventional Pioneer products. The KURO LINK functions include playback of content using an on-screen control panel. However, not all device operations may be available through KURO LINK. For details, see the charts below. Control Function Controlled Equipment Playback of content Recorder Player On-screen control Recorder Player Display Language Recorder Setup Player AV system control AV system Power ON Power OFF Recorder Player Recorder Player AV system Function Description Pressing PLAY automatically selects the source and begins playback Recorder/player operation controlled on-screen or with the panel's remote (play, stop, fast forward/reverse, etc.) Information on the display menu language transfers to the recorder or player (for details, see the operation manual that came with the device) Receiver/amplifier operation also controlled with the panel's remote (input through the HDMI port) Panel turns On when a connected device is turned On and send images to the panel Connected device(s) turn Off when the panel is turned Off Note: Except for Power OFF and Display Language Setup functions, only a single HDMI terminal may be active at a time. The flat panel display's remote can control a maximum of two (2) recorders, two (2) playback devices, and one (1) AV system at a time. To select and use the various KURO LINK functions for a connected Pioneer AV system, recorder, or player, use the panel's KURO LINK menu. To access the KURO LINK menu, follow the steps below. 1 ) Press USER MENU on the remote. 2 ) Select KURO LINK from the main menu. Use the arrow buttons to highlight an option then press ENTER. Disc Navigator Timer REC (DVR) Timer REC List (DVR) Pause Live TV Stop REC (DVR) CTRL Panel(AV-SYS) Playback CTRL Panel Switch to AV Sound Switch to FPD Sound 60 En
-
 1
1 -
2
-
3
-
4
-
5
-
6
-
7
-
8
-
9
-
10
-
11
-
12
-
13
-
14
-
15
-
16
-
17
-
18
-
19
-
20
-
21
-
22
-
23
-
24
-
25
-
26
-
27
-
28
-
29
-
30
-
31
-
32
-
33
-
34
-
35
-
36
-
37
-
38
-
39
-
40
-
41
-
42
-
43
-
44
-
45
-
46
-
47
-
48
-
49
-
50
-
51
-
52
-
53
-
54
-
 55
55 -
 56
56 -
 57
57 -
 58
58 -
 59
59 -
 60
60 -
 61
61 -
 62
62 -
 63
63 -
 64
64 -
 65
65 -
66
-
67
-
68
-
69
-
70
-
71
-
72
-
73
-
74
-
75
-
76
-
77
-
78
-
79
-
80
-
81
-
82
-
83
-
84
-
85
-
86
-
87
-
88
-
89
-
90
-
91
-
92
-
93
-
94
-
95
-
96
-
97
-
98
-
99
-
100
-
101
-
102
-
103
-
104
-
105
-
106
-
107
-
108
-
109
-
110
-
111
-
112
-
113
-
114
-
115
-
116
-
117
-
118
-
119
-
120
-
121
-
122
-
123
-
124
-
125
-
126
-
127
-
128
-
129
-
130
-
131
-
132
-
133
-
134
-
135
-
136
-
137
-
138
-
139
-
140
-
141
-
142
-
143
-
144
-
145
-
146
-
147
-
148
-
149
-
150
-
151
-
152
-
153
-
154
-
155
-
156
-
157
-
158
-
159
-
160
-
161
-
162
-
163
-
164
-
165
-
166
-
167
-
168
-
169
-
170
-
171
-
172
-
173
-
174
-
175
-
176
-
177
-
178
-
179
-
180
-
181
-
182
-
183
-
184
-
185
-
186
-
187
-
188
-
189
-
190
-
191
-
192
-
193
-
194
-
195
-
196
-
197
-
198
-
199
-
200
-
201
-
202
-
203
-
204
-
205
-
206
-
207
-
208
-
209
-
210
-
211
-
212
-
213
-
214
-
215
-
216
-
217
-
218
-
219
-
220
-
221
-
222
-
223
-
224
-
225
-
226
-
227
-
228
-
229
-
230
-
231
-
232
-
233
-
234
-
235
-
236
-
237
-
238
-
239
-
240
-
241
-
242
-
243
-
244
-
245
-
246
-
247
-
248
-
249
-
250
-
251
-
252
-
253
-
254
-
255
-
256
-
257
-
258
-
259
-
260
-
261
-
262
-
263
-
264
-
265
-
266
-
267
-
268
-
269
-
270
-
271
-
272
-
273
-
274
-
275
-
276
-
277
-
278
-
279
-
280
-
281
-
282
-
283
-
284
-
285
-
286
-
287
-
288
-
289
-
290
-
291
-
292
-
293
-
294
-
295
-
296
-
297
-
298
-
299
-
300
-
301
-
302
-
303
-
304
-
305
-
306
-
307
-
308
-
309
-
310
-
311
-
312
-
313
-
314
-
315
-
316
-
317
-
318
-
319
-
320
-
321
-
322
-
323
-
324
-
325
-
326
 |
 |
