Pioneer KRP-600M Owner's Manual - Page 32
Smart Starts for New Owners
 |
UPC - 012562899503
View all Pioneer KRP-600M manuals
Add to My Manuals
Save this manual to your list of manuals |
Page 32 highlights
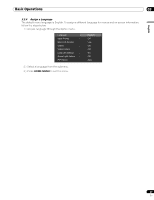
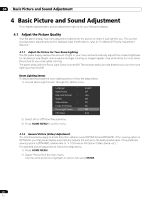
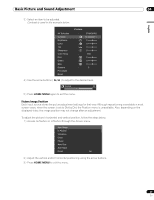
04 Basic Picture and Sound Adjustment 4.2 Smart Starts for New Owners Many of the flat panel display features make it easier to use but also environmentally friendlier. This section explains how to extend the life of your panel through being energy efficient. We suggest applying all of the following functions below for the simplest usage, best quality, and longest life span. 4.2.1 Extend Your Panel Life This function provides short-cuts to your panel's longer service life. Your flat panel display includes a Long Life Settings option. Activating this option causes the panel to automatically select several different features that can prolong the life of your panel and help alleviate after-image ghosts or burn-in. To set this option, follow the steps below. 1 ) Access Long Life Settings through the Option menu. A confirmation screen appears. 2 ) Select Yes from the submenu. The following settings are automatically entered: •Auto Size: Wide Zoom •Side Mask - Detection: Mode 1 •Orbiter (AV source): Mode 1 •Orbiter (PC source): Mode 1 •Energy Save: Save 1 •AV Selection: OPTIMUM (only when it was set to DYNAMIC previously) 3 ) Press HOME MENU to exit the menu. 4.2.2 Adjust the Power Indicator Brightness Adjust the brightness of the Power On indicator depending on the brightness level of the viewing area. Setting to Auto toggles the brightness of the indicator between High, Mid and Low to match the brightness level of the viewing area. To set the indicator, follow the directions below. 1 ) Access Blue LED Dimmer through the Option menu. 2 ) Select Auto, High, Mid or Low from the submenu. 3 ) Press HOME MENU to exit the menu. 4.2.3 Set Input Priority With a priority input assigned, the flat panel display automatically switches to that input when signals are present. To set the priority input, follow the directions below. 1 ) Access Input Priority through the Option menu. 2 ) Select Auto from the submenu. 3 ) Select the desired input. Detecting another signal at a different input causes the selected input to automatically change to the new input. After input changes, the previous input is not restored even when the signal disappears at the input. 4 ) Press HOME MENU to exit the menu. 32 En
-
 1
1 -
2
-
3
-
4
-
5
-
6
-
7
-
8
-
9
-
10
-
11
-
12
-
13
-
14
-
15
-
16
-
17
-
18
-
19
-
20
-
21
-
22
-
23
-
24
-
25
-
26
-
 27
27 -
 28
28 -
 29
29 -
 30
30 -
 31
31 -
 32
32 -
 33
33 -
 34
34 -
 35
35 -
 36
36 -
 37
37 -
38
-
39
-
40
-
41
-
42
-
43
-
44
-
45
-
46
-
47
-
48
-
49
-
50
-
51
-
52
-
53
-
54
-
55
-
56
-
57
-
58
-
59
-
60
-
61
-
62
-
63
-
64
-
65
-
66
-
67
-
68
-
69
-
70
-
71
-
72
-
73
-
74
-
75
-
76
-
77
-
78
-
79
-
80
-
81
-
82
-
83
-
84
-
85
-
86
-
87
-
88
-
89
-
90
-
91
-
92
-
93
-
94
-
95
-
96
-
97
-
98
-
99
-
100
-
101
-
102
-
103
-
104
-
105
-
106
-
107
-
108
-
109
-
110
-
111
-
112
-
113
-
114
-
115
-
116
-
117
-
118
-
119
-
120
-
121
-
122
-
123
-
124
-
125
-
126
-
127
-
128
-
129
-
130
-
131
-
132
-
133
-
134
-
135
-
136
-
137
-
138
-
139
-
140
-
141
-
142
-
143
-
144
-
145
-
146
-
147
-
148
-
149
-
150
-
151
-
152
-
153
-
154
-
155
-
156
-
157
-
158
-
159
-
160
-
161
-
162
-
163
-
164
-
165
-
166
-
167
-
168
-
169
-
170
-
171
-
172
-
173
-
174
-
175
-
176
-
177
-
178
-
179
-
180
-
181
-
182
-
183
-
184
-
185
-
186
-
187
-
188
-
189
-
190
-
191
-
192
-
193
-
194
-
195
-
196
-
197
-
198
-
199
-
200
-
201
-
202
-
203
-
204
-
205
-
206
-
207
-
208
-
209
-
210
-
211
-
212
-
213
-
214
-
215
-
216
-
217
-
218
-
219
-
220
-
221
-
222
-
223
-
224
-
225
-
226
-
227
-
228
-
229
-
230
-
231
-
232
-
233
-
234
-
235
-
236
-
237
-
238
-
239
-
240
-
241
-
242
-
243
-
244
-
245
-
246
-
247
-
248
-
249
-
250
-
251
-
252
-
253
-
254
-
255
-
256
-
257
-
258
-
259
-
260
-
261
-
262
-
263
-
264
-
265
-
266
-
267
-
268
-
269
-
270
-
271
-
272
-
273
-
274
-
275
-
276
-
277
-
278
-
279
-
280
-
281
-
282
-
283
-
284
-
285
-
286
-
287
-
288
-
289
-
290
-
291
-
292
-
293
-
294
-
295
-
296
-
297
-
298
-
299
-
300
-
301
-
302
-
303
-
304
-
305
-
306
-
307
-
308
-
309
-
310
-
311
-
312
-
313
-
314
-
315
-
316
-
317
-
318
-
319
-
320
-
321
-
322
-
323
-
324
-
325
-
326
 |
 |
