Pioneer KRP-600M Owner's Manual - Page 4

Correct the Picture for an AV or PC Source - settings

Page 4 highlights

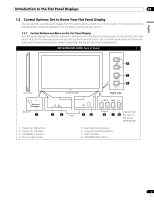
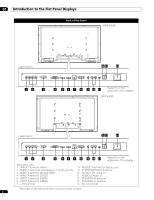
TABLE OF CONTENTS 5.1.3 Choose a PC Source...36 5.1.4 Set the Panel to Recognize a Game Console ...36 5.2 Adjust Specific Picture Elements ...37 5.2.1 Choose a Screen Size (Automatically or Manually 37 5.2.2 Correct the Picture for an AV or PC Source ...39 5.3 Assign Advanced Picture Functions ...40 5.3.1 Adjust for Screen Masking (black bars on sides 40 5.3.2 Select a Color Temperature Level...41 5.3.3 Adjust the Image Gradation Characteristics (Gamma 42 5.3.4 Select a PureCinema Level for High Quality Image 42 5.3.5 Select an Intelligent Mode Option...43 5.3.6 Select the Picture Detail Options...44 5.3.7 Use CTI and Color Space ...44 5.3.8 Use the Color Management...45 5.3.9 Reduce Noise from the Image...45 5.3.10 Adjust Color Signals...46 5.4 View in Multi-Screen ...47 5.4.1 Split / Swap / Shift the Screen...47 5.4.2 Turn the Small Screen On/Off ...48 5.5 Freeze the Picture ...48 5.6 Manage the Power ...49 6 Use Other Equipment With Your Flat Panel Display 50 6.1 Program the Remote Control to Operate Other Equipment 50 6.1.1 Use the Learning Function ...50 6.1.2 Assign a Manufacturing Code to the Remote Control 51 6.1.3 Issue a Library Search for a Manufacturer Code 51 6.1.4 Clear Added Manufacturer Codes from the Remote Control 52 6.1.5 Control a Pioneer Receiver ...52 6.1.6 Control a Cable (CBL) or Satellite (SAT) System 53 6.1.7 Control a Video Cassette Recorder (VCR) ...54 6.1.8 Control a DVD Player/DVR Recorder/BD Player 55 6.2 Apply Settings for Other Equipment...56 6.2.1 Apply Settings for an AV System...56 6.2.2 Apply Settings for a PC ...57 6.3 Use HDMI Inputs...58 6.3.1 Enter an HDMI Input Name...58 6.3.2 Specify the HDMI Input Type ...59 6.3.3 Specify a Digital HDMI Signal Type ...59 6.4 Control Equipment with the Panel's Remote Through HDMI 60 6.4.1 Control an AV System...62 6.4.2 Control a Recorder ...63 6.4.3 Control a Player...63 6.4.4 Add an AV Amp or a BD Player...64 6.5 Specific KURO LINK Commands ...65 6.5.1 Play Source Sound Using an HDMI Command 65 6.5.2 Turn OFF the Power With an HDMI Command 65 6.5.3 Turn ON the Power With an HDMI Command...65 6.5.4 Test the Power Control (On/Off) ...66 6.6 Connect a Game Console or Camcorder ...66 6.7 Use the IR REPEATER OUT ...66 6.8 Connect to a Network ...67 6.8.1 IP Control Setting ...68 6.8.2 Use the Web Control System...69 6.9 Assign a Serial Number...73 6.9.1 Assign an ID Number...73 6.9.2 Assign a Baud Rate...74 6.10 Select the Integrator Mode...74 4 En

  • 1
  • 2
  • 3
  • 4
  • 5
  • 6
  • 7
  • 8
  • 9
  • 10
  • 11
  • 12
  • 13
  • 14
  • 15
  • 16
  • 17
  • 18
  • 19
  • 20
  • 21
  • 22
  • 23
  • 24
  • 25
  • 26
  • 27
  • 28
  • 29
  • 30
  • 31
  • 32
  • 33
  • 34
  • 35
  • 36
  • 37
  • 38
  • 39
  • 40
  • 41
  • 42
  • 43
  • 44
  • 45
  • 46
  • 47
  • 48
  • 49
  • 50
  • 51
  • 52
  • 53
  • 54
  • 55
  • 56
  • 57
  • 58
  • 59
  • 60
  • 61
  • 62
  • 63
  • 64
  • 65
  • 66
  • 67
  • 68
  • 69
  • 70
  • 71
  • 72
  • 73
  • 74
  • 75
  • 76
  • 77
  • 78
  • 79
  • 80
  • 81
  • 82
  • 83
  • 84
  • 85
  • 86
  • 87
  • 88
  • 89
  • 90
  • 91
  • 92
  • 93
  • 94
  • 95
  • 96
  • 97
  • 98
  • 99
  • 100
  • 101
  • 102
  • 103
  • 104
  • 105
  • 106
  • 107
  • 108
  • 109
  • 110
  • 111
  • 112
  • 113
  • 114
  • 115
  • 116
  • 117
  • 118
  • 119
  • 120
  • 121
  • 122
  • 123
  • 124
  • 125
  • 126
  • 127
  • 128
  • 129
  • 130
  • 131
  • 132
  • 133
  • 134
  • 135
  • 136
  • 137
  • 138
  • 139
  • 140
  • 141
  • 142
  • 143
  • 144
  • 145
  • 146
  • 147
  • 148
  • 149
  • 150
  • 151
  • 152
  • 153
  • 154
  • 155
  • 156
  • 157
  • 158
  • 159
  • 160
  • 161
  • 162
  • 163
  • 164
  • 165
  • 166
  • 167
  • 168
  • 169
  • 170
  • 171
  • 172
  • 173
  • 174
  • 175
  • 176
  • 177
  • 178
  • 179
  • 180
  • 181
  • 182
  • 183
  • 184
  • 185
  • 186
  • 187
  • 188
  • 189
  • 190
  • 191
  • 192
  • 193
  • 194
  • 195
  • 196
  • 197
  • 198
  • 199
  • 200
  • 201
  • 202
  • 203
  • 204
  • 205
  • 206
  • 207
  • 208
  • 209
  • 210
  • 211
  • 212
  • 213
  • 214
  • 215
  • 216
  • 217
  • 218
  • 219
  • 220
  • 221
  • 222
  • 223
  • 224
  • 225
  • 226
  • 227
  • 228
  • 229
  • 230
  • 231
  • 232
  • 233
  • 234
  • 235
  • 236
  • 237
  • 238
  • 239
  • 240
  • 241
  • 242
  • 243
  • 244
  • 245
  • 246
  • 247
  • 248
  • 249
  • 250
  • 251
  • 252
  • 253
  • 254
  • 255
  • 256
  • 257
  • 258
  • 259
  • 260
  • 261
  • 262
  • 263
  • 264
  • 265
  • 266
  • 267
  • 268
  • 269
  • 270
  • 271
  • 272
  • 273
  • 274
  • 275
  • 276
  • 277
  • 278
  • 279
  • 280
  • 281
  • 282
  • 283
  • 284
  • 285
  • 286
  • 287
  • 288
  • 289
  • 290
  • 291
  • 292
  • 293
  • 294
  • 295
  • 296
  • 297
  • 298
  • 299
  • 300
  • 301
  • 302
  • 303
  • 304
  • 305
  • 306
  • 307
  • 308
  • 309
  • 310
  • 311
  • 312
  • 313
  • 314
  • 315
  • 316
  • 317
  • 318
  • 319
  • 320
  • 321
  • 322
  • 323
  • 324
  • 325
  • 326

4
En
TABLE OF CONTENTS
5.1.3
Choose a PC Source
...............................................................................................................................................
36
5.1.4
Set the Panel to Recognize a Game Console
.......................................................................................................
36
5.2
Adjust Specific Picture Elements
..................................................................................................................................
37
5.2.1
Choose a Screen Size (Automatically or Manually)
.............................................................................................
37
5.2.2
Correct the Picture for an AV or PC Source
.........................................................................................................
39
5.3
Assign Advanced Picture Functions
.............................................................................................................................
40
5.3.1
Adjust for Screen Masking (black bars on sides)
................................................................................................
40
5.3.2
Select a Color Temperature Level
..........................................................................................................................
41
5.3.3
Adjust the Image Gradation Characteristics (Gamma)
.......................................................................................
42
5.3.4
Select a PureCinema Level for High Quality Image
.............................................................................................
42
5.3.5
Select an Intelligent Mode Option
.........................................................................................................................
43
5.3.6
Select the Picture Detail Options
..........................................................................................................................
44
5.3.7
Use CTI and Color Space
.......................................................................................................................................
44
5.3.8
Use the Color Management
...................................................................................................................................
45
5.3.9
Reduce Noise from the Image
...............................................................................................................................
45
5.3.10
Adjust Color Signals
.............................................................................................................................................
46
5.4
View in Multi-Screen
.......................................................................................................................................................
47
5.4.1
Split / Swap / Shift the Screen
...............................................................................................................................
47
5.4.2
Turn the Small Screen On/Off
...............................................................................................................................
48
5.5
Freeze the Picture
...........................................................................................................................................................
48
5.6
Manage the Power
..........................................................................................................................................................
49
6
Use Other Equipment With Your Flat Panel Display
...........................................................................
50
6.1
Program the Remote Control to Operate Other Equipment
........................................................................................
50
6.1.1
Use the Learning Function
....................................................................................................................................
50
6.1.2
Assign a Manufacturing Code to the Remote Control
........................................................................................
51
6.1.3
Issue a Library Search for a Manufacturer Code
.................................................................................................
51
6.1.4
Clear Added Manufacturer Codes from the Remote Control
.............................................................................
52
6.1.5
Control a Pioneer Receiver
....................................................................................................................................
52
6.1.6
Control a Cable (CBL) or Satellite (SAT) System
..................................................................................................
53
6.1.7
Control a Video Cassette Recorder (VCR)
............................................................................................................
54
6.1.8
Control a DVD Player/DVR Recorder/BD Player
..................................................................................................
55
6.2
Apply Settings for Other Equipment
..............................................................................................................................
56
6.2.1
Apply Settings for an AV System
...........................................................................................................................
56
6.2.2
Apply Settings for a PC
..........................................................................................................................................
57
6.3
Use HDMI Inputs
.............................................................................................................................................................
58
6.3.1
Enter an HDMI Input Name
...................................................................................................................................
58
6.3.2
Specify the HDMI Input Type
.................................................................................................................................
59
6.3.3
Specify a Digital HDMI Signal Type
......................................................................................................................
59
6.4
Control Equipment with the Panel’s Remote Through HDMI
.....................................................................................
60
6.4.1
Control an AV System
.............................................................................................................................................
62
6.4.2
Control a Recorder
.................................................................................................................................................
63
6.4.3
Control a Player
.......................................................................................................................................................
63
6.4.4
Add an AV Amp or a BD Player
.............................................................................................................................
64
6.5
Specific KURO LINK Commands
..................................................................................................................................
65
6.5.1
Play Source Sound Using an HDMI Command
...................................................................................................
65
6.5.2
Turn OFF the Power With an HDMI Command
...................................................................................................
65
6.5.3
Turn ON the Power With an HDMI Command
.....................................................................................................
65
6.5.4
Test the Power Control (On/Off)
............................................................................................................................
66
6.6
Connect a Game Console or Camcorder
......................................................................................................................
66
6.7
Use the IR REPEATER OUT
............................................................................................................................................
66
6.8
Connect to a Network
.....................................................................................................................................................
67
6.8.1
IP Control Setting
...................................................................................................................................................
68
6.8.2
Use the Web Control System
.................................................................................................................................
69
6.9
Assign a Serial Number
..................................................................................................................................................
73
6.9.1
Assign an ID Number
.............................................................................................................................................
73
6.9.2
Assign a Baud Rate
................................................................................................................................................
74
6.10
Select the Integrator Mode
...........................................................................................................................................
74