Pioneer KRP-600M Owner's Manual - Page 75
Display, Home Menu
 |
UPC - 012562899503
View all Pioneer KRP-600M manuals
Add to My Manuals
Save this manual to your list of manuals |
Page 75 highlights
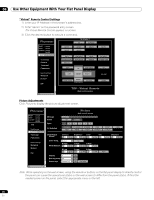
Use Other Equipment With Your Flat Panel Display 06 3 ) Press and hold DISPLAY for at least three seconds while the screen in Step 2 remains visible. Only input signals appear. INPUT2 English 4 ) Press HOME MENU while the screen in Step 3 remains visible but do not hold the button down. The panel switches to Integrator Mode. INTEGRATOR MENU Picture Picture Preset Studio Mode : Monotone Mode : Drive Mode : FRC Mode : Option Fan Control : OSD Display : Power On Mode Input : Power On Mode (Input) Volume : Power On Mode (Volume) Mirror Mode : Banner PIP Translucent : Banner PIP : Max Volume : IP Control Look : Network ID Beacon : Factory Default Off Off 1 Default Auto On Last Last Off Off Off 60 Off Off Exit Note: Pressing and holding or pressing HOME MENU too long causes the panel to remain in User Mode. 6.10.1 Explore the Integrator Mode Menus Picture Preset Use this option to preset the Picture adjustment values for the Home Menu. Studio Mode In addition to normal adjustment values, the panel also provides a separate professional adjustment mode optimum for retake at a TV studio (Studio). Parameter Description On switches to the Studio Mode Off* No effect *Factory default Notes: This setting applies to each input source. Entering Monotone Mode, AV Selection or Blue Only Mode is unavailable while in Studio Mode. 75 En
-
 1
1 -
2
-
3
-
4
-
5
-
6
-
7
-
8
-
9
-
10
-
11
-
12
-
13
-
14
-
15
-
16
-
17
-
18
-
19
-
20
-
21
-
22
-
23
-
24
-
25
-
26
-
27
-
28
-
29
-
30
-
31
-
32
-
33
-
34
-
35
-
36
-
37
-
38
-
39
-
40
-
41
-
42
-
43
-
44
-
45
-
46
-
47
-
48
-
49
-
50
-
51
-
52
-
53
-
54
-
55
-
56
-
57
-
58
-
59
-
60
-
61
-
62
-
63
-
64
-
65
-
66
-
67
-
68
-
69
-
 70
70 -
 71
71 -
 72
72 -
 73
73 -
 74
74 -
 75
75 -
 76
76 -
 77
77 -
 78
78 -
 79
79 -
 80
80 -
81
-
82
-
83
-
84
-
85
-
86
-
87
-
88
-
89
-
90
-
91
-
92
-
93
-
94
-
95
-
96
-
97
-
98
-
99
-
100
-
101
-
102
-
103
-
104
-
105
-
106
-
107
-
108
-
109
-
110
-
111
-
112
-
113
-
114
-
115
-
116
-
117
-
118
-
119
-
120
-
121
-
122
-
123
-
124
-
125
-
126
-
127
-
128
-
129
-
130
-
131
-
132
-
133
-
134
-
135
-
136
-
137
-
138
-
139
-
140
-
141
-
142
-
143
-
144
-
145
-
146
-
147
-
148
-
149
-
150
-
151
-
152
-
153
-
154
-
155
-
156
-
157
-
158
-
159
-
160
-
161
-
162
-
163
-
164
-
165
-
166
-
167
-
168
-
169
-
170
-
171
-
172
-
173
-
174
-
175
-
176
-
177
-
178
-
179
-
180
-
181
-
182
-
183
-
184
-
185
-
186
-
187
-
188
-
189
-
190
-
191
-
192
-
193
-
194
-
195
-
196
-
197
-
198
-
199
-
200
-
201
-
202
-
203
-
204
-
205
-
206
-
207
-
208
-
209
-
210
-
211
-
212
-
213
-
214
-
215
-
216
-
217
-
218
-
219
-
220
-
221
-
222
-
223
-
224
-
225
-
226
-
227
-
228
-
229
-
230
-
231
-
232
-
233
-
234
-
235
-
236
-
237
-
238
-
239
-
240
-
241
-
242
-
243
-
244
-
245
-
246
-
247
-
248
-
249
-
250
-
251
-
252
-
253
-
254
-
255
-
256
-
257
-
258
-
259
-
260
-
261
-
262
-
263
-
264
-
265
-
266
-
267
-
268
-
269
-
270
-
271
-
272
-
273
-
274
-
275
-
276
-
277
-
278
-
279
-
280
-
281
-
282
-
283
-
284
-
285
-
286
-
287
-
288
-
289
-
290
-
291
-
292
-
293
-
294
-
295
-
296
-
297
-
298
-
299
-
300
-
301
-
302
-
303
-
304
-
305
-
306
-
307
-
308
-
309
-
310
-
311
-
312
-
313
-
314
-
315
-
316
-
317
-
318
-
319
-
320
-
321
-
322
-
323
-
324
-
325
-
326
 |
 |
