Pioneer PDV-LC10 Owner's Manual - Page 21
Main unit front panel
 |
View all Pioneer PDV-LC10 manuals
Add to My Manuals
Save this manual to your list of manuals |
Page 21 highlights
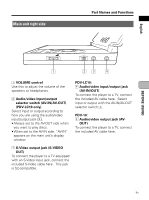
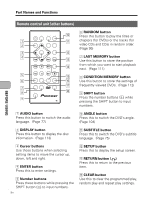
English Main unit front panel Part Names and Functions COLOR BRIGHT MONITOR BEFORE USING PHONES DIGITAL OUT (OPTICAL) ON/OFF HOLD 1 2 3 45 1 Lid 2 PHONES/DIGITAL OUT (OPTICAL) jack To connect stereo headphones or an amplifier, connect a stereo minijack or optical digital cable here. 3 Remote sensor The remote control signals are received here. 4 Power ON/OFF/HOLD switch Slide the power switch to the ON/OFF side and hold it there for at least 1 second to turn the player's power on and off. The hold (accidental operation prevention) function is turned on when the switch is slid to the HOLD side. Hold function The hold function disables the control buttons, so the currently playing picture or sound is not interrupted even if a control button is pressed accidentally during playback. "HOLD" appears on the main unit's display window if a control button is pressed while the hold function is on. Only the power button on the remote control unit functions when the hold function is on. 5 Power indicator Off: The power is off. Turn on the power using the main unit's power switch. Red: The power is set to the standby mode. Turn on the power using the power switch on the main unit or the power button on the remote control unit. Green: The power is on. 21 En
-
 1
1 -
2
-
3
-
4
-
5
-
6
-
7
-
8
-
9
-
10
-
11
-
12
-
13
-
14
-
15
-
 16
16 -
 17
17 -
 18
18 -
 19
19 -
 20
20 -
 21
21 -
 22
22 -
 23
23 -
 24
24 -
 25
25 -
 26
26 -
27
-
28
-
29
-
30
-
31
-
32
-
33
-
34
-
35
-
36
-
37
-
38
-
39
-
40
-
41
-
42
-
43
-
44
-
45
-
46
-
47
-
48
-
49
-
50
-
51
-
52
-
53
-
54
-
55
-
56
-
57
-
58
-
59
-
60
-
61
-
62
-
63
-
64
-
65
-
66
-
67
-
68
-
69
-
70
-
71
-
72
-
73
-
74
-
75
-
76
-
77
-
78
-
79
-
80
-
81
-
82
-
83
-
84
-
85
-
86
-
87
-
88
-
89
-
90
-
91
-
92
-
93
-
94
-
95
-
96
-
97
-
98
-
99
-
100
-
101
-
102
-
103
-
104
-
105
-
106
-
107
-
108
-
109
-
110
-
111
-
112
-
113
-
114
-
115
-
116
-
117
-
118
-
119
-
120
-
121
-
122
-
123
-
124
-
125
-
126
-
127
-
128
 |
 |
