Pioneer PDV-LC10 Owner's Manual - Page 25
Remote control unit frequently used buttons
 |
View all Pioneer PDV-LC10 manuals
Add to My Manuals
Save this manual to your list of manuals |
Page 25 highlights
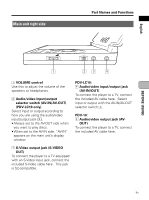
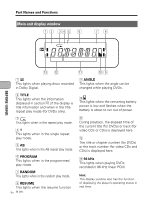
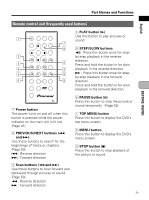
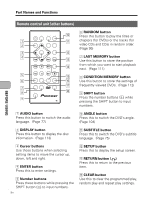
Part Names and Functions English BEFORE USING Remote control unit (frequently used buttons) 1 2 3 4 5 6 AUDIO SUBTITLE ANGLE DISPLAY MENU TOP MENU ENTER SETUP PREV 4 NEXT RETURN ¢ REV PLAY FWD CLEAR 1 3 ¡C 1 2 3 STEP/SLOW PAUSE STEP/SLOW STOP e 8 E7 4 5 6 +10 RANDOM REPEAT PROGRAM A-B 7 8 9 0 LAST MEM. COND. MEM. SEARCH MODE SHIFT 7 8 2 3 9 5 Î 1 Power button The power turns on and off when this button is pressed while the power indicator on the main unit is lit red. (Page 41) 2 PREVIOUS/NEXT buttons (4 and ¢) Use these buttons to search for the beginnings of tracks or chapters. (Page 53) 4 : Reverse direction ¢ : Forward direction 3 Scan buttons (1 and ¡) Use these buttons to scan forward and backward through pictures or sound. (Page 53) 1 : Reverse direction ¡ : Forward direction 4 PLAY button (3) Use this button to play pictures or sound. 5 STEP/SLOW buttons e : Press this button once for stepby-step playback in the reverse direction. Press and hold the button in for slow playback in the reverse direction. E : Press this button once for stepby-step playback in the forward direction. Press and hold the button in for slow playback in the forward direction. 6 PAUSE button (8) Press this button to stop the picture or sound temporarily. (Page 52) 7 TOP MENU button Press this button to display the DVD's top menu screen. 8 MENU button Press this button to display the DVD's menu screen. 9 STOP button (7) Press this button to stop playback of the picture or sound. 25 En
-
 1
1 -
2
-
3
-
4
-
5
-
6
-
7
-
8
-
9
-
10
-
11
-
12
-
13
-
14
-
15
-
16
-
17
-
18
-
19
-
 20
20 -
 21
21 -
 22
22 -
 23
23 -
 24
24 -
 25
25 -
 26
26 -
 27
27 -
 28
28 -
 29
29 -
 30
30 -
31
-
32
-
33
-
34
-
35
-
36
-
37
-
38
-
39
-
40
-
41
-
42
-
43
-
44
-
45
-
46
-
47
-
48
-
49
-
50
-
51
-
52
-
53
-
54
-
55
-
56
-
57
-
58
-
59
-
60
-
61
-
62
-
63
-
64
-
65
-
66
-
67
-
68
-
69
-
70
-
71
-
72
-
73
-
74
-
75
-
76
-
77
-
78
-
79
-
80
-
81
-
82
-
83
-
84
-
85
-
86
-
87
-
88
-
89
-
90
-
91
-
92
-
93
-
94
-
95
-
96
-
97
-
98
-
99
-
100
-
101
-
102
-
103
-
104
-
105
-
106
-
107
-
108
-
109
-
110
-
111
-
112
-
113
-
114
-
115
-
116
-
117
-
118
-
119
-
120
-
121
-
122
-
123
-
124
-
125
-
126
-
127
-
128
 |
 |
