Pioneer PRO-810HD Owner's Manual - Page 22
Audio connections
 |
View all Pioneer PRO-810HD manuals
Add to My Manuals
Save this manual to your list of manuals |
Page 22 highlights
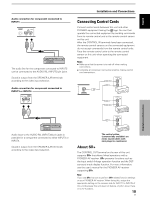
English Installation and Connections Audio connections Before making connections, be sure to check that the audio component's power and the unit's main power is off. Connecting the speakers This unit is equipped with a 7W + 7W internal amplifier. If speakers are to be connected to the unit, following the accompanying connection instructions. 12 mm Twist exposed wire strands together. Push tab to the open position, and insert the wire. Then, close tab firmly to secure the wire in place. Notes ÷ After connecting the wires, pull gently on the cables to confirm that the wire cores are fastened securely in their terminals. Insecure connections will result in noise or interrupted sound. ÷ Do not allow the wire cores of the ª and · speaker cables to protrude excessively, since they may touch each other, causing a short circuit. This will produce excessive load on the plasma display, causing operation to malfunction or stop. Making connections to the audio inputs on this unit This unit features four audio inputs. The following chart shows the video inputs and the corresponding audio input terminals. Video input INPUT1 INPUT2 INPUT3 INPUT4 INPUT5 Audio input jacks Pin jacks (L/R)*1 Pin jacks (L/R) Pin jacks (L/R)*2 Pin jacks (L/R)*2 Pin jacks (L/R) Sound output Sound of the selected video input is output from the SPEAKER (L/R) terminals. *1 The audio input jack is the same for INPUT1 D-sub and HDMI. *2 The audio input jack is the same for INPUT3 and INPUT4. Audio connection for component connected to INPUT1 (D-sub or HDMI) IINNPPUUTT11 AUDIO R L The audio line for the component connected to D-sub or HDMI INPUTs of INPUT1 can be connected to the AUDIO R/L (INPUT1) pin jacks. Sound is output from the SPEAKER (L/R) terminals according to the video input selection. Note When using HDMI analog audio, set AUDIO to ANALOG (or AUTO) (Please see page 27). Audio connection for component connected to INPUT2 AUDIO INPUT2 R L The audio line for the component connected to INPUT2 can be connected to the AUDIO R/L (INPUT2) pin jacks. Sound is output from the SPEAKER (L/R) terminals according to the video input selection. Note When using AUDIO INPUT2, set the AUDIO to ANALOG (or AUTO) (Please see page 27). Installation and Connections 18 EN
-
 1
1 -
2
-
3
-
4
-
5
-
6
-
7
-
8
-
9
-
10
-
11
-
12
-
13
-
14
-
15
-
16
-
 17
17 -
 18
18 -
 19
19 -
 20
20 -
 21
21 -
 22
22 -
 23
23 -
 24
24 -
 25
25 -
 26
26 -
 27
27 -
28
-
29
-
30
-
31
-
32
-
33
-
34
-
35
-
36
-
37
-
38
-
39
-
40
-
41
-
42
-
43
-
44
-
45
-
46
-
47
-
48
-
49
-
50
-
51
-
52
-
53
-
54
-
55
-
56
-
57
-
58
-
59
-
60
-
61
-
62
-
63
-
64
-
65
-
66
-
67
-
68
-
69
-
70
-
71
-
72
-
73
-
74
-
75
-
76
-
77
-
78
-
79
-
80
-
81
-
82
-
83
-
84
-
85
-
86
-
87
-
88
-
89
-
90
-
91
-
92
-
93
-
94
-
95
-
96
-
97
-
98
-
99
-
100
-
101
-
102
-
103
-
104
-
105
-
106
-
107
-
108
-
109
-
110
-
111
-
112
-
113
-
114
-
115
-
116
-
117
-
118
-
119
-
120
-
121
-
122
-
123
-
124
-
125
-
126
-
127
-
128
-
129
-
130
-
131
-
132
-
133
-
134
-
135
-
136
-
137
-
138
-
139
-
140
-
141
-
142
-
143
-
144
-
145
-
146
-
147
-
148
-
149
-
150
-
151
-
152
-
153
-
154
-
155
-
156
-
157
-
158
-
159
-
160
-
161
-
162
-
163
-
164
-
165
-
166
-
167
-
168
-
169
-
170
-
171
-
172
-
173
-
174
 |
 |
