Pioneer VSX-1122-K Owner's Manual - Page 21
Selecting the Speaker system, About the audio connection - zone 2 setup
 |
View all Pioneer VSX-1122-K manuals
Add to My Manuals
Save this manual to your list of manuals |
Page 21 highlights
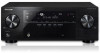
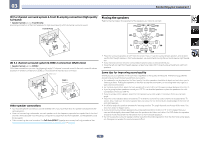
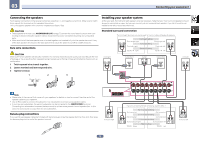
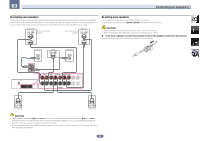
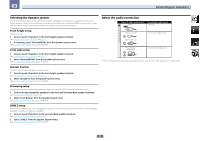
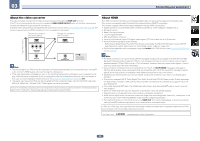
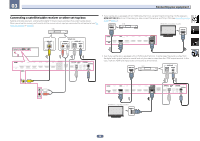
03 Connecting your equipment Selecting the Speaker system The front height terminals can be used for front wide and Speaker B connections, in addition to for the front height speakers. Also, the surround back terminals can be used for bi-amping and ZONE 2 connections, in addition to for the surround back speakers. Make this setting according to the application. Front height setup *Default setting 1 Connect a pair of speakers to the front height speaker terminals. See Standard surround connection on page 19. 2 If necessary, select 'Normal(SB/FH)' from the Speaker System menu. See Speaker system setting on page 80 to do this. Front wide setup 1 Connect a pair of speakers to the front height speaker terminals. See Standard surround connection on page 19. 2 Select 'Normal(SB/FW)' from the Speaker System menu. See Speaker system setting on page 80 to do this. Speaker B setup You can listen to stereo playback in another room. 1 Connect a pair of speakers to the front height speaker terminals. See Standard surround connection on page 19. 2 Select 'Speaker B' from the Speaker System menu. See Speaker system setting on page 80 to do this. Bi-Amping setup Bi-amping connection of the front speakers for high sound quality with 5.1-channel surround sound. 1 Connect bi-amp compatible speakers to the front and surround back speaker terminals. See Bi-amping your speakers on page 20. 2 Select 'Front Bi-Amp' from the Speaker System menu. See Speaker system setting on page 80 to do this. ZONE 2 setup With these connections you can simultaneously enjoy 5.1-channel surround sound in the main zone with stereo playback on another component in ZONE 2. 1 Connect a pair of speakers to the surround back speaker terminals. See Standard surround connection on page 19. 2 Select 'ZONE 2' from the Speaker System menu. See Speaker system setting on page 80 to do this. About the audio connection Types of cables and terminals HDMI Transferable audio signals HD audio Sound signal priority Digital (Coaxial) Digital (Optical) Conventional digital audio RCA (Analog) (White/Red) Conventional analog audio ! With an HDMI cable, video and audio signals can be transferred in high quality over a single cable. 21
-
 1
1 -
2
-
3
-
4
-
5
-
6
-
7
-
8
-
9
-
10
-
11
-
12
-
13
-
14
-
15
-
 16
16 -
 17
17 -
 18
18 -
 19
19 -
 20
20 -
 21
21 -
 22
22 -
 23
23 -
 24
24 -
 25
25 -
 26
26 -
27
-
28
-
29
-
30
-
31
-
32
-
33
-
34
-
35
-
36
-
37
-
38
-
39
-
40
-
41
-
42
-
43
-
44
-
45
-
46
-
47
-
48
-
49
-
50
-
51
-
52
-
53
-
54
-
55
-
56
-
57
-
58
-
59
-
60
-
61
-
62
-
63
-
64
-
65
-
66
-
67
-
68
-
69
-
70
-
71
-
72
-
73
-
74
-
75
-
76
-
77
-
78
-
79
-
80
-
81
-
82
-
83
-
84
-
85
-
86
-
87
-
88
-
89
-
90
-
91
-
92
-
93
-
94
-
95
-
96
-
97
-
98
-
99
-
100
-
101
-
102
-
103
-
104
-
105
-
106
-
107
 |
 |