Pioneer VSX-518-K Owner's Manual - Page 13
Connect the COMPONENT VIDEO - manual
 |
UPC - 012562884684
View all Pioneer VSX-518-K manuals
Add to My Manuals
Save this manual to your list of manuals |
Page 13 highlights
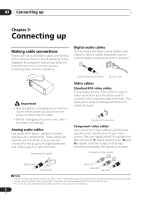
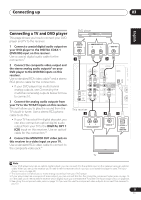
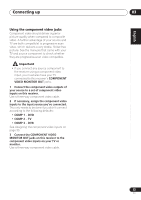
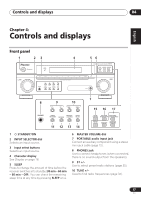
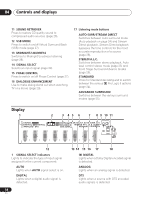
Connecting up 03 English Deutsch Français Italiano Nederlands Español Using the component video jacks Component video should deliver superior picture quality when compared to composite video. A further advantage (if your source and TV are both compatible) is progressive-scan video, which delivers a very stable, flicker-free picture. See the manuals that came with your TV and source component to check whether they are progressive-scan video compatible. Important • If you connect any source component to the receiver using a component video input, you must also have your TV connected to this receiver's COMPONENT VIDEO MONITOR OUT jacks. 1 Connect the component video outputs of your source to a set of component video inputs on this receiver. Use a three-way component video cable. 2 If necessary, assign the component video inputs to the input source you've connected. This only needs to be done if you didn't connect according to the following defaults: • COMP 1 - DVD • COMP 2 - TV • COMP 3 - DVR See Assigning the component video inputs on page 33. 3 Connect the COMPONENT VIDEO MONITOR OUT jacks on this receiver to the component video inputs on your TV or monitor. Use a three-way component video cable. 13 En
-
 1
1 -
2
-
3
-
4
-
5
-
6
-
7
-
 8
8 -
 9
9 -
 10
10 -
 11
11 -
 12
12 -
 13
13 -
 14
14 -
 15
15 -
 16
16 -
 17
17 -
 18
18 -
19
-
20
-
21
-
22
-
23
-
24
-
25
-
26
-
27
-
28
-
29
-
30
-
31
-
32
-
33
-
34
-
35
-
36
-
37
-
38
-
39
-
40
-
41
-
42
-
43
-
44
-
45
-
46
-
47
-
48
-
49
-
50
-
51
-
52
-
53
-
54
-
55
-
56
-
57
-
58
-
59
-
60
-
61
-
62
-
63
-
64
-
65
-
66
-
67
-
68
-
69
-
70
-
71
-
72
-
73
-
74
-
75
-
76
-
77
-
78
-
79
-
80
-
81
-
82
-
83
 |
 |