Pioneer VSX-518-K Owner's Manual - Page 33
The System Setup menu, The Input Assign menu - remote
 |
UPC - 012562884684
View all Pioneer VSX-518-K manuals
Add to My Manuals
Save this manual to your list of manuals |
Page 33 highlights
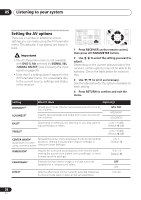
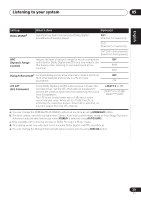
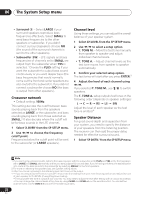
The System Setup menu 06 English Deutsch Français Italiano Nederlands Español 2 Use / to choose the speaker that you want then set the distance. Use / to adjust the distance of each speaker (in 0.5 ft. (15 cm) increments). The Input Assign menu You only need to make settings in the Input Assign menu if you didn't hook up your digital equipment according to the default settings for the digital inputs, or if you have connected equipment using component video cables. 1 Select 'IN ASSIG.' from the System Setup menu. 2 Use / to select the setting you want to adjust then press ENTER. • DIG. IN - See Assigning the digital inputs below. • COMP. IN - See Assigning the component video inputs below. 3 Press RETURN after making the adjustments necessary for each setting. Assigning the digital inputs • Default settings: COAX 1 (coaxial) - DVD COAX 2 (coaxial) - DVR OPT 1 (optical) - CD You only need to do this if you didn't connect your digital components according to the defaults above. This tells the receiver what component is connected to which terminal so it corresponds to the buttons on the remote. 1 Select 'DIG. IN' from the IN ASSIG. menu. 2 Use / to select the number of the digital input to which you've connected your digital component. The numbers correspond with the numbers beside the inputs on the rear of the receiver. 3 Select the component that corresponds with the one you connected to that input. • Use the / buttons and ENTER to select DVD, TV, CD, CDR, DVR or OFF. • If you assign a digital input to a certain function (for example, DVD) then any digital inputs previously assigned to that function will automatically be switched off. Assigning the component video inputs • Default settings: COMP 1 - DVD COMP 2 - TV COMP 3 - DVR If you didn't make component video connections according to the defaults above, you must assign the numbered input to the component you've connected (or else you may see the video signal of a different component). For more on this, see Using the component video jacks on page 13. 1 Select 'COMP. IN' from the IN ASSIG. menu. 2 Use / to select the number of the component video input to which you've connected your video component. The numbers match the numbers beside the inputs on the rear of the receiver. 3 Select the component that corresponds with the one you connected to that input. • Use the / buttons and ENTER to select DVD, TV, DVR or OFF. • If you assign a component input to a certain function, any component inputs previously assigned to that function will automatically be switched off. • Make sure you have connected the audio from the component to the corresponding inputs on the rear of the receiver. • If you connect any source component to the receiver using a component video input, you should also have your TV connected to this receiver's COMPONENT VIDEO MONITOR OUT jacks. 33 En
-
 1
1 -
2
-
3
-
4
-
5
-
6
-
7
-
8
-
9
-
10
-
11
-
12
-
13
-
14
-
15
-
16
-
17
-
18
-
19
-
20
-
21
-
22
-
23
-
24
-
25
-
26
-
27
-
 28
28 -
 29
29 -
 30
30 -
 31
31 -
 32
32 -
 33
33 -
 34
34 -
 35
35 -
 36
36 -
 37
37 -
 38
38 -
39
-
40
-
41
-
42
-
43
-
44
-
45
-
46
-
47
-
48
-
49
-
50
-
51
-
52
-
53
-
54
-
55
-
56
-
57
-
58
-
59
-
60
-
61
-
62
-
63
-
64
-
65
-
66
-
67
-
68
-
69
-
70
-
71
-
72
-
73
-
74
-
75
-
76
-
77
-
78
-
79
-
80
-
81
-
82
-
83
 |
 |