Pioneer VSX-822-K Owner's Manual - Page 14
Making cable connections - compatible speakers
 |
View all Pioneer VSX-822-K manuals
Add to My Manuals
Save this manual to your list of manuals |
Page 14 highlights
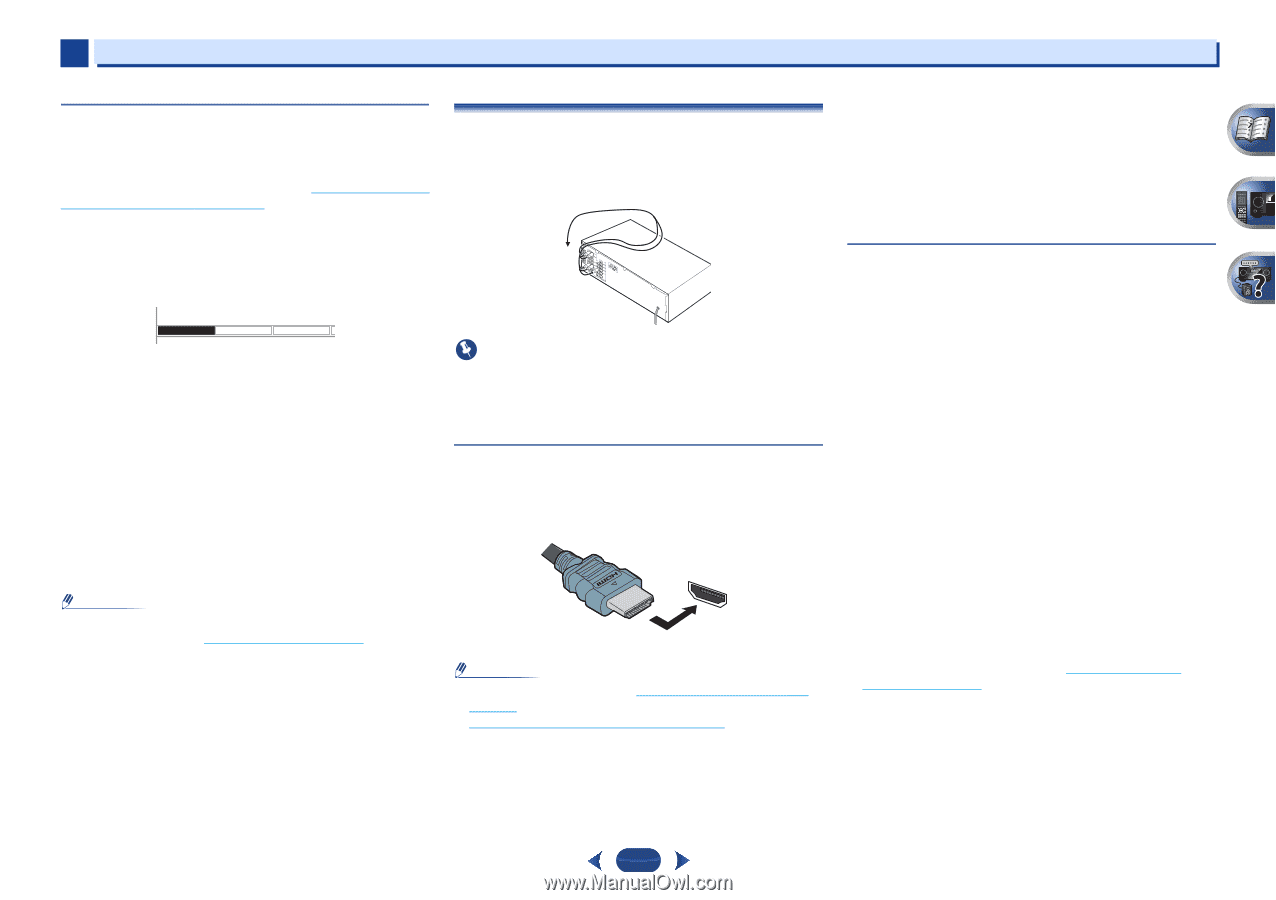
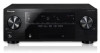
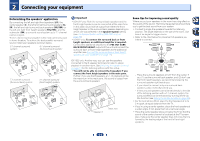
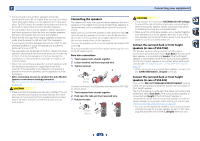
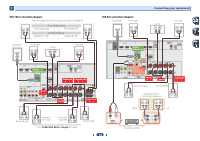
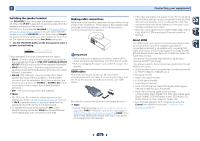
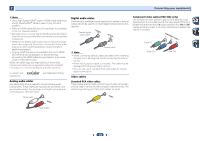
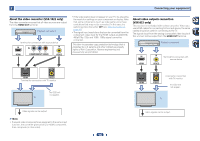
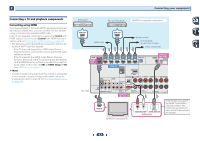
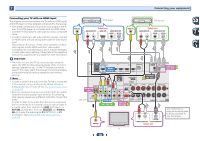
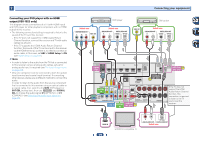
2 Connecting your equipment Switching the speaker terminal Use SPEAKERS button to change the speaker system on or off. When the SP OFF is selected, no sound is output from the speakers connected to this receiver. VSX-1022 only: If you selected Surr.Back in The Speaker System setting (VSX-1022 only) on page 49, you can switch between speakers using the SPEAKERS button. If you selected Height, the button will simply switch your main speaker terminal on or off. The options below are for the Surr.Back setting only. Use the SPEAKERS button on the front panel to select a speaker terminal setting. Making cable connections Make sure not to bend the cables over the top of this unit (as shown in the illustration). If this happens, the magnetic field produced by the transformers in this unit may cause a humming noise from the speakers. SPEAKERS DIMMER DISPLAY Press repeatedly to choose a speaker terminal option: • SPA - Sound is output from the speakers connected to the A-speaker terminals and PRE OUT SURR BACK/FRONT HEIGHT (VSX-822 only) (multichannel playback is possible). • SPB (VSX-1022 only) - Sound is output from the two speakers connected to the B-speaker terminals (only stereo playback is possible). • SPAB (VSX-1022 only) - Sound is output from the Aspeaker terminals, the two speakers in the B-speaker terminals, and the subwoofer. Multichannel sources are downmixed only when the STEREO or STEREO ALC mode is selected for stereo output from A- and B-speaker terminals. • SP - No sound is output from the speakers. Note • VSX-1022 only: The subwoofer output depends on the settings you made in Speaker Setting on page 46. However, if SPB is selected above, no sound is heard from the subwoofer (the LFE channel is not downmixed). • All speaker terminals are switched off (SP) when headphones are connected. SPB can be selected even when headphones are connected for VSX-1022. Important • Before making or changing connections, switch off the power and disconnect the power cord from the AC outlet. • Before unplugging the power cord, switch the power into standby. HDMI cables Both video and sound signals can be transmitted simultaneously with one cable. If connecting the player and the TV via this receiver, for both connections, use HDMI cables. HDMI Be careful to connect the terminal in the proper direction. Note • Set the HDMI parameter in Setting the Audio options on page 36 to THRU (THROUGH) and set the input signal in Selecting the audio input signal on page 25 to HDMI, if you want to hear HDMI audio output from your TV (no sound will be heard from this receiver). • If the video signal does not appear on your TV, try adjusting the resolution settings on your component or display. Note that some components (such as video game units) have resolutions that may not be displayed. In this case, use a (analog) composite connection. • When the video signal from the HDMI is 480i, 480p, 576i or 576p, Multi Ch PCM sound and HD sound cannot be received. About HDMI The HDMI connection transfers uncompressed digital video, as well as almost every kind of digital audio that the connected component is compatible with, including DVDVideo, DVD-Audio, SACD, Dolby Digital Plus, Dolby TrueHD, DTS-HD Master Audio (see below for limitations), Video CD/ Super VCD and CD. This receiver incorporates High-Definition Multimedia Interface (HDMI®) technology. This receiver supports the functions described below through HDMI connections. • Digital transfer of uncompressed video (contents protected by HDCP (1080p/24, 1080p/60, etc.)) • 3D signal transfer • Deep Color signal transfer • x.v.Color signal transfer • Audio Return Channel • Input of multi-channel linear PCM digital audio signals (192 kHz or less) for up to 8 channels • Input of the following digital audio formats: - Dolby Digital, Dolby Digital Plus, DTS, High bitrate audio (Dolby TrueHD, DTS-HD Master Audio), DVD-Audio, CD, SACD (DSD 2 ch only), Video CD, Super VCD • Synchronized operation with components using the Control with HDMI function (see Control with HDMI function on page 52) 14
-
 1
1 -
2
-
3
-
4
-
5
-
6
-
7
-
8
-
 9
9 -
 10
10 -
 11
11 -
 12
12 -
 13
13 -
 14
14 -
 15
15 -
 16
16 -
 17
17 -
 18
18 -
 19
19 -
20
-
21
-
22
-
23
-
24
-
25
-
26
-
27
-
28
-
29
-
30
-
31
-
32
-
33
-
34
-
35
-
36
-
37
-
38
-
39
-
40
-
41
-
42
-
43
-
44
-
45
-
46
-
47
-
48
-
49
-
50
-
51
-
52
-
53
-
54
-
55
-
56
-
57
-
58
-
59
-
60
-
61
-
62
-
63
-
64
-
65
 |
 |