Pioneer VSX-822-K Owner's Manual - Page 27
to browse the selected category e.g. - support
 |
View all Pioneer VSX-822-K manuals
Add to My Manuals
Save this manual to your list of manuals |
Page 27 highlights
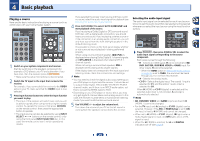
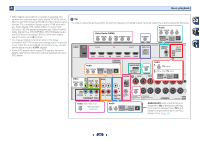
4 Basic playback Playing an iPod This receiver has the iPod iPhone iPad USB terminal that will allow you to control playback of audio content from your iPod using the controls of this receiver. Important • Pioneer cannot under any circumstances accept responsibility for any direct or indirect loss arising from any inconvenience or loss of recorded material resulting from the iPod failure. • About one minute is required between turning the power on and completion of startup. Note • This receiver is compatible with the audio and video of the iPod nano (audio only for the iPod nano 3G/4G/5G/6G), iPod touch (1G/2G/3G/4G), iPhone, iPhone 3G, iPhone 3GS, iPhone 4, iPhone 4S, iPad and iPad 2. However, some of the functions may be restricted for some models. The receiver is not compatible with the iPod shuffle. • This receiver has been developed and tested for the software version of iPod/iPhone/iPad indicated on the website of Pioneer (http://pioneer.jp/homeav/support/ios/ na/). • Installing software versions other than indicated on the website of Pioneer to your iPod/iPhone/iPad may result in incompatibility with this receiver. • iPod, iPhone and iPad are licensed for reproduction of noncopyrighted materials or materials the user is legally permitted to reproduce. • Features such as the equalizer cannot be controlled using this receiver, and we recommend switching the equalizer off before connecting. 1 Switch on the receiver and your TV. See Connecting an iPod on page 21. 2 Switch the TV input so that it connects to the receiver. • Switch the TV input to the input that connects this receiver to the TV through the corresponding HDMI cable. 3 Press iPod/USB to switch the receiver to the iPod/USB input. When the display shows the names of folders and files, you're ready to play music from the iPod. • If after pressing iPod/USB the display shows NO DEVICE, try switching off the receiver and reconnecting the iPod to the receiver. • The controls of your iPod will be inoperable when connected to this receiver. Playing back files stored on an iPod To navigate songs on your iPod, you can take advantage of the OSD of your TV connected to this receiver. • Note that non-roman characters in the title are displayed as '#'. • This feature is not available for photos or video clips on your iPod. Finding what you want to play When your iPod is connected to this receiver, you can browse songs stored on your iPod by playlist, artist, album name, song name, genre or composer, similar to using your iPod directly. 1 Use / to select a category, then press ENTER to browse that category. • To return to the previous level any time, press RETURN. 2 Use / to browse the selected category (e.g., albums). • Use / to move to previous/next levels. 3 Continue browsing until you arrive at what you want to play, then press to start playback. Tip • If you're in the song category, you can also press ENTER to start playback. • You can play all of the songs in a particular category by selecting the All item at the top of each category list. For example, you can play all the songs by a particular artist. Basic playback controls This receiver's remote control buttons can be used for basic playback of files stored on an iPod. • Press iPod/USB to switch the remote control to the iPod/ USB operation mode. MUTE AUDIO PARAMETER TUNE TOOLS MENU PRESET PRESET ENTER HOME MENU PTY iPod CTRL TUNE 1 2 3 DISP 4 5 6 CH 7 8 9 CH SHIFT Watching photos and video content To view photos or video on your iPod, since video control is not possible using this receiver, you must use the main controls of your iPod instead. Important • To play photos or video on your iPod, you must connect the HDMI OUT terminal and TV. • iPod photos and video content can be viewed only when the iPod is connected to the iPod VIDEO input on the front panel. • This feature can only be used with an iPod having video output. 1 Press iPod CTRL to switch to the iPod controls for photo and video playback. The receiver controls will be unavailable while you are watching iPod videos or browsing photos. 2 Press iPod CTRL again to switch back to the receiver controls when you're done. Tip • Change the receiver's input to the iPod in one action by pressing iPod iPhone iPad DIRECT CONTROL on the front panel to enable iPod operations on the iPod. 27
-
 1
1 -
2
-
3
-
4
-
5
-
6
-
7
-
8
-
9
-
10
-
11
-
12
-
13
-
14
-
15
-
16
-
17
-
18
-
19
-
20
-
21
-
 22
22 -
 23
23 -
 24
24 -
 25
25 -
 26
26 -
 27
27 -
 28
28 -
 29
29 -
 30
30 -
 31
31 -
 32
32 -
33
-
34
-
35
-
36
-
37
-
38
-
39
-
40
-
41
-
42
-
43
-
44
-
45
-
46
-
47
-
48
-
49
-
50
-
51
-
52
-
53
-
54
-
55
-
56
-
57
-
58
-
59
-
60
-
61
-
62
-
63
-
64
-
65
 |
 |
