Poulan PP105G30 Rider Operation Manual - Page 14
Eje, Husillos Y Sistema De
 |
View all Poulan PP105G30 Rider manuals
Add to My Manuals
Save this manual to your list of manuals |
Page 14 highlights
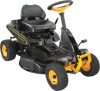
TO USE THROTTLE CONTROL Always operate engine at full speed (fast). • Operating engine at less than full speed (fast) reduces engine's operating efficiency. • Full speed (fast) offers the best mower performance. Throttle TO MOVE FORWARD AND BACKWARD The direction and speed of movement is controlled by the motion control lever. 1. Start riding mower with clutch/brake pedal depressed and motion control lever in neutral (N) position. 2. Move motion control lever to desired position. 3. Slowly release clutch/brake pedal to start movement. Motion Control Lever • The average lawn should be cut to approximately 2-1/2" (63,5 mm) during the cool season and to over 3" (76,2) during hot months. For healthier and better looking lawns, mow often and after moderate growth. • For best cutting performance, grass over 6" (152,4 mm) in height should be mowed twice. Make the first cut relatively high; the second to desired height. TO OPERATE MOWER Your riding mower is equipped with an operator presence sensing switch. Any attempt by the operator to leave the seat with the engine running and the deck clutch engaged will shut off the engine. You must remain fully and centrally positioned in the seat to prevent the engine from hesitating or cutting off when operating your equipment on rough, rolling terrain or hills. 1. Select desired height of cut. 2. Start mower blade by engaging deck clutch lever. TO STOP MOWER BLADE - Disengage deck clutch lever. Deck Clutch Lever "Disengaged" Position Mower Height Adjustment High Position TO ADJUST MOWER CUTTING HEIGHT The position of the mower height deck lift lever determines the cutting height. • Grasp lift lever. • Press lift lever plunger with thumb and move lever to desired position. The cutting height range is approximately 1-1/2 to 4" (38,1 to 101,6 mm). The heights are measured from the ground to the blade tip with the engine not running. These heights are approximate and may vary depending upon soil conditions, height of grass and types of grass being mowed. Deck Clutch Lever "Engaged" Position Mower Height Adjustment Low Position CAUTION: Do not operate the mower without either the entire grass catcher, on mowers so equipped, mulch cover, or the deflector shield in place. Deflector Shield 14 Mulch Cover CORTADORA DE CÉSPED Siga siempre las reglas de seguridad cuando realice cualquier mantenimiento. OPERACIÓN DEL FRENO Si la cortadora de césped requiere más de 1,21 m (4 pies) para detenerse a la velocidad máxima sobre una superficie de concreto o pavimento seco nivelado, entonces se debe dar servicio al freno en el centro de servicio autorizado más cercano. LLANTAS • Mantenga la presión de las llantas a 0,82 bar (12 psi). • Mantenga las llantas libres de gasolina, aceite o químicos para el control de insectos, pues pueden dañar el caucho. • Evite los palos, las piedras, los surcos profundos, objetos filosos y otros peligros que pueden causar daño en las llantas. AVISO: Para sellar las pinchaduras de las llantas y prevenir las llantas desinfladas debido a fugas lentas, puede comprar sellador de llantas con el distribuidor de partes local. El sellador de llantas también previene la podredura en seco y la corrosión de las llantas. EJE, HUSILLOS Y SISTEMA DE CREMALLERA Y PIÑÓN • Se deben lubricar correctamente con grasa los ejes de rueda delantera, los husillos delanteros y el sistema de cremallera y piñón. Husillos Cremallera y piñón • Nunca opere la palanca del embrague de la plataforma a menos que esté sentado en el asiento. VÉRIFIÉZ SISTEMA FUNCIONAMIENTO ATRÁS (ROS) • Cuando el motor está en marcha con el interruptor de llave en posición de motor "ON" y el embrague del accesorio conectado, cualquier tentativa del operador de viajar marcha atrás, apagará el motor. • Cuando el motor está en marcha con el interruptor de llave del sistema de funcionamiento atrás (ROS) en la posición "ON" y el embrague del accesorio conectado, cualquier tentativa del operador de viajar marcha atrás, NO apagará el motor. Posición ROS "ON" Motor en posición "ON" (Operación Normal) CUIDADO DE LA CUCHILLA Para obtener los mejores resultados, la cuchilla de la cortadora de césped debe estar afilada. Cambie la cuchilla si está desgastada, doblada o dañada. PRECAUCIÓN: Use sólo una cuchilla de reemplazo aprobada por el fabricante de la cortadora de césped. Usar una cuchilla no aprobada por el fabricante de la cortadora de césped es peligroso, pues podría dañar la cortadora de césped y anular la garantía. RETIRO DE LA CUCHILLA 1. Eleve la cortadora de césped a la posición más alta para tener acceso a la cuchilla. Eje SISTEMA PRESENCIA OPERADOR Y SISTEMA FUNCIONAMIENTO ATRÁS (ROS) Asegurarse de que el sistema de presencia del operador, el sistema de trabajo y el sistema funcionamiento atrás funcionen bien. Si tu cortadora de césped no función como descrito, reparar el problema inmediatamente. • El motor no arrancará si el pedal de embrague/ freno está completamente presionado y el mando del embrague del accesorio está desconectado. VÉRIFIÉZ SISTEMA PRESENCIA OPERADOR AVISO: Protéjase las manos con guantes y/o envuelva la cuchilla con un paño grueso. 2. Retire el perno de la cuchilla girándolo hacia la izquierda. 3. Instale una hoja que sea nueva o se haya vuelto a afilar, con el lado que tiene "GRASS SIDE" grabado orientado al suelo. Orificio central Perno de cuchilla (especial) Cuchilla Mandril 02545 Armado Estrella • Cuando el motor está en marcha, cualquier tentativa del operador de abandonar el asiento sin haber puesto el freno de estacionamiento primero, apagará el motor. • Cuando el motor está en marcha y el embrague del accesorio está conectado, cualquier tentativa del operador de abandonar el asiento, apagará el motor. IMPORTANTE: Para asegurar un ensamblaje correcto, el orificio central de la cuchilla se debe alinear con la estrella del ensamblaje del mandril. 4. Instale y ajuste bien el perno de la cuchilla (62-75 Nm(45 - 55 pies-Libras). IMPORTANTE: El perno de la cuchilla especial está tratado con calor. 47
-
 1
1 -
2
-
3
-
4
-
5
-
6
-
7
-
8
-
 9
9 -
 10
10 -
 11
11 -
 12
12 -
 13
13 -
 14
14 -
 15
15 -
 16
16 -
 17
17 -
 18
18 -
 19
19 -
20
-
21
-
22
-
23
-
24
-
25
-
26
-
27
-
28
-
29
-
30
 |
 |
