Poulan PP105G30 Rider Operation Manual - Page 22
Service And Adjustments, OperaciÓn
 |
View all Poulan PP105G30 Rider manuals
Add to My Manuals
Save this manual to your list of manuals |
Page 22 highlights
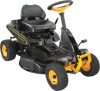
SERVICE AND ADJUSTMENTS WARNING: TO AVOID SERIOUS INJURY, BEFORE PERFORMING ANY SERVICE OR ADJUSTMENTS: 1. Depress clutch/brake pedal fully and set parking brake. 2. Place motion control lever in neutral (N) position. 3. Place deck clutch in "DISENGAGED" position. 4. Turn ignition key to "STOP" and remove key. 5. Ensure the blade and all moving parts have completely stopped. 6. Disconnect spark plug wire from spark plug and place wire where it cannot come in contact with plug. RIDING MOWER TO REMOVE MOWER 1. Place deck clutch in "DISENGAGED" position. 2. Move mower height adjustment lift lever forward to lower mower to its lowest position. 3. Remove mandrel cover. 4. Remove pins holding left and right front mower suspension arms in place. 6. Remove pin holding deck lift link arm in place. 7. Remove bolt holding deck side to side leveling rod in place. 8. Remove belt from around pulleys. 9. Slide deck out from under side of mower. TO INSTALL MOWER Install in reverse order following instructions in "TO REMOVE MOWER" section. 5. Remove bolt holding deck front to rear leveling rod in place. Deck Leveling Side to Side Rod Bolt Mandrel Cover Front Leveling Rod Bolt Mower Suspension Arm Pin Deck Lift Link Pin OPERACIÓN Estos símbolos pueden aparecer en la cortadora de césped o en la literatura provista con el producto. Aprenda y entienda su significado. MARCHA ATRÁS NEUTRO ALTO BAJO ESTRANGULACIÓN RÁPIDO LENTO INTERRUPTOR DE IGNICIÓN P MOTOR APAGADO MOTOR EN MARCHA MOTOR ENCENDIDO FRENO DE ESTACIONAMIENTO FRENO DE MANO SE CERRÓ FRENO DE MANO ABIERTO ALTURA DE LA SEGADORA LEVANTAMIENTO DE LA SEGADORA SISTEMA FUNCIONAMIENTO ATRÁS (ROS) MARCHA ATRÁS MARCHA HACIA ADELANTE PRESIÓN DEL ACEITE COMBUSTIBLE BATERÍA 15 PROTECCIÓN DE OÍDO SE REQUIERE 15 ACCESORIO DEL EMBRAGUE ENGANCHADO ACCESORIO DEL EMBRAGUE DESENGANCHADO PELIGRO, GUARDE LAS MANOS Y LOS PIES LEJOS MANTENGA EL PELIGROS DE AREA DESPEJADA PENDIENTES (VEA LA SECCIÓN DE LAS REGLAS DE SEGURIDAD) PEDAL DE FRENO/EMBRAGUE No seguir las siguientes instrucciones puede provocar heridas o muerte. Los símbolos de aviso de seguridadse utilizan para identificar informaciones de seguridad relativas a peligros que pueden provocar la muerte, heridas graves y/o daños a la máquina. PELIGRO indica un peligro que, si no se evita, provoca muerte o lesiones graves. ADVERTENCIA indica un peligro que, si no se evita, puede provocar muerte o lesiones graves. PRECAUCIÓN indica un peligro que, si no se evita, puede provocar lesiones ligeras o moderadas. PRECAUCIÓN cuando se utiliza sin el símbolo de aviso, indica una situación que puede provocar daños al tractor y/o al motor. SUPERFICIES CALIENTES indica un peligro que, si no se evita, puede provocar la muerte, lesiones graves y/o danos a la máquina. FUEGO indica un peligro que, si no se evita, puede provocar la muerte, lesiones graves y/o danos a la máquina. 22 39
-
 1
1 -
2
-
3
-
4
-
5
-
6
-
7
-
8
-
9
-
10
-
11
-
12
-
13
-
14
-
15
-
16
-
 17
17 -
 18
18 -
 19
19 -
 20
20 -
 21
21 -
 22
22 -
 23
23 -
 24
24 -
 25
25 -
 26
26 -
 27
27 -
28
-
29
-
30
 |
 |
