Poulan PP105G30 Rider Operation Manual - Page 25
Para Sacar La Cortadora De CÉs
 |
View all Poulan PP105G30 Rider manuals
Add to My Manuals
Save this manual to your list of manuals |
Page 25 highlights
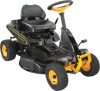
PARA INSTALACIÓN DEL ASIENTO 1. Retire el perno y la arandela plana asegurando el asiento en el empaque de cartón y póngalo aparte para ensamblar el asiento a la cortadora de césped. Retire el empaque de cartón y deséchelo. 2. Coloque el asiento en la tabla del asiento de manera que las tres (3) almohadillas de la parte inferior estén colocadas sobre los orificios ranurados grandes de la tabla. 3. Presione hacia abajo el asiento para colocar las almohadillas en las ranuras y jale el asiento hacia la parte posterior de la cortadora de césped. 4. Levante el asiento y apriete bien el perno y la arandela plana. 5. Retire la cinta y deséchela. 6. Baje el asiento a la posición de operación siéntese sobre él. Presione el pedal de embrague/freno completamente hasta abajo. Si la posición de operación no es cómoda, ajuste el asiento. Ranurado Cinta Cojín Arandela plana Base del Asiento Perno Lengüeta Palanca de ajuste PARA AJUSTAR EL ASIENTO DEL FRENTE HACIA ATRÁS - 1. Siéntese en el asiento. 2. Levante la palanca de ajuste y deslice el asiento hasta que logre una posición cómoda, lo que le permitirá presionar el pedal del embrague/freno hasta el fondo. 3. Libere la palanca para bloquear el asiento en su posición. Perilla de ajuste lumbar Palanca de ajuste SOPORTE LUMBAR - • Afloje la perilla de ajuste lumbar. • Deslice el respaldo del asiento hacia arriba o hacia abajo a la posición más cómoda para bajar el soporte de la espalda. • Apriete la perilla de ajuste lumbar. AVISO: Ahora puede sacar la cortadora de céspedde la tarima. Continúe usando las instrucciones que siguen para retirar la cortadora de césped de la tarima. ADVERTENCIA: Antes de empezar, lea, entienda y siga todas las instrucciones de la sección de Operación de este manual. Asegúrese de que la cortadora de césped esté en un área bien ventilada. Asegúrese de que el área de enfrente de la cortadora de césped esté libre de gente y objetos. PARA SACAR LA CORTADORA DE CÉSPED DE LA TARIMA (Consulte la sección de Operación para ver la ubicación y función de los controles) 1. Eleve la palanca del elevador de la plataforma hasta su posición máxima. 2. Suelte el freno de estacionamiento al liberar el pedal del embrague/freno. 3. Cambie unidad a la posición de neutro. 4. Saque la cortadora de césped de la tarima. 36 TO ADJUST STEERING WHEEL ALIGNMENT If steering wheel crossbars are not horizontal (left to right) when wheels are positioned straight forward, remove steering wheel and reassemble per instructions in the "INSTALL STEERING COLUMN" section of this manual. TO REMOVE WHEEL FOR REPAIRS FRONT WHEEL 1. Block up front axle securely. 2. Remove dust cover, retaining ring, and washer to allow wheel removal. 3. Repair tire and reassemble. 4. Replace washer and retaining ring securely in axle groove. REAR WHEEL 1. Block up rear axle securely. 2. Remove dust cover, retaining ring, washer, and square key while pulling tire off. 3. Repair tire and reassemble. 4. Replace square key while putting tire back on, then replace washer and retaining ring securely in axle groove. REPLACING BATTERY WARNING: Do not short battery terminals by allowing a wrench or any other object to contact both terminals at the same time. Before connecting battery, remove metal bracelets, wristwatch bands, rings, etc. Positive terminal must be connected first to prevent sparking from accidental grounding. 1. Lift seat pan to raised position. 2. Remove terminal cover. 3. Disconnect BLACK battery cable then RED battery cable, battery strap and carefully remove battery from riding mower. 4. Install new battery with terminals in same position as old battery. 5. Reinstall terminal cover. 6. First connect RED battery cable to positive (+) battery terminal with bolt and nut as shown. Tighten securely. 7. Connect BL ACK grounding cable to negative (-) battery terminal with remaining bolt and nut. Tighten securely 8. Lower seat pan. Washer Retaining Ring Seat Pan Nut Nut Dust Cover Square Key (rear wheel only) NOTE: To seal tire punctures and prevent flat tires due to slow leaks, purchase and use tire sealant from authorized service center. Tire sealant also prevents tire dry rot and corrosion. TO START ENGINE WITH A WEAK BATTERY CAUTION: Lead-acid batteries generate explosive gases. Keep sparks, flame and smokingmaterialsawayfrombatteries. Always wear eye protection when around batteries. If your battery is too weak to start the engine, it should be recharged. (See "BATTERY" in the Maintenance section of this manual). Negative Cable (Black) Bolt Positive Cable (Red) INTERLOCKS AND RELAYS Loose or damaged wiring may cause your riding mower to run poorly, stop running, or prevent it from starting. • Check wiring. Ensure all wiring and con- nectors are secure. ENGINE Your carburetor is not adjustable. If your engine does not operate properly due to suspected carburetor problems, take your riding mower to a qualified service center for repair and/or adjustment. 25
-
 1
1 -
2
-
3
-
4
-
5
-
6
-
7
-
8
-
9
-
10
-
11
-
12
-
13
-
14
-
15
-
16
-
17
-
18
-
19
-
 20
20 -
 21
21 -
 22
22 -
 23
23 -
 24
24 -
 25
25 -
 26
26 -
 27
27 -
 28
28 -
 29
29 -
 30
30
 |
 |
