Ricoh 2051 Operating Instructions - Page 16
Operation switch, Clip Tray, Number keys, Function keys, Function Status indicator - sp
 |
View all Ricoh 2051 manuals
Add to My Manuals
Save this manual to your list of manuals |
Page 16 highlights
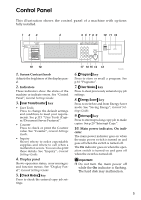
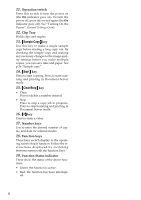
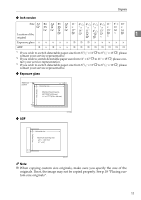
11. Operation switch Press this switch to turn the power on (the On indicator goes on). To turn the power off, press this switch again (the On indicator goes off). See "Turning On the Power", General Settings Guide. 12. Clip Tray Holds clips and staples. 13. {Sample Copy} key Use this key to make a single sample copy before starting a long copy run. By checking the sample copy and making any necessary changes to the image quality settings before you make multiple copies, you can save time and paper. See p.36 "Sample copy". 14. {Start} key Press to start copying. Press to start scanning and printing in Document Server mode. 15. {Clear/Stop} key • Clear Press to delete a number entered. • Stop Press to stop a copy job in progress. Press to stop Scanning and printing in Document Server mode. 16. {#} key Press to enter a value. 17. Number keys Use to enter the desired number of copies, and data for selected modes. 18. Function keys These keys switch display to the operating screen of each function. Follow the instructions displayed by switching between screen with the function keys. 19. Function Status indicator These show the status of the above functions: • Green: the function is active. • Red: the function has been interrupt- ed. 6
-
 1
1 -
2
-
3
-
4
-
5
-
6
-
7
-
8
-
9
-
10
-
 11
11 -
 12
12 -
 13
13 -
 14
14 -
 15
15 -
 16
16 -
 17
17 -
 18
18 -
 19
19 -
 20
20 -
 21
21 -
22
-
23
-
24
-
25
-
26
-
27
-
28
-
29
-
30
-
31
-
32
-
33
-
34
-
35
-
36
-
37
-
38
-
39
-
40
-
41
-
42
-
43
-
44
-
45
-
46
-
47
-
48
-
49
-
50
-
51
-
52
-
53
-
54
-
55
-
56
-
57
-
58
-
59
-
60
-
61
-
62
-
63
-
64
-
65
-
66
-
67
-
68
-
69
-
70
-
71
-
72
-
73
-
74
-
75
-
76
-
77
-
78
-
79
-
80
-
81
-
82
-
83
-
84
-
85
-
86
-
87
-
88
-
89
-
90
-
91
-
92
-
93
-
94
-
95
-
96
-
97
-
98
-
99
-
100
-
101
-
102
-
103
-
104
-
105
-
106
-
107
-
108
-
109
-
110
-
111
-
112
-
113
-
114
-
115
-
116
-
117
-
118
-
119
-
120
-
121
-
122
-
123
-
124
-
125
-
126
-
127
-
128
-
129
-
130
-
131
-
132
-
133
-
134
-
135
-
136
-
137
-
138
-
139
-
140
-
141
-
142
-
143
-
144
-
145
-
146
-
147
-
148
-
149
-
150
-
151
-
152
-
153
-
154
-
155
-
156
-
157
-
158
-
159
-
160
-
161
-
162
-
163
-
164
-
165
-
166
-
167
-
168
-
169
-
170
-
171
-
172
 |
 |