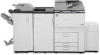
Ricoh Aficio MP 9002 Manuals - Page 128
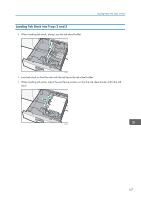
Loading Paper into Trays 2 and 3
 |
View all Ricoh Aficio MP 9002 manuals
Add to My Manuals
Save this manual to your list of manuals |
Page 128 highlights
9. Adding Paper and Toner Loading Paper into Trays 2 and 3 In the following example procedure, paper is loaded into tray 2. • If a paper tray is pushed vigorously when putting it back into place, the position of the tray's side fences may slip out of place. • Check the paper edges are aligned at the right side. • When loading a low number of sheets, be sure not to squeeze the side fences in too tightly. If the side fences are squeezed too tightly against the paper, the edges may crease, the paper may misfeed, or if it weighs between 52-59 g/m2 (14-15 lb. Bond), it may wrinkle. 1. Carefully pull out the paper tray until it stops. CJW103 2. Square the paper and load it print side down. Do not stack paper over the limit mark. CJW104 3. Carefully push the paper tray fully in. • Various sizes of paper can be loaded in trays 2-3 by adjusting the positions of side fences and end fence. For details, see "Changing the Paper Size in Trays 2 and 3", Paper Specifications and Adding Paper . 126
-
 1
1 -
2
-
3
-
4
-
5
-
6
-
7
-
8
-
9
-
10
-
11
-
12
-
13
-
14
-
15
-
16
-
17
-
18
-
19
-
20
-
21
-
22
-
23
-
24
-
25
-
26
-
27
-
28
-
29
-
30
-
31
-
32
-
33
-
34
-
35
-
36
-
37
-
38
-
39
-
40
-
41
-
42
-
43
-
44
-
45
-
46
-
47
-
48
-
49
-
50
-
51
-
52
-
53
-
54
-
55
-
56
-
57
-
58
-
59
-
60
-
61
-
62
-
63
-
64
-
65
-
66
-
67
-
68
-
69
-
70
-
71
-
72
-
73
-
74
-
75
-
76
-
77
-
78
-
79
-
80
-
81
-
82
-
83
-
84
-
85
-
86
-
87
-
88
-
89
-
90
-
91
-
92
-
93
-
94
-
95
-
96
-
97
-
98
-
99
-
100
-
101
-
102
-
103
-
104
-
105
-
106
-
107
-
108
-
109
-
110
-
111
-
112
-
113
-
114
-
115
-
116
-
117
-
118
-
119
-
120
-
121
-
122
-
 123
123 -
 124
124 -
 125
125 -
 126
126 -
 127
127 -
 128
128 -
 129
129 -
 130
130 -
 131
131 -
 132
132 -
 133
133 -
134
-
135
-
136
-
137
-
138
-
139
-
140
-
141
-
142
-
143
-
144
-
145
-
146
-
147
-
148
-
149
-
150
-
151
-
152
-
153
-
154
-
155
-
156
-
157
-
158
-
159
-
160
-
161
-
162
-
163
-
164
-
165
-
166
-
167
-
168
-
169
-
170
-
171
-
172
-
173
-
174
-
175
-
176
-
177
-
178
-
179
-
180
-
181
-
182
-
183
-
184
-
185
-
186
-
187
-
188
-
189
-
190
-
191
-
192
-
193
-
194
-
195
-
196
-
197
-
198
-
199
-
200
-
201
-
202
-
203
-
204
-
205
-
206
-
207
-
208
-
209
-
210
-
211
-
212
-
213
-
214
-
215
-
216
-
217
-
218
-
219
-
220
-
221
-
222
-
223
-
224
-
225
-
226
-
227
-
228
-
229
-
230
-
231
-
232
 |
 |
