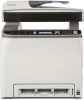
Ricoh Aficio SP C242SF User Manual - Page 12
Sending Scanned Files to a USB Flash Disk - scan to folder
 |
View all Ricoh Aficio SP C242SF manuals
Add to My Manuals
Save this manual to your list of manuals |
Page 12 highlights
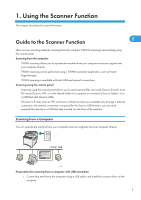
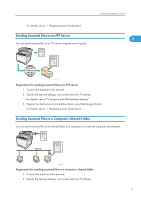
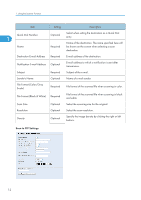
1. Using the Scanner Function For details, see p.9 "Configuring the IPv4 Address Settings". 3. Create a destination folder on the computer's hard disk drive, and configure it as a shared folder. 1 For details, see your operating system's documentation. 4. Register the destinations to the Address Book using Web Image Monitor. For details, see p.11 "Registering Scan Destinations". Sending Scanned Files to a USB Flash Disk You can send and store scanned files on a USB flash disk using the control panel. CES198 Preparation for sending scanned files to a USB flash disk 1. Insert a USB flash disk in the machine. For details, see p.17 "Basic Operation for Scan to USB". 8
-
 1
1 -
2
-
3
-
4
-
5
-
6
-
 7
7 -
 8
8 -
 9
9 -
 10
10 -
 11
11 -
 12
12 -
 13
13 -
 14
14 -
 15
15 -
 16
16 -
 17
17 -
18
-
19
-
20
-
21
-
22
-
23
-
24
-
25
-
26
-
27
-
28
-
29
-
30
-
31
-
32
-
33
-
34
-
35
-
36
-
37
-
38
-
39
-
40
-
41
-
42
-
43
-
44
-
45
-
46
-
47
-
48
-
49
-
50
-
51
-
52
-
53
-
54
-
55
-
56
-
57
-
58
-
59
-
60
-
61
-
62
-
63
-
64
-
65
-
66
-
67
-
68
-
69
-
70
-
71
-
72
-
73
-
74
-
75
-
76
-
77
-
78
-
79
-
80
-
81
-
82
-
83
-
84
-
85
-
86
-
87
-
88
-
89
-
90
-
91
-
92
-
93
-
94
-
95
-
96
-
97
-
98
-
99
-
100
-
101
-
102
-
103
-
104
-
105
-
106
-
107
-
108
-
109
-
110
-
111
-
112
-
113
-
114
-
115
-
116
-
117
-
118
-
119
-
120
-
121
-
122
-
123
-
124
-
125
-
126
-
127
-
128
-
129
-
130
-
131
-
132
-
133
-
134
-
135
-
136
-
137
-
138
-
139
-
140
-
141
-
142
-
143
-
144
-
145
-
146
-
147
-
148
-
149
-
150
-
151
-
152
-
153
-
154
-
155
-
156
-
157
-
158
-
159
-
160
-
161
-
162
-
163
-
164
-
165
-
166
-
167
-
168
-
169
-
170
-
171
-
172
-
173
-
174
-
175
-
176
-
177
-
178
-
179
-
180
-
181
-
182
-
183
-
184
-
185
-
186
-
187
-
188
-
189
-
190
-
191
-
192
-
193
-
194
-
195
-
196
-
197
-
198
-
199
-
200
-
201
-
202
-
203
-
204
-
205
-
206
-
207
-
208
-
209
-
210
-
211
-
212
-
213
-
214
-
215
-
216
-
217
-
218
-
219
-
220
-
221
-
222
-
223
-
224
-
225
-
226
-
227
-
228
-
229
-
230
-
231
-
232
-
233
-
234
-
235
-
236
-
237
-
238
-
239
-
240
-
241
-
242
-
243
-
244
-
245
-
246
-
247
-
248
-
249
-
250
-
251
-
252
-
253
-
254
 |
 |

For details, see p.9 "Configuring the IPv4 Address Settings".
3.
Create a destination folder on the computer's hard disk drive, and configure it as a shared
folder.
For details, see your operating system's documentation.
4.
Register the destinations to the Address Book using Web Image Monitor.
For details, see p.11 "Registering Scan Destinations".
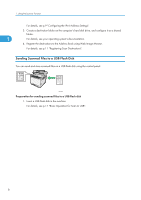
Sending Scanned Files to a USB Flash Disk
You can send and store scanned files on a USB flash disk using the control panel.
CES198
Preparation for sending scanned files to a USB flash disk
1.
Insert a USB flash disk in the machine.
For details, see p.17 "Basic Operation for Scan to USB".
1. Using the Scanner Function
8
1