Samsung NP-QX411H User Manual Xp/vista/windows7 Ver.1.5 (English) - Page 48
CD Drive
 |
View all Samsung NP-QX411H manuals
Add to My Manuals
Save this manual to your list of manuals |
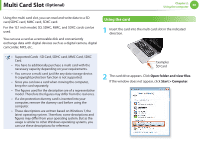
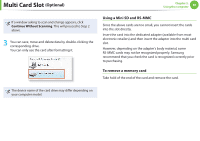
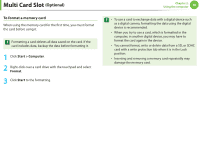
Page 48 highlights
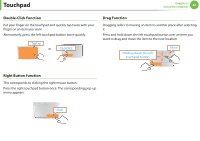
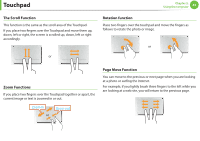
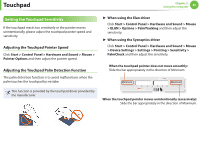
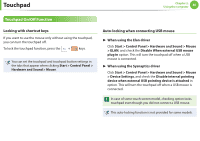
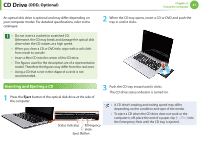
CD Drive (ODD, Optional) Chapter 2. Using the computer 47 An optical disk drive is optional and may differ depending on your computer model. For detailed specifications, refer to the catalogue. • Do not insert a cracked or scratched CD. Otherwise, the CD may break and damage the optical disk drive when the CD rotates at a high speed. • When you clean a CD or DVD title, wipe with a soft cloth from inside to outside. • Insert a Mini CD into the center of the CD drive. • The figures used for the description are of a representative model. Therefore the figures may differ from the real ones. • Using a CD that is not in the shape of a circle is not recommended. 2 When the CD tray opens, insert a CD or DVD and push the tray in until it clicks. Inserting and Ejecting a CD 1 Press the Eject button of the optical disk drive at the side of the computer. 3 Push the CD tray inward until it clicks. The CD drive status indicator is turned on. • A CD drive's reading and writing speed may differ depending on the condition and type of the media. Status Indicator Emergency Hole Eject Button • To eject a CD when the CD drive does not work or the computer is off, place the end of a paper clip ( ) into the Emergency Hole until the CD tray is ejected.
-
 1
1 -
2
-
3
-
4
-
5
-
6
-
7
-
8
-
9
-
10
-
11
-
12
-
13
-
14
-
15
-
16
-
17
-
18
-
19
-
20
-
21
-
22
-
23
-
24
-
25
-
26
-
27
-
28
-
29
-
30
-
31
-
32
-
33
-
34
-
35
-
36
-
37
-
38
-
39
-
40
-
41
-
42
-
 43
43 -
 44
44 -
 45
45 -
 46
46 -
 47
47 -
 48
48 -
 49
49 -
 50
50 -
 51
51 -
 52
52 -
 53
53 -
54
-
55
-
56
-
57
-
58
-
59
-
60
-
61
-
62
-
63
-
64
-
65
-
66
-
67
-
68
-
69
-
70
-
71
-
72
-
73
-
74
-
75
-
76
-
77
-
78
-
79
-
80
-
81
-
82
-
83
-
84
-
85
-
86
-
87
-
88
-
89
-
90
-
91
-
92
-
93
-
94
-
95
-
96
-
97
-
98
-
99
-
100
-
101
-
102
-
103
-
104
-
105
-
106
-
107
-
108
-
109
-
110
-
111
-
112
-
113
-
114
-
115
-
116
-
117
-
118
-
119
-
120
-
121
-
122
-
123
-
124
-
125
-
126
-
127
-
128
-
129
-
130
-
131
-
132
-
133
 |
 |
