Samsung SGH-T379 User Manual (user Manual) (ver.f2) (English) - Page 68
Finding a Contact Entry, Print via Bluetooth
 |
View all Samsung SGH-T379 manuals
Add to My Manuals
Save this manual to your list of manuals |
Page 68 highlights
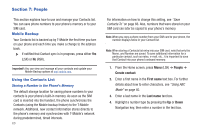
Finding a Contact Entry You can store phone numbers and their corresponding names onto either your SIM card or phone's built-in memory. They are physically separate but are used as a single entity, called Contacts. Note: A Phone icon appears to the left of a Contact entry stored on the phone. A SIM card icon appears to the left of an entry stored on the SIM card. 1. From the Home screen, press Menu (LSK) ➔ People ➔ Contacts. 2. Enter the first few letters of the name in the text box. The Contacts entries are listed, starting with the first entry matching your input. - or - Scroll up or down until the entry you want is highlighted. 3. Once you locate the desired entry, press to dial the number. - or - Press Options (LSK) to access the following options: • Edit: allows you to edit the Name and number for the selected contact. 62 • Send: allows you to send a message to the selected number. You may choose between Message, Email, or Exchange email. • New contact: takes you to the Add new contact menu. • Call: places the call to the selected phone number. • Copy to phone/SIM card: copies the selected or all of the contacts to the phone or SIM card. Depends on where the contact was previously saved. • Assign speed dial: allows you to assign a speed dial key number to the selected Contacts entry. • Send namecard via: allows you to send your name card by way of Message, Bluetooth enabled devices, Email, or Exchange email. • Delete: allows you to delete the Selected or Multiple names and numbers from your Contacts or delete all numbers. You are asked to confirm your name and number deletion by pressing the Yes (LSK). To cancel, press the No (RSK). • Print via Bluetooth: sends the contents of the selected contact to a Bluetooth enabled printer. • Mobile backup: allows you to view the Last sync you performed, or view the About mobile backup information. • Back: allows you to return to the previous screen. 4. Press View ( ) to view contact information, then press Options (LSK) and select one of the following options: • Edit: allows you to edit the name and number fields in the entry. You can also add an email address and notes.
-
 1
1 -
2
-
3
-
4
-
5
-
6
-
7
-
8
-
9
-
10
-
11
-
12
-
13
-
14
-
15
-
16
-
17
-
18
-
19
-
20
-
21
-
22
-
23
-
24
-
25
-
26
-
27
-
28
-
29
-
30
-
31
-
32
-
33
-
34
-
35
-
36
-
37
-
38
-
39
-
40
-
41
-
42
-
43
-
44
-
45
-
46
-
47
-
48
-
49
-
50
-
51
-
52
-
53
-
54
-
55
-
56
-
57
-
58
-
59
-
60
-
61
-
62
-
 63
63 -
 64
64 -
 65
65 -
 66
66 -
 67
67 -
 68
68 -
 69
69 -
 70
70 -
 71
71 -
 72
72 -
 73
73 -
74
-
75
-
76
-
77
-
78
-
79
-
80
-
81
-
82
-
83
-
84
-
85
-
86
-
87
-
88
-
89
-
90
-
91
-
92
-
93
-
94
-
95
-
96
-
97
-
98
-
99
-
100
-
101
-
102
-
103
-
104
-
105
-
106
-
107
-
108
-
109
-
110
-
111
-
112
-
113
-
114
-
115
-
116
-
117
-
118
-
119
-
120
-
121
-
122
-
123
-
124
-
125
-
126
-
127
-
128
-
129
-
130
-
131
-
132
-
133
-
134
-
135
-
136
-
137
-
138
-
139
-
140
-
141
-
142
-
143
-
144
-
145
-
146
-
147
-
148
-
149
-
150
-
151
-
152
-
153
-
154
-
155
-
156
-
157
-
158
-
159
-
160
-
161
-
162
-
163
-
164
-
165
-
166
-
167
-
168
-
169
-
170
-
171
-
172
-
173
-
174
 |
 |
