Samsung SL-M4020ND/XAA User Manual Ver.1.01 (English) - Page 49
Eco printing - default password
 |
View all Samsung SL-M4020ND/XAA manuals
Add to My Manuals
Save this manual to your list of manuals |
Page 49 highlights
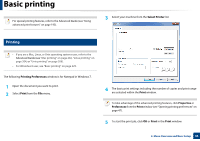
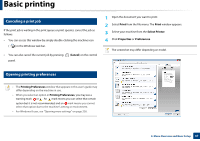
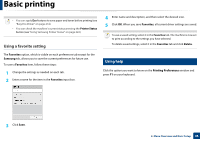
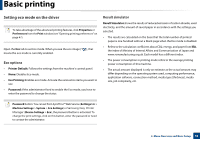
Basic printing 11 Eco printing The Eco function reduces toner consumption and paper usage. The Eco function allows you to save print resources and lead you to eco-friendly printing. If you press the Eco button from the control panel, Eco mode is enabled. The default setting of Eco mode is double-sided printing (long edge), multiple pages per side (2-up), skip blank pages, and toner save. Some features may not be available depending on the model. • Double-sided printing (long edge) feature is only available for duplex models (see "Variety feature" on page 10). • Depending on the printer driver you use, Skip blank pages may not work properly. If Skip blank pages feature does not work properly, set the feature from the Easy Eco Driver (see "Easy Eco Driver" on page 214). Setting Eco mode on the control panel • For models that do not have the display screen on the control panel, this feature is not applicable. • It may be necessary to press OK to navigate to lower-level menus for some models. 1 Select (Menu) > System Setup > Eco Setup on the control panel. 2 Select the option you want and press OK. • Default Mode: Select this to turn on or off the eco mode. - Off: Set the eco mode off. - On: Set the eco mode on. If you set the eco mode on with a password from the SyncThru™ Web Service (Settings tab > Machine Settings > System > Eco Settings) or Samsung Easy Printer Manager (Device Settings > Eco), the On force message appears. You have to enter the password to change the eco mode status. • Change Temp.: Follow the settings from Syncthru™ Web Service or Samsung Easy Printer Manager. Before you select this item, you must set the eco function in SyncThru™ Web Service (Settings tab > Machine Settings > System > Eco Settings) or Samsung Easy Printer Manager (Device Settings > Eco). - Default Eco: The machine is set to Default Eco mode. - Custom Eco: Change any necessary values. 3 Press OK to save the selection. 2. Menu Overview and Basic Setup 49
-
 1
1 -
2
-
3
-
4
-
5
-
6
-
7
-
8
-
9
-
10
-
11
-
12
-
13
-
14
-
15
-
16
-
17
-
18
-
19
-
20
-
21
-
22
-
23
-
24
-
25
-
26
-
27
-
28
-
29
-
30
-
31
-
32
-
33
-
34
-
35
-
36
-
37
-
38
-
39
-
40
-
41
-
42
-
43
-
 44
44 -
 45
45 -
 46
46 -
 47
47 -
 48
48 -
 49
49 -
 50
50 -
 51
51 -
 52
52 -
 53
53 -
 54
54 -
55
-
56
-
57
-
58
-
59
-
60
-
61
-
62
-
63
-
64
-
65
-
66
-
67
-
68
-
69
-
70
-
71
-
72
-
73
-
74
-
75
-
76
-
77
-
78
-
79
-
80
-
81
-
82
-
83
-
84
-
85
-
86
-
87
-
88
-
89
-
90
-
91
-
92
-
93
-
94
-
95
-
96
-
97
-
98
-
99
-
100
-
101
-
102
-
103
-
104
-
105
-
106
-
107
-
108
-
109
-
110
-
111
-
112
-
113
-
114
-
115
-
116
-
117
-
118
-
119
-
120
-
121
-
122
-
123
-
124
-
125
-
126
-
127
-
128
-
129
-
130
-
131
-
132
-
133
-
134
-
135
-
136
-
137
-
138
-
139
-
140
-
141
-
142
-
143
-
144
-
145
-
146
-
147
-
148
-
149
-
150
-
151
-
152
-
153
-
154
-
155
-
156
-
157
-
158
-
159
-
160
-
161
-
162
-
163
-
164
-
165
-
166
-
167
-
168
-
169
-
170
-
171
-
172
-
173
-
174
-
175
-
176
-
177
-
178
-
179
-
180
-
181
-
182
-
183
-
184
-
185
-
186
-
187
-
188
-
189
-
190
-
191
-
192
-
193
-
194
-
195
-
196
-
197
-
198
-
199
-
200
-
201
-
202
-
203
-
204
-
205
-
206
-
207
-
208
-
209
-
210
-
211
-
212
-
213
-
214
-
215
-
216
-
217
-
218
-
219
-
220
-
221
-
222
-
223
-
224
-
225
-
226
-
227
-
228
-
229
-
230
-
231
-
232
-
233
-
234
-
235
-
236
-
237
-
238
-
239
-
240
-
241
-
242
-
243
-
244
-
245
-
246
-
247
-
248
-
249
-
250
-
251
-
252
-
253
-
254
-
255
-
256
-
257
-
258
-
259
-
260
-
261
-
262
-
263
-
264
-
265
-
266
-
267
-
268
-
269
-
270
-
271
-
272
-
273
 |
 |