Samsung SPH-M330 User Manual (user Manual) (ver.f4) (English) - Page 73
Assigning a Picture to an Entry, Finding Contacts Entries
 |
View all Samsung SPH-M330 manuals
Add to My Manuals
Save this manual to your list of manuals |
Page 73 highlights
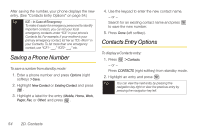
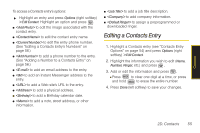
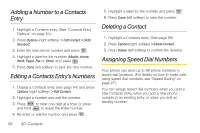
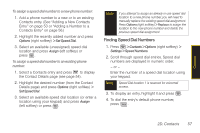
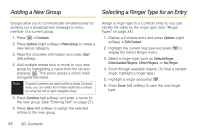
Contacts Assigning a Picture to an Entry Finding Contacts Entries Assign a picture to display each time a certain contact calls you. 1. Display a Contacts entry information and press Options (right softkey) > Edit Contact. 2. Highlight the current image or picture type and press Add (right softkey) to display the Photo ID menu. 3. Select an option, such as None, New Picture, My Albums, or Screen Savers. 4. Highlight a picture. Ⅲ If you selected New Picture, the camera will launch and you will use it to take a new picture. (See "2G. Camera" on page 76 for details.) Ⅲ If you selected My Albums, you may need to select In Phone or Online Albums to find the picture. 5. Press Assign (left softkey) to save the assigned picture. 6. Press Done (left softkey) to complete the process. Finding Contacts by Name 1. Press > Contacts. - or - Press CONTACTS (right softkey). 2. Scroll through all the entries. - or - Enter the first letter or letters of a name (such as "dav" for "Dave"). (The more letters you enter, the more your search narrows.) 3. To display an entry, highlight it and press . 4. To dial the entry's default phone number, press . - or - To display additional Contacts entries, press the navigation key up or down and press . Shortcut From standby mode, press CONTACTS (right softkey) to display the Search feature. 2D. Contacts 59
-
 1
1 -
2
-
3
-
4
-
5
-
6
-
7
-
8
-
9
-
10
-
11
-
12
-
13
-
14
-
15
-
16
-
17
-
18
-
19
-
20
-
21
-
22
-
23
-
24
-
25
-
26
-
27
-
28
-
29
-
30
-
31
-
32
-
33
-
34
-
35
-
36
-
37
-
38
-
39
-
40
-
41
-
42
-
43
-
44
-
45
-
46
-
47
-
48
-
49
-
50
-
51
-
52
-
53
-
54
-
55
-
56
-
57
-
58
-
59
-
60
-
61
-
62
-
63
-
64
-
65
-
66
-
67
-
 68
68 -
 69
69 -
 70
70 -
 71
71 -
 72
72 -
 73
73 -
 74
74 -
 75
75 -
 76
76 -
 77
77 -
 78
78 -
79
-
80
-
81
-
82
-
83
-
84
-
85
-
86
-
87
-
88
-
89
-
90
-
91
-
92
-
93
-
94
-
95
-
96
-
97
-
98
-
99
-
100
-
101
-
102
-
103
-
104
-
105
-
106
-
107
-
108
-
109
-
110
-
111
-
112
-
113
-
114
-
115
-
116
-
117
-
118
-
119
-
120
-
121
-
122
-
123
-
124
-
125
-
126
-
127
-
128
-
129
-
130
-
131
-
132
-
133
-
134
-
135
-
136
-
137
-
138
-
139
-
140
-
141
-
142
-
143
-
144
-
145
-
146
-
147
-
148
-
149
-
150
-
151
-
152
-
153
-
154
-
155
-
156
-
157
-
158
-
159
-
160
 |
 |
