Sharp AR M207 AR-M162 AR-M207 Operation Manual Suite - Page 105
Shared Printer Settings - driver xp
 |
View all Sharp AR M207 manuals
Add to My Manuals
Save this manual to your list of manuals |
Page 105 highlights
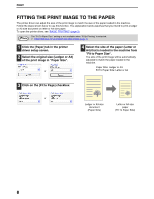
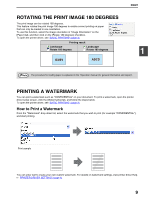
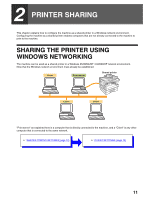
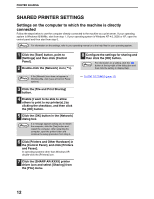
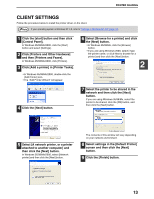
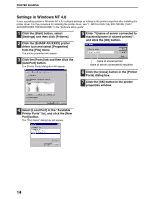
PRINTER SHARING SHARED PRINTER SETTINGS Settings on the computer to which the machine is directly connected Follow the steps below to use the computer directly connected to the machine as a print server. If your operating system is Windows 95/98/Me, start from step 1. If your operating system is Windows NT 4.0, 2000 or XP, open the control panel and then start from step 6. Note For information on the settings, refer to your operating manual or to the help files for your operating system. 1 Click the [Start] button, point to [Settings] and then click [Control Panel]. 2 Double-click the [Network] icon ( ). Note If the [Network] icon does not appear in Windows Me, click [view all Control Panel options]. 3 Click the [File and Print Sharing] button. 4 Enable [I want to be able to allow others to print to my printer(s).] by clicking the checkbox, and then click the [OK] button. 5 Click the [OK] button in the [Network] dialog box. Note If a message appears asking you to restart the computer, click the [Yes] button and restart the computer. After restarting the computer, open the printer folder and continue the setup procedure from Step 6. 6 Click [Printers and Other Hardware] in the [Control Panel], and click [Printers and Faxes]. In operating systems other than Windows XP, double-click the [Printers] icon. 7 Click the [SHARP AR-XXXX] printer driver icon and select [Sharing] from the [File] menu. 8 Configure the settings for sharing and then click the [OK] button. Note For information on a setting, click the button at the top-right of the dialog box and then click the setting to display Help. ☞ CLIENT SETTINGS (page 13) 12
-
 1
1 -
2
-
3
-
4
-
5
-
6
-
7
-
8
-
9
-
10
-
11
-
12
-
13
-
14
-
15
-
16
-
17
-
18
-
19
-
20
-
21
-
22
-
23
-
24
-
25
-
26
-
27
-
28
-
29
-
30
-
31
-
32
-
33
-
34
-
35
-
36
-
37
-
38
-
39
-
40
-
41
-
42
-
43
-
44
-
45
-
46
-
47
-
48
-
49
-
50
-
51
-
52
-
53
-
54
-
55
-
56
-
57
-
58
-
59
-
60
-
61
-
62
-
63
-
64
-
65
-
66
-
67
-
68
-
69
-
70
-
71
-
72
-
73
-
74
-
75
-
76
-
77
-
78
-
79
-
80
-
81
-
82
-
83
-
84
-
85
-
86
-
87
-
88
-
89
-
90
-
91
-
92
-
93
-
94
-
95
-
96
-
97
-
98
-
99
-
 100
100 -
 101
101 -
 102
102 -
 103
103 -
 104
104 -
 105
105 -
 106
106 -
 107
107 -
 108
108 -
 109
109 -
 110
110 -
111
-
112
-
113
-
114
-
115
-
116
-
117
-
118
-
119
-
120
-
121
-
122
-
123
-
124
-
125
-
126
-
127
-
128
-
129
-
130
-
131
-
132
-
133
-
134
-
135
-
136
-
137
-
138
-
139
-
140
-
141
-
142
-
143
-
144
-
145
-
146
-
147
-
148
-
149
-
150
-
151
-
152
-
153
-
154
-
155
-
156
-
157
-
158
-
159
-
160
-
161
-
162
-
163
-
164
-
165
-
166
-
167
-
168
-
169
-
170
-
171
-
172
-
173
-
174
-
175
-
176
-
177
-
178
-
179
-
180
-
181
-
182
-
183
-
184
-
185
-
186
-
187
-
188
-
189
-
190
-
191
-
192
-
193
-
194
-
195
-
196
-
197
-
198
-
199
-
200
-
201
-
202
-
203
-
204
-
205
-
206
-
207
-
208
-
209
-
210
-
211
-
212
-
213
-
214
-
215
-
216
-
217
-
218
-
219
-
220
-
221
-
222
-
223
-
224
-
225
-
226
-
227
-
228
-
229
-
230
-
231
-
232
-
233
-
234
-
235
-
236
-
237
-
238
-
239
-
240
-
241
-
242
-
243
-
244
-
245
-
246
-
247
-
248
-
249
-
250
-
251
-
252
-
253
-
254
-
255
-
256
-
257
-
258
-
259
-
260
-
261
-
262
-
263
-
264
-
265
-
266
-
267
-
268
-
269
-
270
-
271
-
272
-
273
-
274
-
275
-
276
-
277
-
278
-
279
-
280
-
281
-
282
-
283
-
284
-
285
-
286
-
287
-
288
-
289
-
290
-
291
-
292
-
293
-
294
-
295
-
296
-
297
-
298
-
299
-
300
-
301
-
302
-
303
-
304
-
305
-
306
-
307
-
308
-
309
-
310
-
311
-
312
-
313
-
314
-
315
-
316
-
317
-
318
-
319
-
320
-
321
-
322
-
323
-
324
-
325
-
326
-
327
-
328
-
329
-
330
-
331
-
332
-
333
-
334
-
335
-
336
-
337
-
338
-
339
-
340
-
341
-
342
-
343
-
344
-
345
-
346
-
347
-
348
-
349
-
350
-
351
-
352
-
353
-
354
-
355
-
356
-
357
-
358
-
359
-
360
-
361
-
362
-
363
-
364
-
365
-
366
-
367
-
368
-
369
-
370
-
371
-
372
 |
 |