Sharp AR M207 AR-M162 AR-M207 Operation Manual Suite - Page 113
Scanning From A Wia-compliant, Application Windows Xp - copier drivers
 |
View all Sharp AR M207 manuals
Add to My Manuals
Save this manual to your list of manuals |
Page 113 highlights
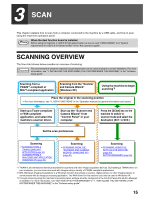
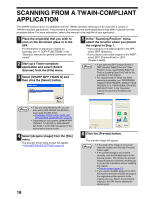
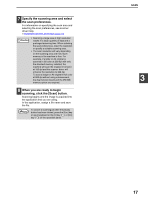
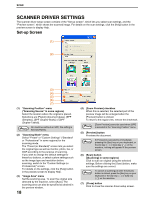
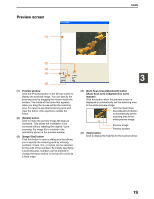
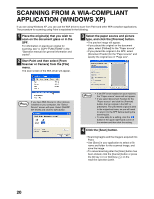
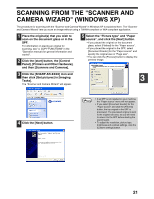
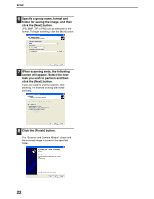
SCANNING FROM A WIA-COMPLIANT APPLICATION (WINDOWS XP) If you are using Windows XP, you can use the WIA driver to scan from Paint and other WIA-compliant applications. The procedure for scanning using Paint is explained in the following. 1 Place the original(s) that you wish to scan on the document glass or in the SPF. For information on placing an original for scanning, see "4. COPY FUNCTIONS" in the "Operation manual (for general information and copier)". 2 Start Paint and then select [From Scanner or Camera] from the [File] menu. The scan screen of the WIA driver will appear. 3 Select the paper source and picture type, and click the [Preview] button. • The preview image will appear. • If you placed the original on the document glass, select [Flatbed] for the "Paper source". • If you placed the original in the SPF, select [Document Feeder] for the "Paper source" and specify the original size in "Page size". Note If you have WIA drivers for other devices installed on your computer, the "Select Device" screen will open. Select [SHARP AR-XXXX] and click the [OK] button. Note • If an SPF is not installed on your machine, the "Paper source" menu will not appear. • If you select [Document Feeder] for the "Paper source" and click the [Preview] button, the top original in the SPF is previewed. The previewed original is sent to the original exit area, so you will need to return it to the SPF before starting the scanning job. • To view Help for a setting, click the button in the upper right-hand corner of the window and then click the setting. 4 Click the [Scan] button. • Scanning begins and the image is acquired into Paint. • Use [Save] in your application to select a file name and folder for the scanned image, and save the image. • To cancel scanning after the [Scan] button has been clicked, click the [Cancel] button or press the [C] key ( ) or [CA] key ( ) on the machine operation panel. 20
-
 1
1 -
2
-
3
-
4
-
5
-
6
-
7
-
8
-
9
-
10
-
11
-
12
-
13
-
14
-
15
-
16
-
17
-
18
-
19
-
20
-
21
-
22
-
23
-
24
-
25
-
26
-
27
-
28
-
29
-
30
-
31
-
32
-
33
-
34
-
35
-
36
-
37
-
38
-
39
-
40
-
41
-
42
-
43
-
44
-
45
-
46
-
47
-
48
-
49
-
50
-
51
-
52
-
53
-
54
-
55
-
56
-
57
-
58
-
59
-
60
-
61
-
62
-
63
-
64
-
65
-
66
-
67
-
68
-
69
-
70
-
71
-
72
-
73
-
74
-
75
-
76
-
77
-
78
-
79
-
80
-
81
-
82
-
83
-
84
-
85
-
86
-
87
-
88
-
89
-
90
-
91
-
92
-
93
-
94
-
95
-
96
-
97
-
98
-
99
-
100
-
101
-
102
-
103
-
104
-
105
-
106
-
107
-
 108
108 -
 109
109 -
 110
110 -
 111
111 -
 112
112 -
 113
113 -
 114
114 -
 115
115 -
 116
116 -
 117
117 -
 118
118 -
119
-
120
-
121
-
122
-
123
-
124
-
125
-
126
-
127
-
128
-
129
-
130
-
131
-
132
-
133
-
134
-
135
-
136
-
137
-
138
-
139
-
140
-
141
-
142
-
143
-
144
-
145
-
146
-
147
-
148
-
149
-
150
-
151
-
152
-
153
-
154
-
155
-
156
-
157
-
158
-
159
-
160
-
161
-
162
-
163
-
164
-
165
-
166
-
167
-
168
-
169
-
170
-
171
-
172
-
173
-
174
-
175
-
176
-
177
-
178
-
179
-
180
-
181
-
182
-
183
-
184
-
185
-
186
-
187
-
188
-
189
-
190
-
191
-
192
-
193
-
194
-
195
-
196
-
197
-
198
-
199
-
200
-
201
-
202
-
203
-
204
-
205
-
206
-
207
-
208
-
209
-
210
-
211
-
212
-
213
-
214
-
215
-
216
-
217
-
218
-
219
-
220
-
221
-
222
-
223
-
224
-
225
-
226
-
227
-
228
-
229
-
230
-
231
-
232
-
233
-
234
-
235
-
236
-
237
-
238
-
239
-
240
-
241
-
242
-
243
-
244
-
245
-
246
-
247
-
248
-
249
-
250
-
251
-
252
-
253
-
254
-
255
-
256
-
257
-
258
-
259
-
260
-
261
-
262
-
263
-
264
-
265
-
266
-
267
-
268
-
269
-
270
-
271
-
272
-
273
-
274
-
275
-
276
-
277
-
278
-
279
-
280
-
281
-
282
-
283
-
284
-
285
-
286
-
287
-
288
-
289
-
290
-
291
-
292
-
293
-
294
-
295
-
296
-
297
-
298
-
299
-
300
-
301
-
302
-
303
-
304
-
305
-
306
-
307
-
308
-
309
-
310
-
311
-
312
-
313
-
314
-
315
-
316
-
317
-
318
-
319
-
320
-
321
-
322
-
323
-
324
-
325
-
326
-
327
-
328
-
329
-
330
-
331
-
332
-
333
-
334
-
335
-
336
-
337
-
338
-
339
-
340
-
341
-
342
-
343
-
344
-
345
-
346
-
347
-
348
-
349
-
350
-
351
-
352
-
353
-
354
-
355
-
356
-
357
-
358
-
359
-
360
-
361
-
362
-
363
-
364
-
365
-
366
-
367
-
368
-
369
-
370
-
371
-
372
 |
 |
