Sharp AR M207 AR-M162 AR-M207 Operation Manual Suite - Page 367
The MFP driver cannot be correctly, installed by Plug and Play Windows, Another printer is using
 |
View all Sharp AR M207 manuals
Add to My Manuals
Save this manual to your list of manuals |
Page 367 highlights
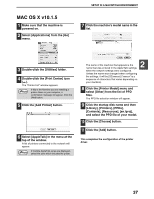
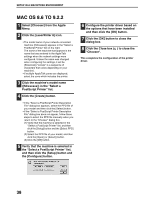
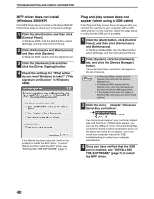
TROUBLESHOOTING AND USEFUL INFORMATION The MFP driver cannot be correctly installed by Plug and Play (Windows 2000/XP) In Windows 2000/XP, if the MFP driver cannot be correctly installed by Plug and Play (for example, Plug and Play takes place without copying the required files for the MFP driver installation from the installer), follow these steps to remove unneeded devices. To install the MFP driver, see "INSTALLING THE SOFTWARE" (page 7). 1 Click the [start] button, click [Control Panel], and then click [Performance and Maintenance]. In Windows 2000, click the [Start] button, select [Settings], and then click [Control Panel]. 2 Click [System], click the [Hardware] tab, and click the [Device Manager] button. Note In Windows 2000, double-click the [System] icon, click the [Hardware] tab, and click the [Device Manager] button. 3 Click the icon ( ) beside "Other devices". Another printer is using the parallel port (when using a parallel cable) If another printer is using the parallel port and printing is not possible using the machine, follow the steps below to change the port setting of the other printer driver, and make sure that the port of the printer driver for the machine is set to "LPT1". 1 Click the [start] button, click [Control Panel], click [Printers and Other Hardware], and then click [Printers and Faxes]. In Windows 95/98/Me/NT 4.0/2000, click the [Start] button, select [Settings], and then click [Printers]. 2 Click the icon of the printer driver for which you wish to change the port setting, and select [Properties] from the [File] menu. 3 3 Click the [Ports] tab. In Windows 95/98/Me, click the [Details] tab. 4 Select [FILE:] in the [Print to the following port] list box, and click the [OK] button. If "AR-XXXX Scanner" and "SHARP AR-XXXX" appear, select and delete both these items. If "Other devices" does not appear, close Note the "Device Manager" window. 4 To install the MFP driver, see "INSTALLING THE SOFTWARE" (page 7). 5 Click the [SHARP AR-XXXX] icon and select [Properties] from the [File] menu. 6 Click the [Ports] tab. In Windows 95/98/Me, click the [Details] tab. 7 Select [LPT1] in the "Print to the following port" list and click the [OK] button. Note In the event that you need to use the other printer, repeat the above steps to set the port of the machine to [FILE:], and change the port setting of the other printer back to [LPT1]. 41
-
 1
1 -
2
-
3
-
4
-
5
-
6
-
7
-
8
-
9
-
10
-
11
-
12
-
13
-
14
-
15
-
16
-
17
-
18
-
19
-
20
-
21
-
22
-
23
-
24
-
25
-
26
-
27
-
28
-
29
-
30
-
31
-
32
-
33
-
34
-
35
-
36
-
37
-
38
-
39
-
40
-
41
-
42
-
43
-
44
-
45
-
46
-
47
-
48
-
49
-
50
-
51
-
52
-
53
-
54
-
55
-
56
-
57
-
58
-
59
-
60
-
61
-
62
-
63
-
64
-
65
-
66
-
67
-
68
-
69
-
70
-
71
-
72
-
73
-
74
-
75
-
76
-
77
-
78
-
79
-
80
-
81
-
82
-
83
-
84
-
85
-
86
-
87
-
88
-
89
-
90
-
91
-
92
-
93
-
94
-
95
-
96
-
97
-
98
-
99
-
100
-
101
-
102
-
103
-
104
-
105
-
106
-
107
-
108
-
109
-
110
-
111
-
112
-
113
-
114
-
115
-
116
-
117
-
118
-
119
-
120
-
121
-
122
-
123
-
124
-
125
-
126
-
127
-
128
-
129
-
130
-
131
-
132
-
133
-
134
-
135
-
136
-
137
-
138
-
139
-
140
-
141
-
142
-
143
-
144
-
145
-
146
-
147
-
148
-
149
-
150
-
151
-
152
-
153
-
154
-
155
-
156
-
157
-
158
-
159
-
160
-
161
-
162
-
163
-
164
-
165
-
166
-
167
-
168
-
169
-
170
-
171
-
172
-
173
-
174
-
175
-
176
-
177
-
178
-
179
-
180
-
181
-
182
-
183
-
184
-
185
-
186
-
187
-
188
-
189
-
190
-
191
-
192
-
193
-
194
-
195
-
196
-
197
-
198
-
199
-
200
-
201
-
202
-
203
-
204
-
205
-
206
-
207
-
208
-
209
-
210
-
211
-
212
-
213
-
214
-
215
-
216
-
217
-
218
-
219
-
220
-
221
-
222
-
223
-
224
-
225
-
226
-
227
-
228
-
229
-
230
-
231
-
232
-
233
-
234
-
235
-
236
-
237
-
238
-
239
-
240
-
241
-
242
-
243
-
244
-
245
-
246
-
247
-
248
-
249
-
250
-
251
-
252
-
253
-
254
-
255
-
256
-
257
-
258
-
259
-
260
-
261
-
262
-
263
-
264
-
265
-
266
-
267
-
268
-
269
-
270
-
271
-
272
-
273
-
274
-
275
-
276
-
277
-
278
-
279
-
280
-
281
-
282
-
283
-
284
-
285
-
286
-
287
-
288
-
289
-
290
-
291
-
292
-
293
-
294
-
295
-
296
-
297
-
298
-
299
-
300
-
301
-
302
-
303
-
304
-
305
-
306
-
307
-
308
-
309
-
310
-
311
-
312
-
313
-
314
-
315
-
316
-
317
-
318
-
319
-
320
-
321
-
322
-
323
-
324
-
325
-
326
-
327
-
328
-
329
-
330
-
331
-
332
-
333
-
334
-
335
-
336
-
337
-
338
-
339
-
340
-
341
-
342
-
343
-
344
-
345
-
346
-
347
-
348
-
349
-
350
-
351
-
352
-
353
-
354
-
355
-
356
-
357
-
358
-
359
-
360
-
361
-
 362
362 -
 363
363 -
 364
364 -
 365
365 -
 366
366 -
 367
367 -
 368
368 -
 369
369 -
 370
370 -
 371
371 -
 372
372
 |
 |