Sharp PN-T322B Service Manual - Page 12
Installing The Batteries, Changing The Battery, Remote Control Operation Range, Caution
 |
View all Sharp PN-T322B manuals
Add to My Manuals
Save this manual to your list of manuals |
Page 12 highlights
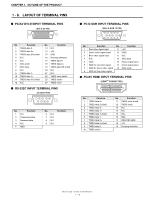
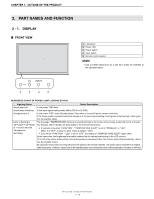
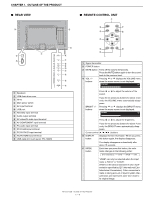
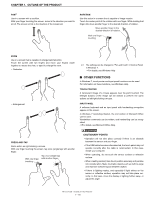
CHAPTER 1. OUTLINE OF THE PRODUCT 7 INPUT button The menu is displayed. Press or to select the input mode, and press to enter. You can select the input terminal by pressing the input switch of the monitor. Input mode Video Audio DVI-D D-SUB PC/AV DVI-D input terminal PC D-SUB input terminal PC audio input terminal HDMI PC/AV HDMI *1 input terminal COMPONENT AV COMPONENT AV audio input terminal input VIDEO AV video input terminal terminal USB *2 USB port --- 8 MENU button 9 SIZE button *1 If audio will be not input by HDMI cable, use the PC audio input terminal. *2 Image and audio files in the USB flash drive can be displayed/played. Displays and turns off the menu screen. The menu is displayed. Press or to select the screen size. n When the input mode is "USB", the screen size cannot be changed. n The menu disappears after about 4 seconds if you do not press any buttons. 3 ) Insert the battery case into the remote control. Insert until you hear a click. MEMO n Do not use a battery other than a CR2025 battery. n The preinstalled batteries in the remote control were installed at the factory, and therefore may become depleted before the specified usage time is reached. n When the batteries become exhausted, replace them with new (commercially available) batteries. n If you will not be using the remote control for a long time, remove the batteries. ■ REMOTE CONTROL OPERATION RANGE The operation range of the remote control unit is approx. 16.4 feet (5 m) at an angle of approx 10° from the center to the top/bottom/right/left of the remote control sensor. Remote control sensor ■ INSTALLING THE BATTERIES Batteries and an insulation sheet are preinstalled in the remote control at the factory. Before using the remote control, be sure to remove the insulation sheet. Insulation sheet 10 16.4 feet (5 m) 10 10 10 Pull out ■ CHANGING THE BATTERY 1 ) Pull out the battery case. Press the catch on the battery case while pulling out the case. Battery case Catch 2 ) Insert the battery. Make sure the polarities (+ and -) of the battery are oriented correctly. Lithium battery (CR2025) CAUTION n Do not expose the remote control unit to shock by dropping or stepping on it. This could lead to a malfunction. n Do not sit with the remote control in your pants pocket. This may break the remote control. n Do not expose the remote control unit to liquids, and do not place it in an area with high humidity. n The remote control unit may not work properly if the remote control sensor is under direct sunlight or strong lighting. n Objects between the remote control unit and the remote control sensor may prevent proper operation. n Replace the batteries when they run low as this may shorten the remote control's operation range. n If a fluorescent light is illuminated near the remote control unit, it may interfere with proper operation. n Do not use it with the remote control of other equipment such as air conditioner, stereo components, etc. PN-T321/T322B OUTLINE OF THE PRODUCT 1 - 8
-
 1
1 -
2
-
3
-
4
-
5
-
6
-
 7
7 -
 8
8 -
 9
9 -
 10
10 -
 11
11 -
 12
12 -
 13
13 -
 14
14 -
 15
15 -
 16
16 -
 17
17 -
18
-
19
-
20
-
21
-
22
-
23
-
24
-
25
-
26
-
27
-
28
-
29
-
30
-
31
-
32
-
33
-
34
-
35
-
36
-
37
-
38
-
39
-
40
-
41
-
42
-
43
-
44
-
45
-
46
-
47
-
48
-
49
-
50
-
51
-
52
-
53
-
54
-
55
-
56
-
57
-
58
-
59
-
60
-
61
-
62
-
63
-
64
-
65
-
66
-
67
-
68
-
69
-
70
-
71
-
72
-
73
-
74
-
75
-
76
-
77
-
78
-
79
-
80
 |
 |