Sharp PN-Y556 PN-Y326 PN-Y436 PN-Y496 PN-Y556 Operation Manual - Page 35
Controlling the Monitor with a computer (RS-232C), Computer connection, Communication conditions,
 |
View all Sharp PN-Y556 manuals
Add to My Manuals
Save this manual to your list of manuals |
Page 35 highlights
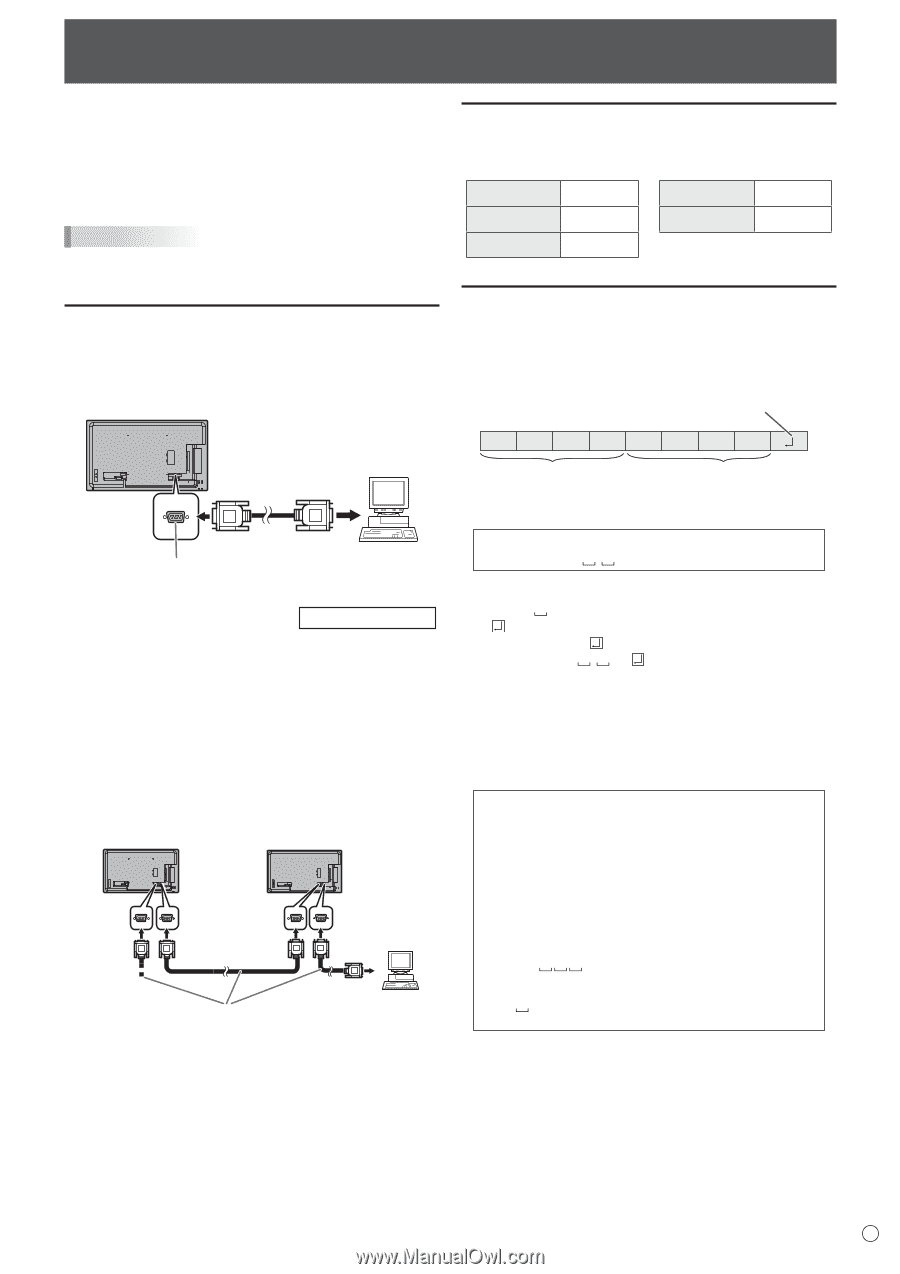
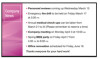
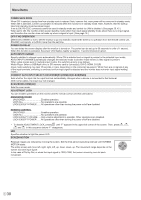
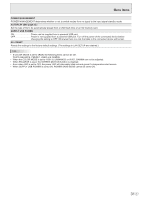
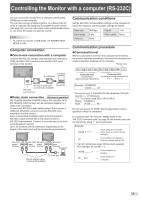
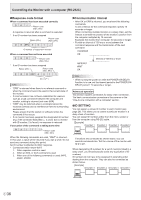
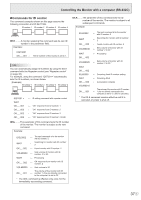
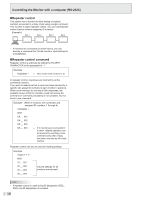
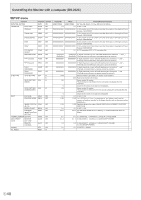
Controlling the Monitor with a computer (RS-232C) You can control this monitor from a computer via RS-232C (COM port) on the computer. You can also connect multiple monitors via a daisy chain by using a computer. By assigning ID numbers to each monitor (see page 36), you can make input mode selection/adjustment or can check the status of a specific monitor. TIPS • To control the monitor via RS-232C, set POWER SAVE MODE to OFF. Computer connection nOne-to-one connection with a computer Connect with RS-232 straight cable between the computer's COM port (RS-232C connector) and the RS-232C input terminal on the monitor. Communication conditions Set the RS-232C communication settings on the computer to match the monitor's communication settings as follows: Baud rate Data length Parity bit 9600bps 8 bits None Stop bit 1 bit Flow control None Communication procedure nCommand format When a command is sent from the computer to the monitor, the monitor operates according to the received command and sends a response message to the computer. Return code Computer To COM port C1 C2 C3 C4 P1 P2 P3 P4 Command field Parameter field (4 prescribed (4 character string comprised of: alphanumerical characters) 0-9, +, -, space, ?) RS-232 straight cable (commercially available) RS-232C input terminal nDaisy chain connection... Advanced operation PN-Y556/PN-Y496/PN-Y436/PN-Y326 or PN-Y555/PN-Y475/ PN-Y425/PN-Y325 monitors can be connected together in a daisy chain connection. Connect with RS-232 straight cable between the computer's COM port (RS-232C connector) and the RS-232C input terminal on the first monitor. Next, connect RS-232 straight cable to the first monitor's RS‑232C output terminal and to the second monitor's RS-232C input terminal. Connect in the same way to the third and subsequent monitors. Up to 25 monitors can be connected. (Depending on the length of the cable used and the surrounding environment.) Second monitor First monitor RS-232C output terminal RS-232C RS-232C input output terminal terminal RS-232C input terminal Computer RS-232 straight cables (commercially available) To COM port Example: VOLM0030 VOLM 30 * Be sure to input 4 characters for the parameter. Pad with spaces (" ") if necessary. (" " is a return code (0DH, 0AH or 0DH)) Wrong : VOLM30 Right : VOLM 30 Do not use spaces for DATE. Specify parameters using a specified number of characters. If a command has "R" listed for "DIRECTION" in the "RS-232C command table" on page 39, the current value can be returned by using "?" as the parameter. Example: VOLM ? ? ? ? From computer to monitor ← (How much is current volume setting?). 30 ← From monitor to computer (Current volume setting: 30). * If an ID number (see page 36) has been assigned (For example, ID number = 1). VOLM ? ← From computer to monitor. 30 001 ← From monitor to computer. 35 E
-
 1
1 -
2
-
3
-
4
-
5
-
6
-
7
-
8
-
9
-
10
-
11
-
12
-
13
-
14
-
15
-
16
-
17
-
18
-
19
-
20
-
21
-
22
-
23
-
24
-
25
-
26
-
27
-
28
-
29
-
 30
30 -
 31
31 -
 32
32 -
 33
33 -
 34
34 -
 35
35 -
 36
36 -
 37
37 -
 38
38 -
 39
39 -
 40
40 -
41
-
42
-
43
-
44
-
45
-
46
-
47
-
48
-
49
-
50
-
51
-
52
-
53
 |
 |