Sharp VL-Z7U Operation Manual - Page 104
Appendix
 |
UPC - 074000353190
View all Sharp VL-Z7U manuals
Add to My Manuals
Save this manual to your list of manuals |
Page 104 highlights
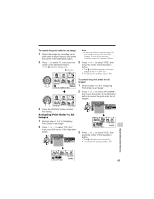
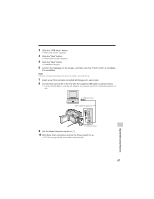
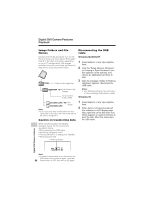
AApppepndeixndix Picture/Backlight Adjustments Available modes: All modes If the picture is difficult to see due to ambient light or other factors, adjust the monitor picture settings. 6 Press j or k to adjust the item to the desired setting, then press the center of the Operation button. LCD BR I GHT - Darker LCD COLOR - Decrease + Brighter + Increase • The example screens shown are for Tape Camera mode. VF BR I GHT - Darker + Brighter Adjusting the Picture 1 Press the DISPLAY button until the mode screen appears. 2 Press l or m on the Operation button to select "MENU", then press the center of the Operation button. 3 Press l or m to select "EXECUTE", then press the center of the Operation button. 4 Press l or m to select O, then press the center of the Operation button. 7 Press the DISPLAY button to turn off the menu screen. Notes: • When adjusting the color, the picture on the LCD monitor may differ from the picture actually recorded. Do not change the color setting unless necessary. (This adjustment only affects the monitor picture, not the recorded image.) • The viewfinder turns on if you select "VF BRIGHT". LCD SET B A C K L I GH T NORMAL L C D BR I GHT - + LCD COLOR - + VF BR I GHT - + RE T URN 5 Press l or m to select "LCD BRIGHT", "LCD COLOR" or "VF BRIGHT", then press the center of the Operation button. Appendix 90
-
 1
1 -
2
-
3
-
4
-
5
-
6
-
7
-
8
-
9
-
10
-
11
-
12
-
13
-
14
-
15
-
16
-
17
-
18
-
19
-
20
-
21
-
22
-
23
-
24
-
25
-
26
-
27
-
28
-
29
-
30
-
31
-
32
-
33
-
34
-
35
-
36
-
37
-
38
-
39
-
40
-
41
-
42
-
43
-
44
-
45
-
46
-
47
-
48
-
49
-
50
-
51
-
52
-
53
-
54
-
55
-
56
-
57
-
58
-
59
-
60
-
61
-
62
-
63
-
64
-
65
-
66
-
67
-
68
-
69
-
70
-
71
-
72
-
73
-
74
-
75
-
76
-
77
-
78
-
79
-
80
-
81
-
82
-
83
-
84
-
85
-
86
-
87
-
88
-
89
-
90
-
91
-
92
-
93
-
94
-
95
-
96
-
97
-
98
-
 99
99 -
 100
100 -
 101
101 -
 102
102 -
 103
103 -
 104
104 -
 105
105 -
 106
106 -
 107
107 -
 108
108 -
 109
109 -
110
-
111
-
112
-
113
-
114
-
115
-
116
-
117
-
118
-
119
-
120
-
121
-
122
-
123
-
124
-
125
-
126
-
127
-
128
-
129
-
130
-
131
-
132
-
133
-
134
-
135
-
136
-
137
-
138
-
139
-
140
 |
 |
