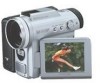
Sharp VL-Z7U Operation Manual - Page 29
Using the Lens Cap
 |
UPC - 074000353190
View all Sharp VL-Z7U manuals
Add to My Manuals
Save this manual to your list of manuals |
Page 29 highlights
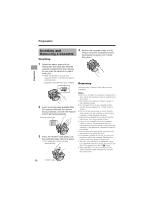
Preparation 10 Press m or l to select "30" (minute), then press the center of the Operation button. SE T T I NG JUN. 2. 2004 1 0 : 3 0 : 0 0 AM Using the Lens Cap Attach the strap of the lens cap to the hand strap as shown below. • The internal clock now starts operating with the seconds display. 11 Press the DISPLAY button to turn off the menu screen. Note: • If the date and time have been set, the SETTING 1 screen (T) appears in step 4. Select "SETTING" in the OTHERS 2 screen (~) using the Operation button. When attaching or removing the lens cap, grasp the indents on both sides of the cap. Changing to the 24-hour Time Mode 1 After performing step 10 above, press l or m to select "12H/24H", then press the center of the Operation button. OTHERS 2 T IME CODE TC OUT 12H/ 24H 12H SE T T I NG 24H RE TURN Indents When recording, remove the lens cap and attach the lens cap cord to the fastener so that the cap will not get in the way. 2 Press l or m to select "24H", then press the center of the Operation button. 12H 24H 24H 3 Press the DISPLAY button to turn off the menu screen. Notes: • The date and time, once set, are internally recorded even when not displayed on the Fastener screen. • The menu screen automatically turns off if no settings are made within 5 minutes. Note: • Always attach the lens cap over the lens when not using the camcorder. 15
-
 1
1 -
2
-
3
-
4
-
5
-
6
-
7
-
8
-
9
-
10
-
11
-
12
-
13
-
14
-
15
-
16
-
17
-
18
-
19
-
20
-
21
-
22
-
23
-
 24
24 -
 25
25 -
 26
26 -
 27
27 -
 28
28 -
 29
29 -
 30
30 -
 31
31 -
 32
32 -
 33
33 -
 34
34 -
35
-
36
-
37
-
38
-
39
-
40
-
41
-
42
-
43
-
44
-
45
-
46
-
47
-
48
-
49
-
50
-
51
-
52
-
53
-
54
-
55
-
56
-
57
-
58
-
59
-
60
-
61
-
62
-
63
-
64
-
65
-
66
-
67
-
68
-
69
-
70
-
71
-
72
-
73
-
74
-
75
-
76
-
77
-
78
-
79
-
80
-
81
-
82
-
83
-
84
-
85
-
86
-
87
-
88
-
89
-
90
-
91
-
92
-
93
-
94
-
95
-
96
-
97
-
98
-
99
-
100
-
101
-
102
-
103
-
104
-
105
-
106
-
107
-
108
-
109
-
110
-
111
-
112
-
113
-
114
-
115
-
116
-
117
-
118
-
119
-
120
-
121
-
122
-
123
-
124
-
125
-
126
-
127
-
128
-
129
-
130
-
131
-
132
-
133
-
134
-
135
-
136
-
137
-
138
-
139
-
140
 |
 |
