Sharp VL-Z7U Operation Manual - Page 87
Card Recording
 |
UPC - 074000353190
View all Sharp VL-Z7U manuals
Add to My Manuals
Save this manual to your list of manuals |
Page 87 highlights
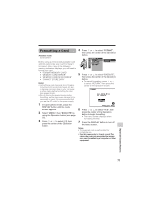
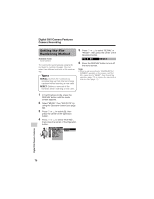
Card Recording Available mode: Card Camera You can take a still picture in the same way as you do with a standard camera and record that image on the card. PHOTO button Power Zoom control 5 Adjust the Power Zoom control to frame the subject as you desire. 6 Press the PHOTO button half-way down to focus on the subject. • The camcorder automatically focuses on the subject. When it is set, you will hear a sound and see T mark, then the camcorder locks the focus. [1280 ] 9/ 11 NORMA L 7 Press the PHOTO button fully to begin recording. Media Selection switch Power switch [1280 ] 9/ 11 NORMA L 1 Insert a card into the camcorder (see page 11). 2 Remove the lens cap. AUTO 3 Set the Media Selection switch to u. 4 Hold down the Lock button and set the Power switch to v. • The picture from the lens now displays. Number of shots taken/remaining • The S indicator flashes red while data is being recorded on the card, and returns to white when recording completes. • To record another image, release the PHOTO button and make sure the picture is not frozen in the monitor, then perform steps 6 and 7. Lock button AU T O [1280 ] 9/ 11 NORMA L Notes: • Recording under insufficient lighting may result in blurred images. It is recommended that you use a tripod to record insufficiently illuminated subjects. • Recording under the light of a fluorescent, mercury, or sodium lamp may cause flickering in the image and, depending on the timing of the shot, may result in changes to color hue in the image. • Set the BEEP menu item to "OFF" to turn off the focus locking sound. • Do not turn the power off or remove the card while the S indicator is flashing in step 7. 73 Digital Still Camera Features
-
 1
1 -
2
-
3
-
4
-
5
-
6
-
7
-
8
-
9
-
10
-
11
-
12
-
13
-
14
-
15
-
16
-
17
-
18
-
19
-
20
-
21
-
22
-
23
-
24
-
25
-
26
-
27
-
28
-
29
-
30
-
31
-
32
-
33
-
34
-
35
-
36
-
37
-
38
-
39
-
40
-
41
-
42
-
43
-
44
-
45
-
46
-
47
-
48
-
49
-
50
-
51
-
52
-
53
-
54
-
55
-
56
-
57
-
58
-
59
-
60
-
61
-
62
-
63
-
64
-
65
-
66
-
67
-
68
-
69
-
70
-
71
-
72
-
73
-
74
-
75
-
76
-
77
-
78
-
79
-
80
-
81
-
 82
82 -
 83
83 -
 84
84 -
 85
85 -
 86
86 -
 87
87 -
 88
88 -
 89
89 -
 90
90 -
 91
91 -
 92
92 -
93
-
94
-
95
-
96
-
97
-
98
-
99
-
100
-
101
-
102
-
103
-
104
-
105
-
106
-
107
-
108
-
109
-
110
-
111
-
112
-
113
-
114
-
115
-
116
-
117
-
118
-
119
-
120
-
121
-
122
-
123
-
124
-
125
-
126
-
127
-
128
-
129
-
130
-
131
-
132
-
133
-
134
-
135
-
136
-
137
-
138
-
139
-
140
 |
 |
