Sharp XG-MB70X Setup Guide - Page 10
Setting up a Network, Connection for the, Projector
 |
View all Sharp XG-MB70X manuals
Add to My Manuals
Save this manual to your list of manuals |
Page 10 highlights
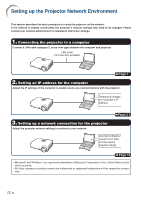
Setting up the Projector Network Environment 3. Setting up a Network Connection for the Projector Settings for such items as the projector's IP address and subnet mask are compatible with the existing network. 1 Start Internet Explorer (version 5.0 or later) on the computer, and enter "http://192.168.150.2/" in "Address", and then press the "Enter" key. 2 If a user name and a password have not yet been set, just click the "OK" button. • If a user name and a password have been set, input the user name and the password, and click the "OK" button. • If the user name or password is entered incorrectly three times, an error message will be displayed. 3 When the screen as shown on the right appears, click "TCP/IP". -10
-
 1
1 -
2
-
3
-
4
-
 5
5 -
 6
6 -
 7
7 -
 8
8 -
 9
9 -
 10
10 -
 11
11 -
 12
12 -
 13
13 -
 14
14 -
 15
15 -
16
-
17
-
18
-
19
-
20
-
21
-
22
-
23
-
24
-
25
-
26
-
27
-
28
-
29
-
30
 |
 |

-10
Setting up the Projector Network Environment
3. Setting up a Network
Connection for the
Projector
Settings for such items as the projector’s IP
address and subnet mask are compatible with
the existing network.
1
Start Internet Explorer (version
5.0 or later) on the computer, and
enter “http://192.168.150.2/” in
“Address”, and then press the
“Enter” key.
2
If a user name and a password
have not yet been set, just click
the “OK” button.
•
If a user name and a password have
been set, input the user name and the
password, and click the “OK” button.
•
If the user name or password is entered
incorrectly three times, an error mes-
sage will be displayed.
3
When the screen as shown on
the right appears, click “TCP/IP”.