Singer 9980 QUANTUM STYLIST Instruction Manual - Page 42
Thread Tension
 |
View all Singer 9980 QUANTUM STYLIST manuals
Add to My Manuals
Save this manual to your list of manuals |
Page 42 highlights
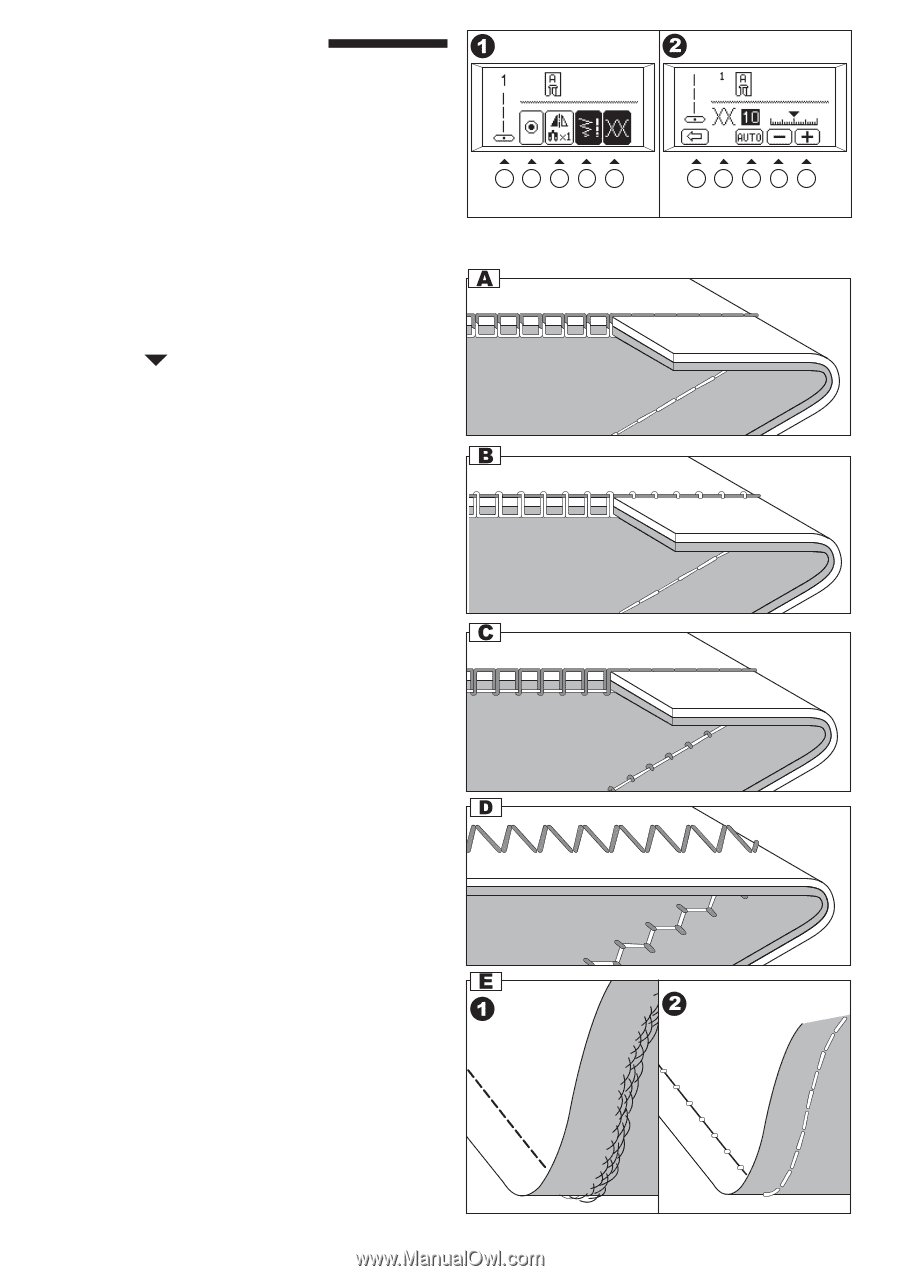
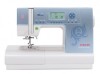
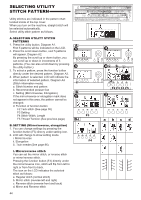
THREAD TENSION This machine adjusts the thread tension automatically when pattern is selected. However you can change the thread tension as follows. 1. Press the function F5 button directly under the tension mark. LCD changes to the thread tension mode. 2. To increase the upper thread tension, press the function F5 (+) button. To decrease the upper thread tension, press the function F4 (-) button. Pre-set tension number is highlighted. The mark " " is indicating the absolute thread tension. By pressing the function F3 (AUTO) or clear "C" button, thread tension will return to pre-set. By pressing the function F1 button, LCD return to the previous mode (Stitch information mode). When another stitch pattern is selected, thread tension will return to pre-set. You can start sewing at this mode and change tension while sewing. A. Preset thread tension Upper and bobbin thread will lock approximately in the middle of fabric. B. When thread tension is increased. Bobbin thread will appear on the top side of fabric. C. When thread tension is decreased. Upper thread will appear on the bottom side of fabric. D. Thread tension (except for straight stitch) Thread tension should be set to a slightly looser tension than that for straight stitch. The upper thread should appear slightly on the bottom side of your fabric, for example, when doing decorative sewing. E. Helpful Hints 1. If your sewing appears as shown in the illustration, stitches on top side of fabric are good but bottom side looks very loopy, it could be that the upper thread is not threaded correctly. Refer to page 32 for correct threading. 2. If after checking the top thread and the bobbin thread is still showing on the top side, check the bobbin to see if it is set correctly. Refer to page 30 for the correct setting. 42 F5 F1 F3 F4 F5
-
 1
1 -
2
-
3
-
4
-
5
-
6
-
7
-
8
-
9
-
10
-
11
-
12
-
13
-
14
-
15
-
16
-
17
-
18
-
19
-
20
-
21
-
22
-
23
-
24
-
25
-
26
-
27
-
28
-
29
-
30
-
31
-
32
-
33
-
34
-
35
-
36
-
 37
37 -
 38
38 -
 39
39 -
 40
40 -
 41
41 -
 42
42 -
 43
43 -
 44
44 -
 45
45 -
 46
46 -
 47
47 -
48
-
49
-
50
-
51
-
52
-
53
-
54
-
55
-
56
-
57
-
58
-
59
-
60
-
61
-
62
-
63
-
64
-
65
-
66
-
67
-
68
-
69
-
70
-
71
-
72
-
73
-
74
-
75
-
76
-
77
-
78
-
79
-
80
-
81
-
82
-
83
-
84
-
85
-
86
-
87
-
88
-
89
-
90
-
91
-
92
-
93
-
94
-
95
-
96
-
97
-
98
-
99
-
100
-
101
-
102
-
103
-
104
-
105
-
106
-
107
-
108
 |
 |