Singer 9980 QUANTUM STYLIST Instruction Manual - Page 52
Basting
 |
View all Singer 9980 QUANTUM STYLIST manuals
Add to My Manuals
Save this manual to your list of manuals |
Page 52 highlights
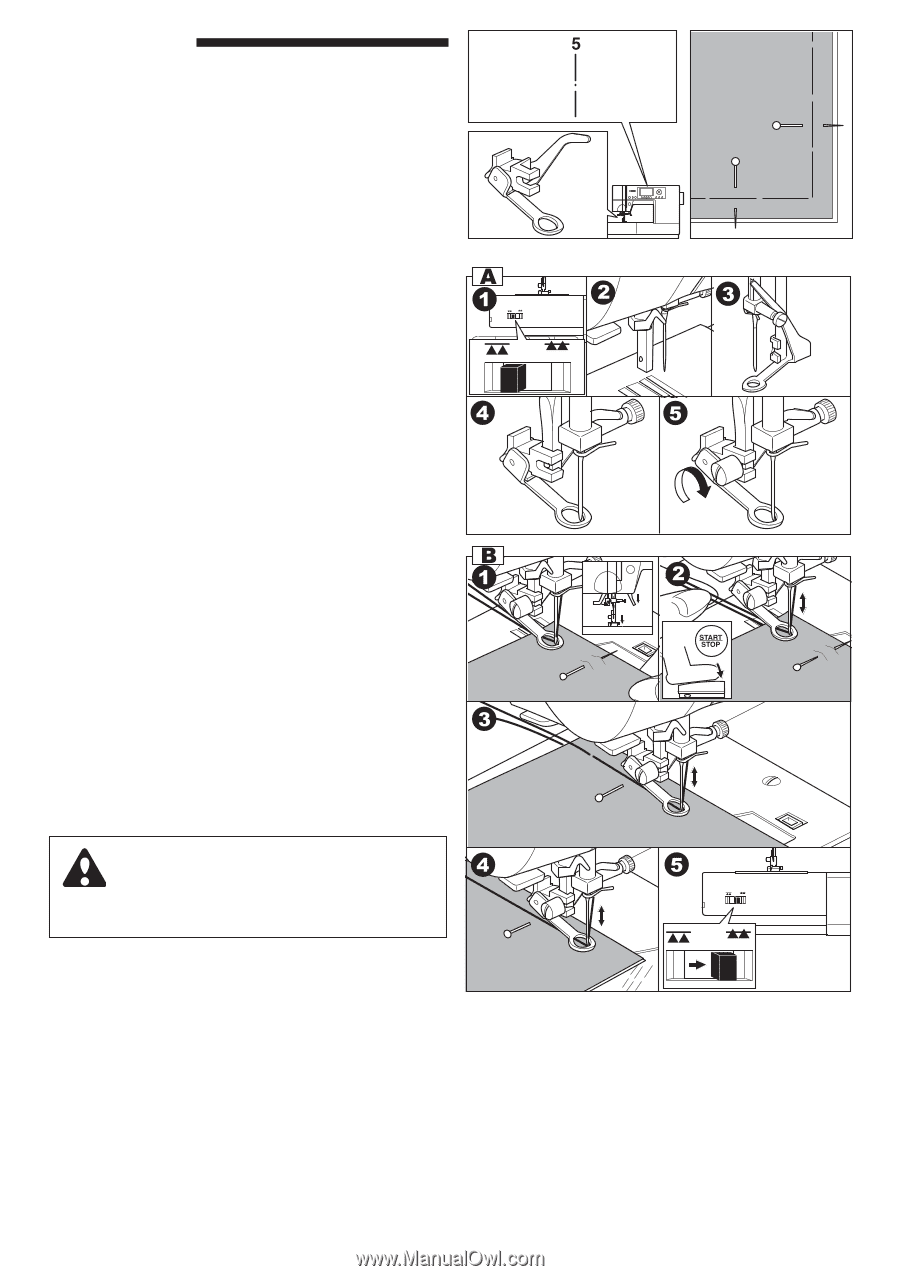
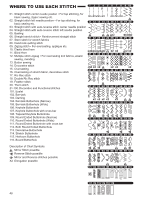
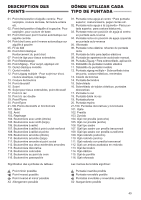
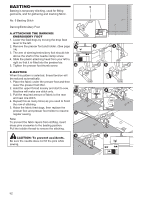
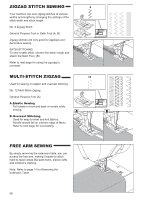
BASTING Basting is temporary stitching, used for fitting garments, and for gathering and marking fabric. No. 5 Basting Stitch Darning/Embroidery Foot A. ATTACHING THE DARNING/ EMBROIDERY FOOT 1. Lower the feed dogs by moving the drop feed lever to the left. 2. Remove the presser foot and holder. (See page 14) 3. The arm of darning/embroidery foot should ride above the shaft of the needle clamp screw. 4. Slide the plastic attaching head from your left to right so that it is fitted into the presser bar. 5. Tighten the presser foot thumb screw. B. BASTING When this pattern is selected, thread tension will be reduced automatically. 1. Place the fabric under the presser foot and then lower the presser foot lifter. 2. Hold the upper thread loosely and start to sew. Machine will make one stitch only. 3. Pull the required amount of fabric to the rear and sew one stitch. 4. Repeat this as many times as you need to finish the row of stitching. 5. Raise the fabric feed dogs, then replace the presser foot and presser foot holder to resume regular sewing. Note: To prevent the fabric layers from shifting, insert dress pins crosswise to the basting position. Pull the bobbin thread to remove the stitching. CAUTION: To prevent accidents. Be sure the needle does not hit the pins while sewing. 52
-
 1
1 -
2
-
3
-
4
-
5
-
6
-
7
-
8
-
9
-
10
-
11
-
12
-
13
-
14
-
15
-
16
-
17
-
18
-
19
-
20
-
21
-
22
-
23
-
24
-
25
-
26
-
27
-
28
-
29
-
30
-
31
-
32
-
33
-
34
-
35
-
36
-
37
-
38
-
39
-
40
-
41
-
42
-
43
-
44
-
45
-
46
-
 47
47 -
 48
48 -
 49
49 -
 50
50 -
 51
51 -
 52
52 -
 53
53 -
 54
54 -
 55
55 -
 56
56 -
 57
57 -
58
-
59
-
60
-
61
-
62
-
63
-
64
-
65
-
66
-
67
-
68
-
69
-
70
-
71
-
72
-
73
-
74
-
75
-
76
-
77
-
78
-
79
-
80
-
81
-
82
-
83
-
84
-
85
-
86
-
87
-
88
-
89
-
90
-
91
-
92
-
93
-
94
-
95
-
96
-
97
-
98
-
99
-
100
-
101
-
102
-
103
-
104
-
105
-
106
-
107
-
108
 |
 |